Hi all-- thought I would run a thought process by everyone to see if anyone has any suggestions. Satori hull # 94 is ready to have the mast and boom repainted. I am starting on the boom as an experiment. The paint is original and not in two bad of shape. There are numerous bubbles where some corrosion is present. I have removed all the hardware. My plan is to sand down the areas of corrosion to bare metal. Treat these areas with alumiprep 33 follow with Alodine primer then final coats of SystemThree ( a polyurethane). I am not planning to remove all of the old paint. I know that it would probably look better if I took the entire surface down to bare metal. From the point of view of protection- I can’t see removing some of the really good coating that remains not to mention the tremendous amount of work to take the entire boom down to bare metal. My thought is to fare the old paint to the bare metal with fine sandpaper then do my topcoats. Any thoughts are welcome. Thanks
Sounds like what I plan to do as well. Remove bubbled paint, sand, Alumprep, Alodine, coat with 2 part LP. I’m not planning to touch the good paint either, except for light sanding. Would also like to hear any thoughts on this: good reasons why painting over decent paint is a bad idea.
Thanks for bringing this topic up!
For what it’s worth, I checked with a local powder coating company here about having my mast coated. They quoted ~$500 to sandblast and coat my mast and boom. Potentially a viable alternative. I’d have to transport it there though, and I’m not sure how to deal with a 50’ spar.
Cheers,
Aaron N.
You mention “numerous bubbles where some corrosion is present”. Are the bubbles confined to areas adjacent to the fittings? I guess the question is, how good is the old primer system? If it’s as poor as mine was, it will continue to cause problems. My partial repaint needed repainting after 7 yrs. The back to bare metal has lasted 12 yrs. Granted, the bright yellow color (Sterling) is a bit faded, and there are a few bubbles.
I think stopping the corrosion around any stainless with urethane bedding compound is critical. The ss storm trysail track was a problem, with blisters at each rivit, until I gooped up the center hole in the rivit to prevent saltwater getting in to the aluminum from the inside. Some folks use a thin plastic spacer between the fitting and the aluminum, but I decided to just try to keep the ocean out of that space.
Dan
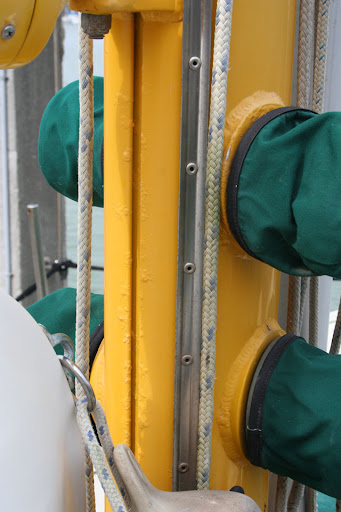
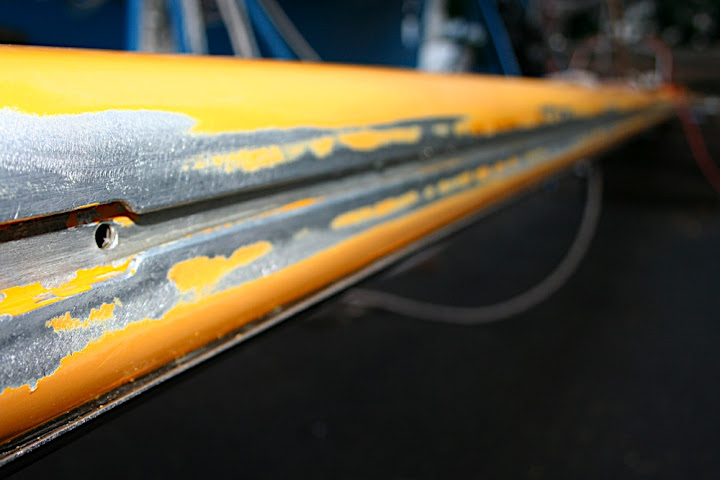
How about the inside of the sail track, the mains’l sail track. Mine was rather bubbled, so much so, that I assumed the slugs wouldn’t slide freely. I’m still wondering what the best technique is for prep and paint.
Here’s some Pics of the mains’l track bubbles I have begun sanding it down… but as I got into it more, I realized it’s going to be difficult to get it prepped and painted properly in there.
The correct way to do this is to have the mast power blasted and re-anodized.
There would appear to have been a failure between the opriginal anodization and the aluminum, which creates localized electrolysis.
John-- you mention anodizing the mast and boom-- I am not that familiar with what this does to the surface. I know that many anodized masts are not painted at all. If you paint an anodized mast do you still go through all the steps i.e. alumiprep and alodine. Also with the softness of aluminum is there any danger of over blasting and removing to much substrate-- just a thought-- seems like every time a let the “experts” do something to my boat they screw something up.
Ben, like you, the sail tracks would be my biggest challenge if I continue the process by hand. I was thinking of constructing a sanding block that fits in the sail track.
Dan-The corrosion I have is mostly around the fittings, though there are some areas where its just bubbled. Totally agree with your comments about bedding, I read one article on the web that suggests removing all rivits and tapping for machine screws.
Interestingly enough where my hardware was attached with machine screws there is much less to no corrosion.
Thanks everyone- for comments and thoughts
Pat on Satori (hull #94) at the mouth of the Columbia River
braving the Columbia River Bar (when tide and weather is right!)
I like the idea of tapping everything. I too will make a slug to fit the sail track and sand away. But painting in there is a different story. Do you plan to spray your mast or roll and tip? I enter into this project knowing it’s not a forever-solution, the same way I enter into a varnish project.
Hi Phil:
It has been ten years since I was last involved in this project, on a friend’s boat.
The vessel has a Forespar mast, similar to the BCC.
Having unstepped the mast we then carefully removed all hardware (Some parts were tough to remove, be patient) and then, a 4:00 AM we put the mast on the roof of a van and drove through the city to a workshop where we could work on it. (Make sure you have a spooter vehicle behind you to alert the van driver if the tail end of the mast is about to hit anything.)
Once in the shop we had a choice of sanding or powder blasting.
Sanding: Cheap, but very time consuming, and difficult to clean areas like the track.
Powder Blasting: Fast, about 1 hour, including the track, and removes all electrolytic material, but it costs money.
Powders: I think we used pummice powder, but soda powder is also available.
Once the mast is naked, carefully go over every inch with an acetate cleaner to remove and dust.
Anodizing: Read here about anodizing aluminum: http://en.wikipedia.org/wiki/Anodizing
If pitting is not too great, use one of the lighter systems, anodizing tends to be self corrrecting, so minor flaws will ne covered.
Painting: The anodization process creates a ready paintable surface, so you should not need to etch. If you want to save a bunch of time and money, add a dye to the anodization process, and forget about the painting. Otherwise, use Awlgrip.
The mast we did 10 years ago still looks perfect today.
Ben and Pat,
I brushed on paint stripper and used a putty knife to remove all the old paint. I used the toxic type, but think there may be a newer benign type available now. It worked well on the inside of the mainsail groove. A 1" putty knife with the last 1/4" bent about 20 degrees to get in to the inside of the groove helped a lot. Sandpaper wrapped around the end of the blade cleans out the softened paint. I was working outdoors in breezy NZ, but if you’re using the toxic stuff indoors, you should use a good mask with canister.
Painting the inside of the groove was not a problem with a brush. Since the area to be painted is not large, doing the whole mast with just a brush worked fine. Keeping a wet edge is always tricky, and it took me a while to get used to using the brushing thinner just so.
On rivits vs tapped machine screws topic, the only rivits on Shaula’s mast were those on the trisail track, and there were a LOT of them! I think rivits work fine IF they and the track are well gooped up, AND if the hole in the center of the rivit is sealed up. Paint thinner and rags cleaned up the extra goop afterwards.
Shaula’s Forespar mast and boom (direct from SLM) had NO noticable primer under the paint. I could see that the Al had been anodined but was amazed to see no primer layers. The Sterling system I used in NZ called for several different primer layers and I think that is a very important part of the job.
Dan
Great idea on the stripper… I have been using it on my bulwarks, but hadn’t thought about it for the aluminum. Glad to hear the brush worked fine in the track. Great info here, thanks for the info.
If you are using a paint stipper, do not use one that has a strong base in it. Aluminum reacts with strong bases to produce hydrogen.
Hey all you strippers,
I’ve had pretty good luck using Peel Away paint remover. The marine version of this product works well and won’t harm aluminum. There are various strengths of the product so look at their web site.www.dumondchemicals.com or www.peelaway.com
Best of luck
Bob & Lois
BCC Jolie Brise