Vixen is a somewhat unique design in that she was ordered from the factory and finished by a couple at home. When I purchased Vixen I was lucky enough to receive the original photographs of her construction.
I finally have gotten around to scanning them and I must say they turned out beautifully. Check them out!
Thank you Dan for putting me in touch with Craig and Vicky, the original owners pictured.
From Craig:
“As hull #2, she was originally molded at our request without an aperture for a prop as we planned to sail her engine-less. When we returned to California, we
moved the hull to Rancho Mirage, CA where, over the course of the next 3-1/2
years, we finished her off as a “spare-time” project, putting in some 6,000
hours (We were new to this boatbuilding thing…) She was launched in San
Diego in July, 1980.”
Hi Ben,
Incredible pictures.. I wish I were as skilled as them.
Mehmet
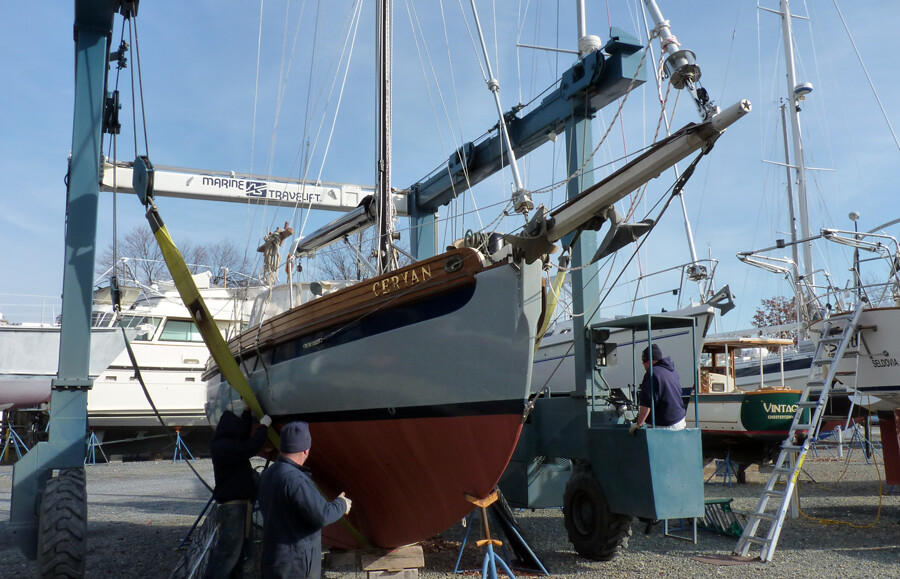
CERYAN #53
ps. I was supposed to be sailing to Florida right now.(On my way to Bora Bora) But two weeks ago as soon she was hauled in to the water raw water intake started leaking. Not the Groce seacock but the backing board. They all have to be replaced..
Departure delayed to spring..
Your boat is beautiful. I love the gray hull color, simply stunning.
If the thru-hull backing plate is leaking, the thru-hull was not set in place with enough bedding compound. Most boatyards like to use 3M 5200. It’s great “stuff” until you need to remove the seacock. 3M 5200 is an adhesive. Most yards will grind off the head of the thru-hull then drive the thru-hull back inside the boat with a large punch and 3 lb. hammer. It’s more cost effective than spending hours attempting to remove the thru-hull intact. Instead of using 3M 5200, I use a polysulfide bedding compound from Boat Life. This is somewhat more reversible. 3M stopped producing polysulfide caulk a few years ago.
Thanks for sharing the build photo of Vixen. She is lovely and the gaff rig is to die for.
The early BCC’s, at Lyle’s insistence,installed the bulwark stanchion as shown in the photos then used a covering board. This mimics wooden boat construction when the ribs were carried above the deck and used for stanchions. Unfortunately, keeping water from seeping below deck at the covering board stanchion interface was a constant problem.
My late husband built Scallywag, but we didn’t keep such wonderful
construction photos. These are a treasure. Looking at them brought back
wonderful memories. There always seemed to be a cat around the boatyard,
too!
Gayle
Hi Rod,
Experienced sailors in the marina insist that I should keep the old Groco seacocks. I am told that they are as good as the ones they make now and could be cleaned and polished with a special paste. There is also cost of replacing them. $1300 (labor) versus $2600. I have hard time explaining these boat expenses to my dear wife who is still working. I retired last May. I just installed Garmin 200 radio and 740 chartplotter among other things. However real question is not the cost but whether it is worth it or not..
This was very unplanned. Ruined my travel plans. I feel like things happening in “Bora Bora” and I am missing them!
Shall I change the seacock which is leaking or replace them all?
Shall I get new ones or keep the old ones?
Shall I do the dismantling or pay a professional to do it?
As you know just hauling a boat in and out costs $350 around here. That is in expensive way to find out that you haven’t put enough goo..
What would you do if you were, well just me.
Suggestions are welcome..
Advice always taken seriously.
Mehmet
CERYAN
Ps. Thank you for the nice words about the boat.. Next time I will post related messages to proper list..
Hi Stew
Thank you but I still want to cry… She is back on the hard. Same place she left several hours before.. As though it never happened..
May be it is a bad dream.
Mehmet,
Sorry to hear about the delay in your plans. However, such delays are not all that uncommon–we’ve probably all have had them. It seems to me that maybe you have 2 different problems. If your wood backing blocks are rotten,or soggy/soft, they should be replaced. If they are nice and dry/hard, I don’t see any need to replace them. If your seacocks are leaking due to internal wear, you should either repair or replace them. When my W-C tapered bronze plug seacocks started leaking after 15 or so yrs, I replaced them with ball valves,as the problem developed. I think we’ve had this discussion before on the forum. I do all the work on Shaula,so I didn’t have to consider the labor bill. Lapping the bronze plugs with grinding compound to restore a tight fit is possible, but I chose not to. I seem to recall that your 3/4" seacocks were Wilcox-Crittenden (W-C), not Groco, but that your head outlet was a Groco (same setup as ours)?
You can remove your old plugs fairly easily with a few tools–a flat piece of steel that fits into the thru hull from the outside (an old flat file?), a big cresent wrench (20 plus inches long?),and maybe a piece of pipe to extend the wrench handle. This should work to remove the thru hull from the outside. Then remove the bolts that hold the seacock to the hull. The seacock should them come off without too much elbow grease.
Bottom line: any leaking seacock or soggy back pad should be fixed before a serious trip. We didn’t do this once and as a result had to have an unexpected haulout to take care of the problem (in Coffs Harbour in Australia).
Mehmet, if you want to pursue this topic, let’s start a new thread.
Dan
I like Groco seacocks with the rubber covered plug. Lin and Larry Pardey, Taleisin of Victoria, fitted Groco seacocks in Seraffyn and Taleisin. We fitted Groco seacocks in our aft-cabin Flicka when we rebuilt her.
In operation, the T-handle that controls the pressure plate inside the seacock body is loosened, the seacock handle is turned to the open or closed position and the T-handle tightened. Tightening the T-handle forces the pressure plate against the Buna-N rubber covering on the plug which expands the rubber and seals the seacock. If the seacocks are maintained and cared for properly, they will last almost forever.
As with most seacocks there are some do’s and don’t’s:
Tightening the T-handle forces the plug at the handle end,to push against the bronze retaining ring that holds the plug inside the seacock. If the T-handle is over tightened, the retaining ring may deform and prevent the seacock from sealing. If this happens, either a new retaining ring should be installed or the old retaining ring removed and straightened.
Attempting to turn the seacock handle without releasing the pressure plate will damage the rubber covering on the plug.
Never, apply grease to the plug or inside the seacock body. Grease will cause the rubber to swell, resulting in a stuck or damaged seacock.
As is the case for all seacocks, including modern ball valve seacocks, the valve should be operated at least once a month. Failure to operate the valve on a regular basis, may result in a stuck seacock or damaged seacock. If the valve is not operated regularly, the rubber coating flows into the seacock’s through-bore. If this happens, turning the seacock damages the rubber covering the plug. A similar things happens with modern ball-valve seacocks. The teflon seals flow into the bore-hole in the ball. When the ball is turned, the seals are damaged.
As mentioned before, the rubber covering the plug is made from Buna-N. If the rubber will not seal against the inside of the seacock, it may have become oval in cross-section. Simply remove the plug from the seacock, place a sheet of 80-grit sandpaper in one hand, followed by the plug and sand the plug’s surface with a rotating back and forth motion. Turn the plug a quarter turn, and repeat the sanding. Repeat this operation for perhaps two turns and reinstall the plug in the seacock.
Groco, does not have any of these seacock bodies but several years ago, they had a few barrels of new plugs and parts. I just called Groco. The front desk, is just that “the front desk” and Patrick did not answer his phone. Groco (Baltimore, MD) has a website and contact information. If you e-mail Groco, mark your e-mail “ATTN: Patrick.”
The person you want to talk to is Patrick. He runs the shop, been there forever and knows every product Groco every manufactured.
Gosh , I didn’t know that Gayle Michel, of BCC Scallywag , was still around and reading this forum as well ? Are you still in Santa Barbara ?
Gayle’s husband was an expert woodworker that applied his and her money, time , talent, tools, and skills, to creating one of those very special and unique, “Owner Built” , BCC’s .
Sure wish we could view photos of his BCC work on “Scallywag”, as it would fit in the “Very Special” , catagory , hands down !
6,000 hrs to 7,000 hrs work on a single boat is not uncommon , for these owner built boats.
I am wondering if our BCC forum might one day have a builders list , of these very special boats ! A few of them come to mind, already .