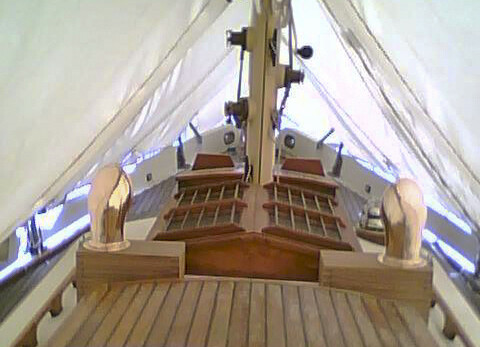
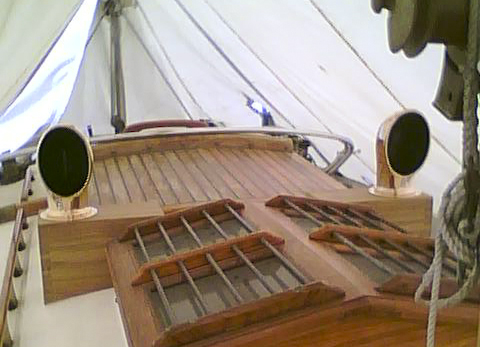
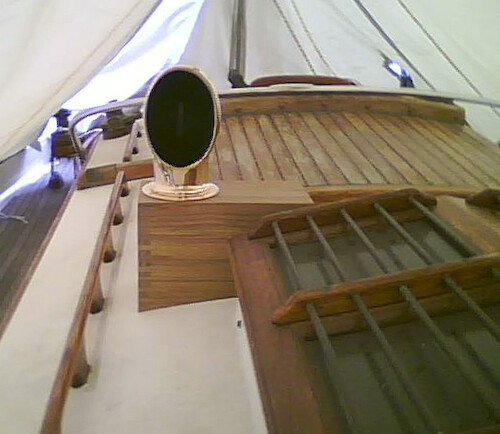
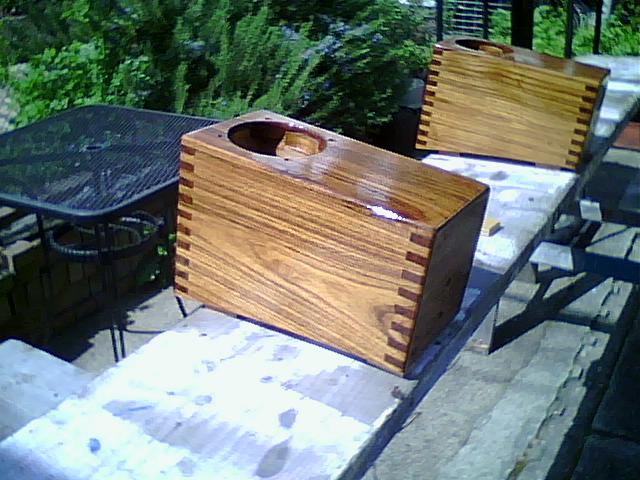
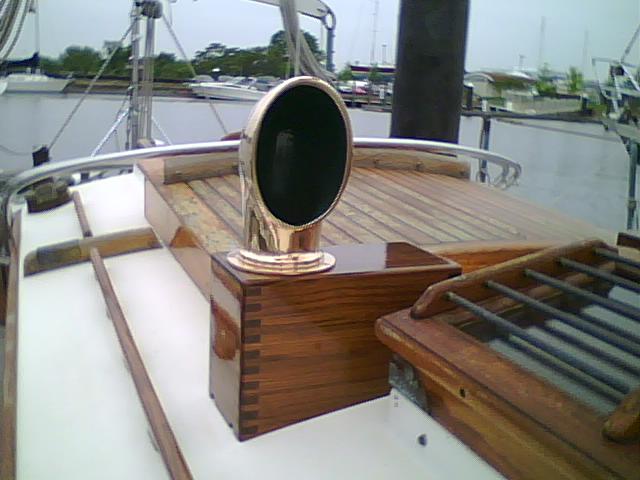
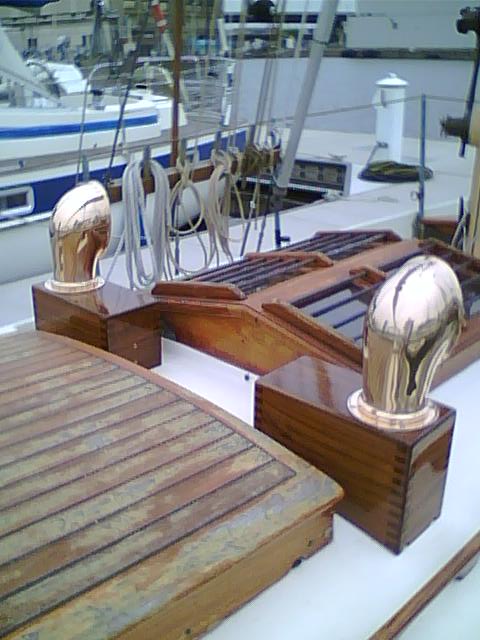
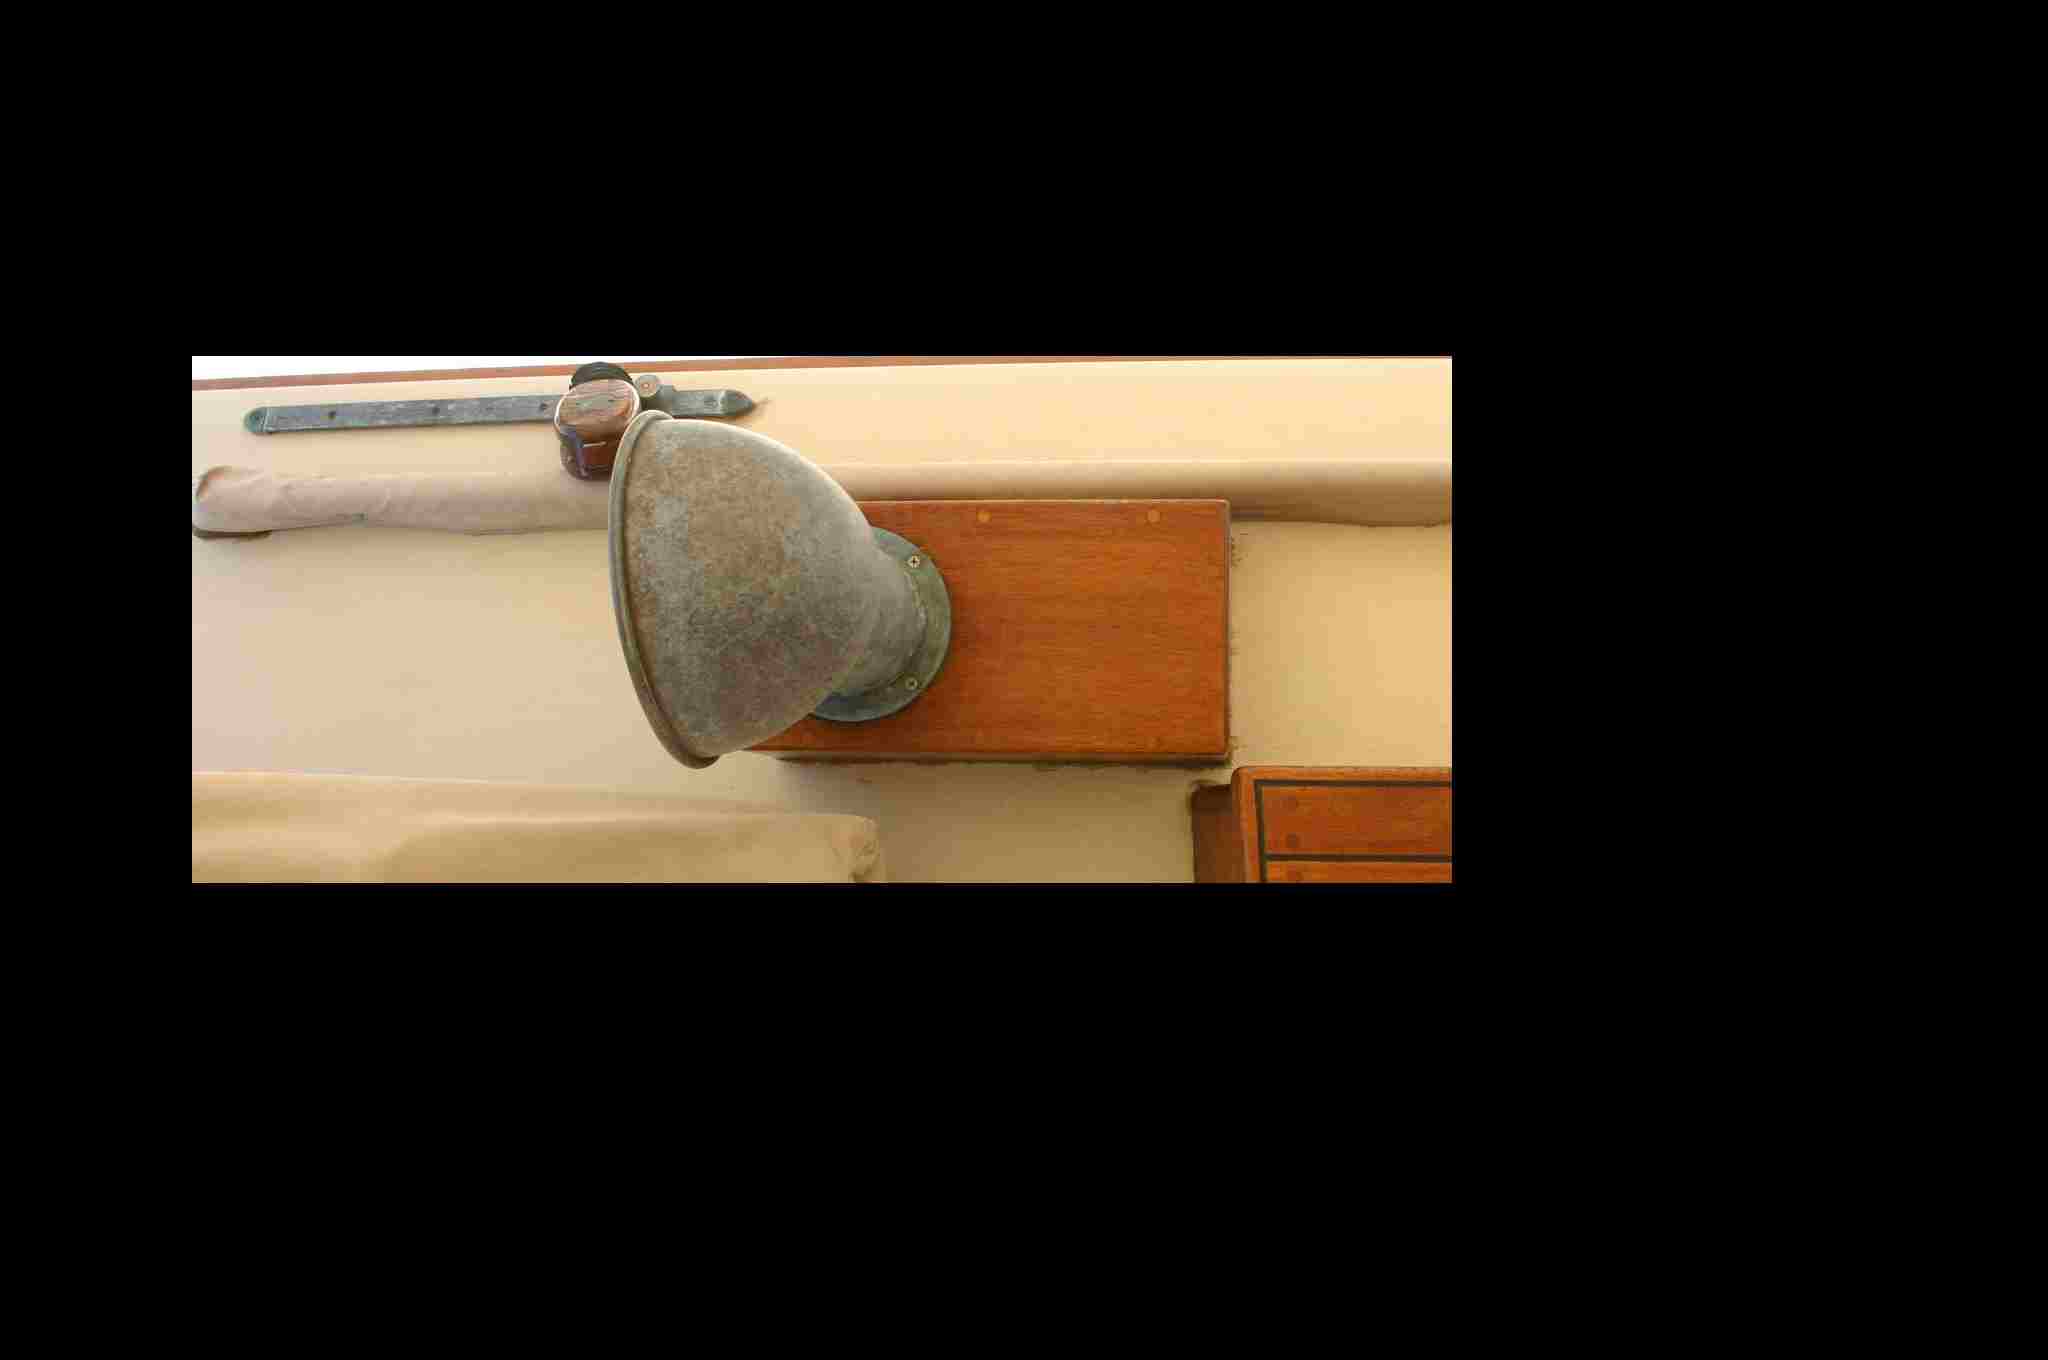
The attached photos show the final test fitting of the cowl vents and dorade boxes before the edges are bull-nosed and “too many coats” of varnish are applied.
Coming Soon
The photos show the final test fitting of the dorade boxes and cowl vents before the dorade box edges are bull-nosed (rounded) and “too many coats” of varnish are applied.
Rod,
Where do you get the vent caps that are used when you remove the cowl vents.
You did a great job on the dorade boxes.
Rich
s/v Susie Q
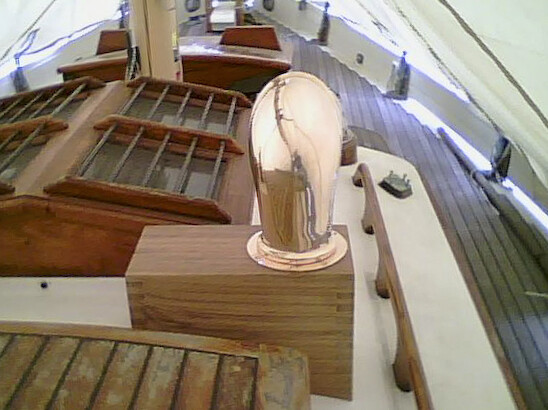
We purchased the cowl vents from Mariners Hardware several years ago. The vents caps were included in the purchase price. These cow vents are cast silcone bronze and weigh about 6 lb.
Thanks for the nice comment about the boxes. There are a few flaws but they will serve their purpose.
I will be uploading more construction photos to the gallery section soon.
Oh, when I cut the hole through the cabin top, I found a little critter hiding between the wood ceiling and the inside of the cabin top. I waited and snapped a photo of the critter making its escape - see attached.
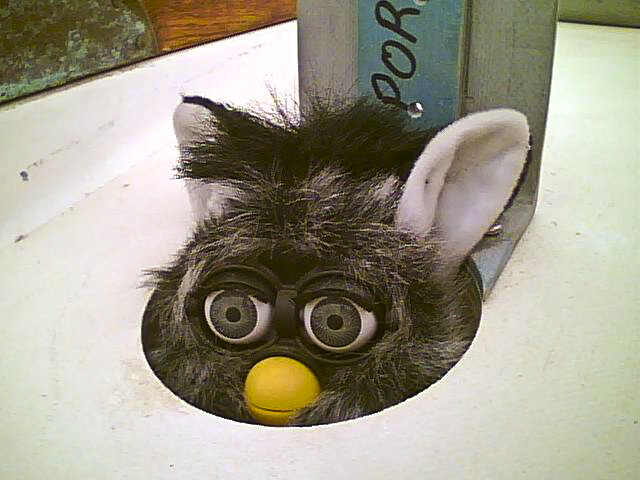
Thanks Rod. Enjoyed the photo.
That must be the secret to SLM quality - critters!
Fair leads,
Aaron N.
If anyone is interested, I just uploaded more constrution photos of the dorade/cowl vent project to the gallery upload section.
Rod,
Thank you for uploading the images of your dorades. I plan to build four boxes for my Westsail 32 in a few weeks and have a few questions about your process!
I’m trying to understand why you put wood cleats in between the overhead slats and cabin top (image 27). Was this so you had something to push against when drilling from below? Or did you want a solid-wall hole through?
Did you route out the core of the cabin top around the vent hole and fill it with epoxy, or seal the surfaces?
What glue did you use for the finger joints? I had been planning to use a rabbit joint, but have seen many boxes with finger or dovetail joints; is this the better way to go due to the strength? I am planning to build the boxes to follow the curve of the cabin top sides (both vertically and horizontally), so I’m thinking a rabbit might be tough due to the odd angles.
Thank you for your time!
Aaron N.
W32 #482 Asia Marie
Aaron:
Your wrote:
I’m trying to understand why you put wood cleats in between the overhead slats and cabin top (image 27). Was this so you had something to push against when drilling from below? Or did you want a solid-wall hole through?
[RB] The wood ceiling in the boat is made from 2" wide Alaskan Cedar planks. When I cut the 4" diameter hole, one of the planks was cut completely through. The cleat pieces between the underside of the GRP cabin top and the wood ceiling provide an anchor point to secure the cut plank with a boat nail or wood screw. Prior to gluing the cleat pieces to the cabin top with epoxy, I taped over the wood ceiling. The tape serves as a bond breaker should any epoxy run down the sides of the cleat pieces. Reversibility is important to me should I every need to revisit the area.
Did you route out the core of the cabin top around the vent hole and fill it with epoxy, or seal the surfaces?
[RB] Because I lined the hole with a GRP stand pipe, I did not think it necessary to route out the coring and fill the space with filled epoxy. The stand pipe is glued to the GRP cabin top with epoxy. I did coat the coring with epoxy, as well as seal the edges of the exposed fiberglass with epoxy.
What glue did you use for the finger joints?
[RB] I used epoxy filled with micro-fibers to glue the finger joints. A resorcinol based glue would have been better but my work is not perfect, hence I needed the gap filling properties of a filled epoxy.
I had been planning to use a rabbit joint, but have seen many boxes with finger or dovetail joints; is this the better way to go due to the strength?
[RB] I used a finger joint because it is stronger than a rabbit joint and is esthetically pleasing. Larry Pardey built Taliesin’s dorade boxes with rabbit joints. He also used a resorcinol based glue. As you stated, a finger joint is stronger than a rabbit joint but I do not believe a finger joint is necessary for a dorade box. I just liked the look. { I do have a small table top saw and did use a jig to cut the finger joints. The rest of the work was done with a router and hand plane. To round the edges, I used a block plane and sandpaper. I borrowed a geared drill with 1/2" chuck to cut the holes with a 4" hole saw. These drills are powerful and should the hole saw bind in the hole, they can break your wrist. Please be careful.}
I am planning to build the boxes to follow the curve of the cabin top sides (both vertically and horizontally), so I’m thinking a rabbit might be tough due to the odd angles.
[RB] When I built the boxes, I built a simple rectangular box - see IDUNA’s album in the BCC gallery and look for the sub-album titled dorade boxes. To transfer the curve of the cabin top, I used door skin stock (1/8" thick veneer) to trace the curve of the cabin top. After carefully cutting out the template with a razor knife, I tapped a sheet of sandpaper to the cabin top then did a final sanding fit of the template to the cabin top. The template was used to transfer the curve to the dorade boxes. After rough cutting the curve in the dorade box, I clapped the template to the dorade box then used a flush trim router bit with a ball bearing pilot at the top of the bit - Amana Tool #45460 - to cut the final curve. The bottom of the box end pieces were hand planned to match the curvature of the side pieces. The boxes fit perfectly to the cabin top without any additional work. Should a small amount of additional work be needed, tape a sheet of 80 grit sandpaper to the cabin top and sand the boxes by moving them over the sandpaper until they match the cabin top.
Hope that all makes sense.
Rod
P.S. The Westsail 32 is a great boat. Sailed correctly and with the right sails set, they are also fast.
Rod,
Thank you for the clear and complete response. All makes sense now.
How are they working? Satisfied with the size? I’ll probably start with two in the main cabin and see what else is necessary.
As for the W32, I was a bit skeptical of their speed for a while; I had the chance to sail on a few with their owners and they all seemed a bit sluggish. However, I also noted none of them were really sailing the boats well (improper trim mostly), so I didn’t write them off. When we got our boat, we made 170 miles per day from Pensacola to SW FL in force three and four. It’s amazing what sailboats can do when sailed ![]()
Fair leads,
Aaron N.
Aaron:
You are more than welcome. I just finished brushing on the 3rd coat of varnish on the dorade boxes. After I have 4 coats of varnish on the boxes, I will let the varnish cure to a hard finish - about 4 days, then sand the boxes and brush on another 4 or 5 coats of “intermediate” varnish. Nothing beats the look of “fresh” varnish.
When I designed the boxes, the size of the mounting space limited the size of the box. Air flow should not be a problem. Very little differential pressure is required across the stand pipe leading to the cabin to achieve a substantial air flow measured in cu ft per minute.
The Westsail 32 is on my short list of favorite boats. As you discovered, they are very fast when sail properly. The hull was designed by Atkins and first produced as the Kendel 32. When the Vick’s took over production, they commissioned Bill Crealock to design the cabin and interior. The Vick’s built an excellent boat and were masters at marketing but failed to keep track of cost.
Our friend Bob Marsh sold Westsail 32’s in their heyday. The Vick’s visited his office and informed Bob they were going to host a Tiki party on the beach and invite as many people as possible. The party would be in the evening and include Tiki torches and a pick roast. The dress attire would be down island. Bob, asked them who was paying for the party. The Vick’s reply, “Why, you are.” He hosted the party and sold more than enough boats to pay for the party and make a nice profit.
Fair Winds,
Rod
P.S. You may like the following Westsail 32 video - gaffed rigged.

Neat work, Rod!
I only just now realised that you ran Iduna’s dorade boxes athwartships (my only excuse is that I recently washed my head, now I cannot do a thing with it!). The SLM standard was to run the boxes longitudinally, ie parallel to the handrail (see attached pic, of Zygote’s starboard dorade box - showing canvas covering handrail and skylight).
Iduna’s boxes, running athwartships, should benefit from the curve of the cabin overhead to drain fast. Only disadvantage that I can think of is that when working on the mainsail and boom, I sometimes stand on that patch of overhead between the turtle and the skylight.
Cheers
Bil
Bil:
Thanks for the nice comment. Your cowl vent and dorade box looks great.
I polished IDUNA’s cowl vents after I installed them but that is the last time they well be polished. They are cast from gunmetal and will patina to a nice browny-gold color.
The location of the boxes is by default. IDUNA has a chimney located on the cabin top in the starboard forward corner. We work the reefing lines on the cabin top near the mast. I would have preferred to locate the vents as far forward as possible but forward of the skylight hatch is reserved for standing to work the reefing lines. It’s all a compromise.
The boxes are designed to be removable. They are held in place with four 1/4" X 20 bronze screws.
I posted more photos on the upload gallery. Hopefully, these will be added to the IDUNA’s dorade/cowl vent gallery.
Fair Winds,
Rod
BCC IDUNA