Does anyone have plans and/or dimensions for the deck boxes that are placed either side of the mast in front of the cabin? Also, can anyone advise me how the propane line is typically routed from the deck box to the galley?
Gary
Dioscuri (#064)
Does anyone have plans and/or dimensions for the deck boxes that are placed either side of the mast in front of the cabin? Also, can anyone advise me how the propane line is typically routed from the deck box to the galley?
Gary
Dioscuri (#064)
Gary: Hi!
I’m away from Zygote at the moment, so I cannot take photos and run a tape over her deck boxes. So until I get back to Z, here are some introductory remarks. After I’ve written and sent this, I’ll search my harddrives to see if I have any pics.
I think Roger Olson did not make a drawing of the Hill deck boxes. But Dick would have had plywood templates in the shed.
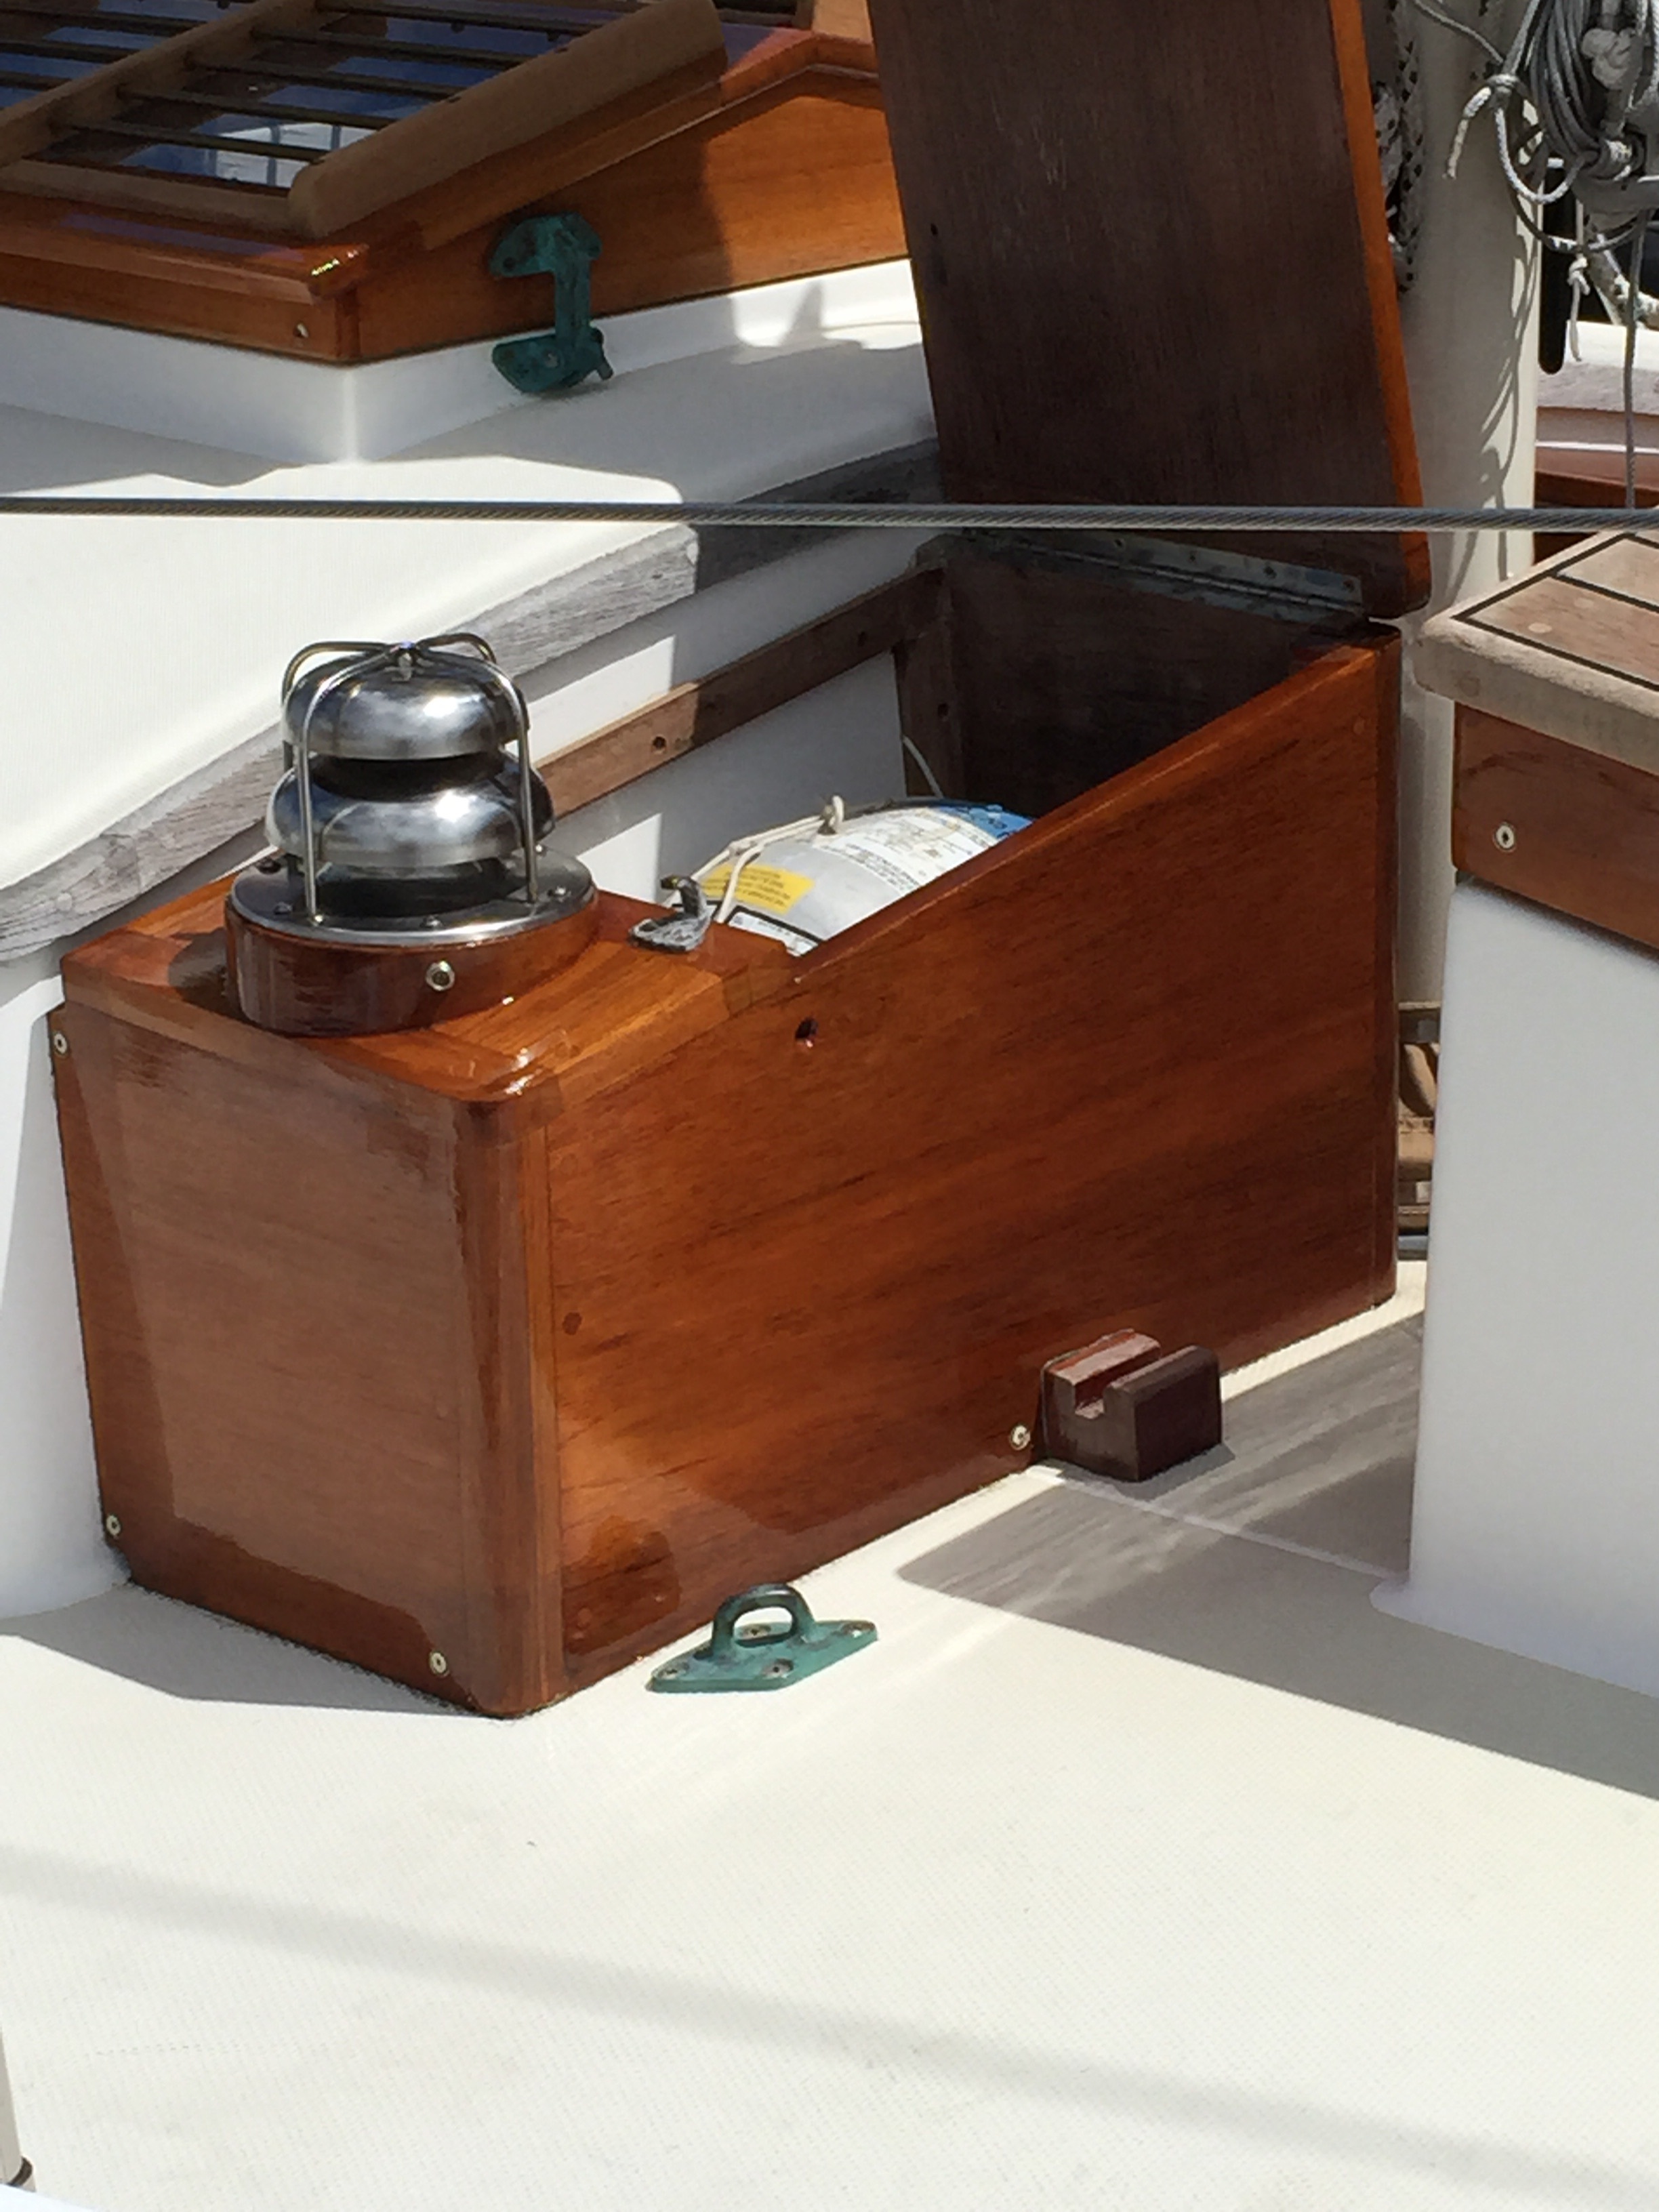
Zygote carries two Hill deck boxes. One on each side of the mast. Built so they are up against the fore face of the coachroof, so that face of the coachroof makes the aft wall of each deck box.
On Z, the function of each Hill deck box is to carry a Manchester horizontal LPG cylinder. Those are nominal 5 kg/10 lb, 2.3 US gallon/8.9 litre aluminium LPG cylinders (see http://www.manchestertank.com/products/dotproducts/aluminummarine.htm).
So if, as your text suggest, you plan to use deck boxes for LPG cylinders, first buy your LPG cylinder and then build a box to suit the cylinder. You would really only want the dimensions of Z’s deck boxes if you had Manchester LPG cylinders of the same dimensions.
If someone were just to want a deck box to stow docklines, winch or windlass handles, or other sundry gear, that’s a different matter.
The dimensions of each box is such that the LPG cylinder is a tight, I’ll say again TIGHT fit. You don’t want any slack to allow a cylinder to move around when the boat pitches, rolls, or heaves. Tight. Moving a cylinder in/out requires slow and careful work (like most things, a second attempt usually works).
Z also has, inside each deck box, a small teak block screwed to the deck to further frustrate any attempt by an LPG cylinder to move transversely.
On Z, the only LPG appliance is a Force 10 stove (two stove-top burners, a griller, and the oven). That’s in the galley to port (based on the traditional thinking that you cook when you’re sailing on starboard tack: port side is down, so anything hot falls away from the cook; and the boat has right of way over a vessel on port tack so with luck the boat will be able to stay on starbd tack while cooking).
That means that only the LPG tank in the port deck box is piped to the stove (one short run of copper pipe, no joins) . The tank in the starboard deck box is a spare.
I have looked at both spreadsheets - the Bildwood spreadsheet is written in a carpentry workshop code: it lists two 4/4 x “8+” x 12’ - S2S to 13/16. I assume that means you buy 1" x a fat 8" x 12’ lumber and sand the 1" to 13/16".
The BCConst3 spreadsheet lists: two 36" x 18" x 13/16" (and suggests adding 30% for wastage) and two 3" x 3" x 36". I assume the latter are for the reinforcing fillets (I’m not good on carpentry lingo, I only did one year of shop at school and then switched to tech and geometric drawing) that run along the deck/wall of the deck box joins and the wall-to-wall junctions. (I’d go for the BCConst3 list; some of the 3" x 3" is ripped diagonally into triangular section fillets to join wall-to-wall; the rest of it is cut into something like 1" x 1" rectangular section lengths that reinforce the deck box-to-deck join; i.e. screwed to both the deck and the wall of the deck box).
I’ve not put in the headwork to determine whether those two lists of materials are equivalent (? doesn’t taste like it) and whether either would suffice if I needed to rebuild Z’s deck boxes.
I can only suggest the usual timewasting: buy some cheap thin ply and have a handful of clamps etc on hand. Put a horizontal LPG cylinder in what looks like the right spot and build a plywood box around it. Glue and clamp the thing together, then hold a party with friends and get everyone in turn to try to open the deck box lid and withdraw the LPG cylinder and then put it back in place.
I forgot to mention:
Z’s deck box lids are held up with spring lid supports. The ones Z has are from Moonlite Marine (which was not far from the Sam L Morse Co yard; see Moonlite Marine - Hatch Holders Roger and Sumio continued the tradition of sourcing gear locally to support the community and so they could check on quality etc).
Hill deck boxes have limber holes to drain water from around the mast partners. That means limber holes at the aft bottom corners of the two longitudinally running walls. One monthly maintenance task is to run the corner of a rag through those holes to keep the limber clean.
Z’s boxes have the same latches (? over-centre latches?) used in the cockpit for cockpit lockers. I have padlocks for those latches, common keyed so all portside lockers use one key, starbd a different key.
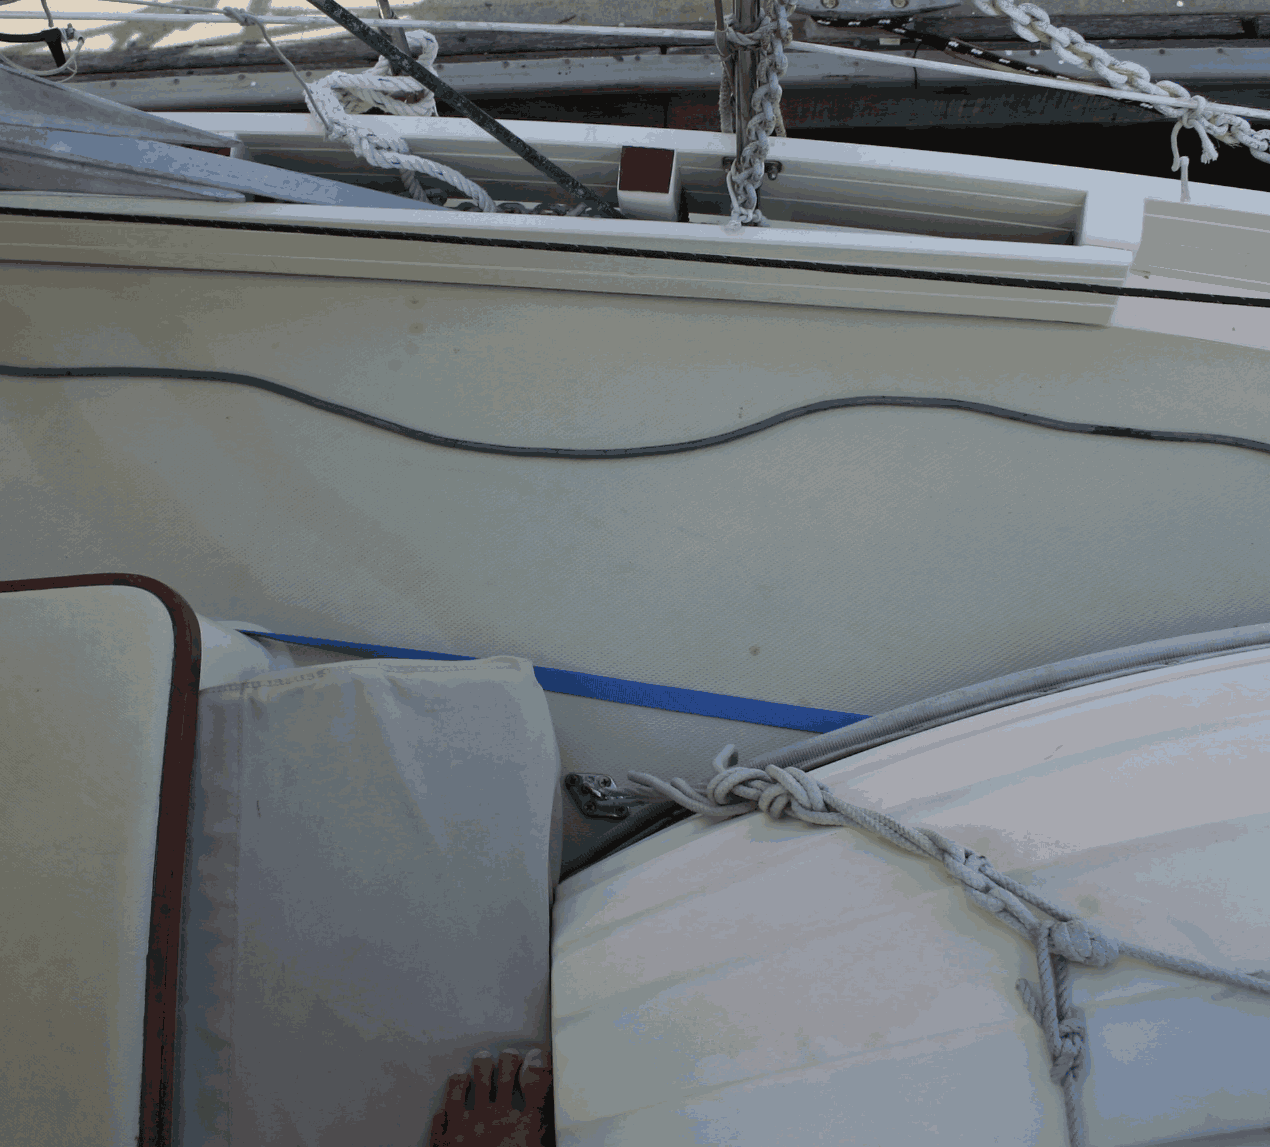
Inside the port deck box: the LPG regulator and relay switch are attached to the inboard face of the deck box; the run of copper pipe starts from the relay switch and then penetrates the deck (inside the box) vertically (along with the wiring to the relay) into the cabin;
Inside the cabin:
a. the copper pipe penetrates the overhead and bends to run along the overhead to port and runs in a straight line to the hull-deck join. (the run of the copper pipe along the overhead is covered by a strip of teak trim)
b. at the hull-deck join, the copper pipe bends to run aft in the port cableway (Z has two cable ways that run from bulkead #4 {the bulkhead between the accommodation space and the galley [port]/icebox & radio shack [starbd]} forward to bulkhead #3; The cable ways are bounded by the overhead (above), the hull-deck join (outboard), a strip of teak screwed to the overhead (inboard), and a teak trim board (below). Z’s port cableway carries 12VDC wires to lights and fans, 240VAC wires to AC outlets, and the LPG copper pipe).
c. the copper LPG pipe penetrates bulkhead #4 and continues aft in the cableway until abreast the stove. The pipe then bends to run vertically down (inside the galley lockers) the hull lining and terminates. A flexible armoured hose then connects to the stove.
I’m glad to see activity on the Forum. Here’re a couple of highlights of the past few months:
Lin Pardey visited and stayed onboard with close friends of her and Larry’s at Scarborough Marina earlier this year. She ran her eyes over Z (we weren’t on board at the time, so I didn’t get to meet Lin or get her to autograph any of my L and L Pardey books - which are anyway now all stored onshore. Drat!).
Webb Chiles http://www.solocircumnavigation.com/SoloSailingCircumnavigation/SoloCircumnavigators/WebbChiles/WebChiles.htm is on yet other solo circumnav in a ridiculously small and light boat (no headroom!) compared to a BCC. I’ve forgotten what number solo circumnav he is up to. Probably lucky number 7. Webb wasn’t in Scarborough Marina - he was a few hundred nm north at Bundaberg (the next port of entry north of Brisbane).
Cheers
Bil
I’ve searched and found no relevant photos other than perhaps this one from 2008 that shows:
Z’s Hill deck boxes have Sunbrella covers (designed by Bob Baltierra, sewn by Dolly Baltierra)
Z’s Cherub dinghy sits with her transom slid into a slots in chocks mounted on the deck just forward of the deck boxes.
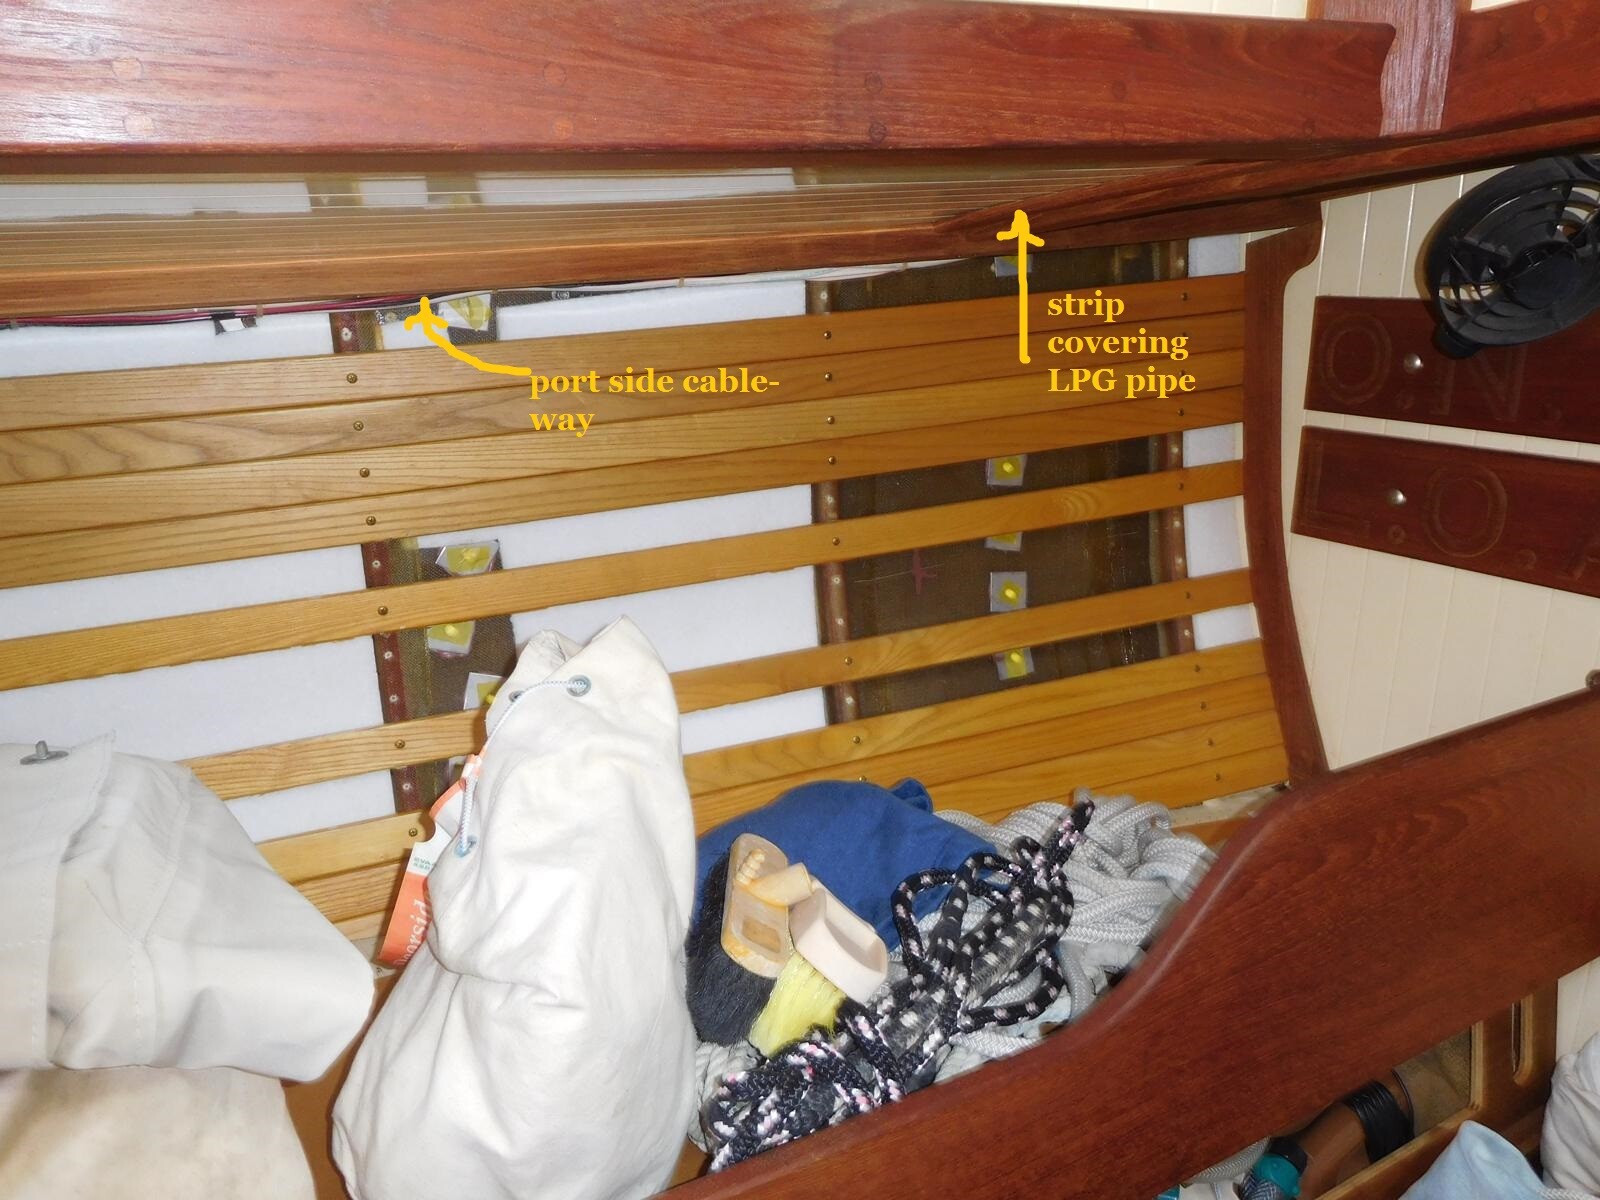
As for inside the cabin, the best I can do is the attached pic taken in the midst of our refit of Zygote late in 2015.
This is in the midst of replacing the external chainplates. You’ll see that I’ve removed the key ceiling battens to get access to the nuts and throughbolts holding the chainplates in place.
The cabin is in disorder - bunk cushions etc removed and various ditty bags and tool rolls etc around. Please excuse the mess.
I’ve arrowed the thin teak strip that cosmetically covers the initial run of the LPG copper pipe from its penetration of the overhead to the port cableway.
I’ve also arrowed the cableway - its covering board has been removed. You cannot see the copper pipe, but you can see some of the 12VDC and 240VAC cables.
Ahoy Bil , do you remember how the LPG copper pipe is made water tight at the through deck hole in the port deck box ?
Douglas: Hi!
Ouch … times like these I realise how much I take some ‘small’ things for granted.
I think that the watertight seal around the LPG copper pipe is nothing more sophisticated than a very healthy amount of clear silicone sealant that extends perhaps 1" above the deck. No fancy gland etc.
Thank you very much Douglas for the advice you gave me one year back on changing chainplates and dealing with the aluminum mast and mast step - everything you told me was accurate and valuable.
Even down to the little things, such as you noting that the topmost throughbolt on each of shroud chainplates was a wee bit bent. When installing the new plates, I worked out the reason for that: there was no easy way of drilling the hole for the top throughbolt such that the shaft of the bolt was perpendicular to the outer face of the channel/chainwale (aka rubrail) and then the head of the bolt would end up flush to the outer face of the channel. Only a few degrees out of perpendicular, but enough to look wrong.
An alternative way of doing the job would have been to chamfer the outer face of the channel, i.e. to angle the face of the channel just a few degrees so it was perpendicular to the bolt hole and the shaft of the bolt.
So when Tommie and Dick installed the chainplates, I figure they just used healthy body English (a jolly healthy hammer blow, I mean) to make it so.
On my first bolt insertion, I couldn’t work out what I was doing wrong to cause the bolt head to sit angled to the chainplate. Then I looked inside and worked out what was the problem. I solved the problem the same way: I held a metal block inside on the end of the bolt (to absorb some of the strike) while a mate of mine used a 2# hammer to cause the bolt shaft to bend just right.
Following one of your other valuable tips, I had carefully checked the curve of each of the old chainplates against the curve of the hull and channel. I found that two of the chainplates on starboard side fit the curve of the hull but stood about 1/4" proud of the channel (and had been pulled into place by nut & bolt tension). Having measured the gap, I was able to get the fabricator to make necessary corrections.
I’m happy I chose to make the shroud chainplates in 2205 duplex s/s. I met a US cruiser, Jim Cate, who has been coasting Aus waters for a jolly long time (he and his spouse, Ann, sailed into Aus years ago when cruisers apparently could get a visa that seems to run forever). To cut the story short, Jim also has chainplates of 2205 - from memory his are 25 years old and look like new! Jim said he knows of a stateside cruiser with even older 2205 chainplates that similarly look new and show no sign of corrosion, stress etc.
Happy July 4!
Cheers
Bil
Bil, thank you very much for your very detailed response! It is most helpful. As you guessed, I do intend to use the Hill deck boxes for propane storage, so it makes great sense to buy the tanks before having the boxes built (although I have some woodworking skills, I think my limited talents and time are too much for the Hill boxes - fortunately, I know a skilled woodworker who charges ridiculously low prices for his work).
Gary
Dioscuri (#064)
Thanks for the pictures Traveler.
Gary
Dioscuri (#064)
Glad to be of assistance. Let me know if you need more detailed pictures.