OK all you freehand drivers, I’ve got the vane mounted to the rudder. Now I need to be sure I understand the use of the thing correctly. If I read it right, the helm gets exceptionally stiff if the vane is locked, and really throws the helmsman around when backing. If the vane is allowed to freewheel, the stiffness disappears but it chatters when motoring. Do I have this right and what solutions has everyone come up with? I can’t have the tiller arm freewheeling 360 degrees above the rudder because of space limitations so I have keyed the top of the shaft to make the arm easily removable. Should allow me to lock it down if necessary and also allow freewheeling for backing or sudden course changes when under the windvane(dodge those pesky sleeping whales). Always appreciate any feedback from users so thanks in advance. Ray
Yes, with the vane locked while motoring it will be “stiff”. I usually let it freewheel but have not noted the chattering to be bothersome. You can offset the vane blade to account for the prop while motoring and this reduces course adjustments whether you’re hand steering or using the autopilot. Mind you, my experience is only coastal sailing in our North west. Regardless of how I use it, it is also pleasing to the eye!
Cheers,
Tom
“Terrier #31”
I have a FH system on Shanti. I think that the trim tab chatters more with a 2 blade prop than a 3. This is just speculation on my part. I think its from the pulse of the prop being in and out of the stream. Anybody out there know? Tom, do you have a 2 or 3 blade prop?
I let the trim tab free wheel in reverse. Usually lock it down otherwise. The big rudder even without the trim tab can toss you around in reverse if your not careful.
Sure is a simple mechanism compared to other vanes. Just some disadvantages to the trim tab mentioned that are easily compensated for.
-
Yes, when under sail (and not using the Freehand to steer), you must have the trim tab free. If the trim tab is locked, the effective rudder size is huge and that makes using the sails to balance the helm jolly difficult in a seaway (it might be possible in sheltered waters, but in a cross sea the helm will rip your arms off).
-
When reversing under engine power, such as backing out of our marina berth, we on Zygote sometimes have the trim tab locked and sometimes it is free. At low speed reversing (say 1 knot), locked or free doesn’t matter. At higher speeds (eg the 3 knots or so at which a BCC can go astern with control), having the trim tab free is better (unless you’ve very strong arms). On Zygote, the trim tab cannot turn 180 or 360 degrees; the upper part of the trim tab contacts the rudder at about 160 degrees.
-
Do you have or not have the worm drive that adjusts the angle of the trim tab? When motoring forward, we on Zygote lock the trim tab and then adjust the worm drive so the trim tab compensates for prop walk. That’s a big benefit. Any chattering is mechanical slop in the system responding to the chaotic flow of water from the prop. Using the worm drive to adjust for prop walk is a major benefit (at least, that is my opinion. I thought everyone did it!?!)
Cheers
Bil
Thanks much to all for the feedback. Bil, I have not mounted the wormdrive yet and was waiting to see how it all worked before deciding. I also trimmed the top of the paddle to clear the rudder allowing 360 degree clearance. It did not take much at all. I assumed that I wouldn’t care about prop walk unless it was for extended time, then using autopilot. Has anyone reshaped the leading or trailing edges of their paddle to any benefit? Cheers, Ray
Worm drive? What part is that? Could you post a picture? Gary, I have a 2 blade prop (Sabb).
Tom
“Terrier” #31
I hunted for a photo, Tom, but Red October and the caterpillar drive proved elusive.
I instead updated Zwords with entries for worm and worm drive (I added barnacle too, but not caterpillar drive).
See https://sites.google.com/site/katshegne/Home/zygote/manuals/manual-files/Zwords.pdf or just browse Katshegne - Manuals for BCC 116 Zygote.
Cheers
Bil
Here’s a pic of that ‘wormdrive’.
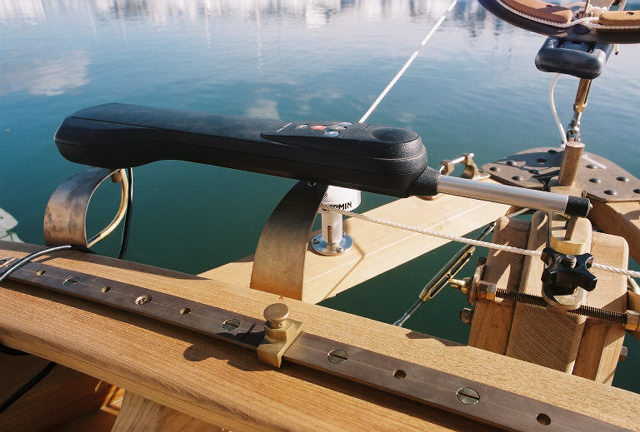
I gotta say that is one of the neatest arrangements I have ever seen, and it uses a simple autopilot no complex stuff!
Bil.
Thanks for photo,my arrangement is similar to yours. I took some photos and posted them on my blog.
So everytime you switch from auto pilot to hand steering you take off the black plastic wing nut that locks the tiller arm to the worm drive so the trim tab can freewheel? I will definitely put a lanyard on it so I don’t deep six it first rattle out of the box.
How much juice do you draw with the Simrad tiller pilot driving the trim tab?
Best,
David Kent= Rose Hull 76
David,
You have to remove the black wing nut anytime you use the trim tab. I put the nut on when I am at anchor or hand steering on a long tack. If it is a long tack, you can “dial” out weather helm with the worm gear.
If you have the Sam L Morse construction manual, there is a wind vane solution in it for you. I believe Roger drew the plans. Doesn’t need a back stay.
If you don’t have the manual I can email you a copy.
Gary
Thanks Gary,
Right. I had it backwards. You take it off to use Simrad tiller pilot and it stays off to hand steer.
I have a copy of the construction manual. Will have a look at the wind vane mount solution.
David Kent
Rose Hull 76
David, if you do build the alternate wind vane for the FH system, think about doing it with carbon fiber. The lighter those units are, the better they work.
Try http://www.dragonplate.com/. I will remake my vane this way when I have a few hundred extra bucks to play with.
Gary,
The alternate vane shown in the construction manual is the solution for my rig. I am going to start piecing it together. Thanks for the tip and the carbon fiber link.
David Kent
Rose Hull 76
I built a backstay windvane using a NACA airfoil made from foam core material. The airfoil was cut by a supplier of RC model airplane wings. In addition to adding a spar to both sides of the wing, I covered the wing with several layers of one ounce fiberglass cloth and epoxy.
Prior to building the vane, I ran lift data for several airfoil shapes using a NASA computer simulated wind tunnel - fun stuff. I looked at torque generated by the airfoil around a point as the airfoil was moved away from the backstay. The data indicated, the airfoil would generate maximum torque if the wing’s cord was decreased and the wing moved away from the backstay.
The complete van with a 4 lb. counter weight weighed 13 lb., including ball bearings, control wheel, etc, i.e. the complete unit.
The van worked great Roger Olsen saw the van and was impressed with its sensitivity to small wind shifts. Where I made my mistake was in the control rod leading to the rudder tab. I installed a cheap plastic U-joint instead of fabricating a simple metal U-joint. The U-joint flexed too much and prevented the windvane from inputing turn corrections into the tab.
I still have the vane, trim tab, etc. etc. If anyone is interest, I will give you the van for the cost of shipping. Send me a private message if you are interested.
Rod
Hello Rod
I launched my BCC Thistle late last summer and have been doing sea trials and getting all of the little stuff squared away. The next thing on my list is to build steering vane. If yours is still available I would be interested in talking to you about it.
If it is not I would still like to hear a bit more detail about it. I had the same idea you did about an airfoil instead of a flat sail to get both sides working more efficiently. I have quite a bit of experience building very light very strong infused carbon airfoils for inboard hydroplanes. A note thanks to all who have contributed to this forum and shared their experiences both good and bad. It has been an invaluable resource while building my boat.
All the best
Eric Pomber