I like Groco seacocks with the rubber covered plug. Lin and Larry Pardey, Taleisin of Victoria, fitted Groco seacocks in Seraffyn and Taleisin. We fitted Groco seacocks in our aft-cabin Flicka when we rebuilt her.
In operation, the T-handle that controls the pressure plate inside the seacock body is loosened, the seacock handle is turned to the open or closed position and the T-handle tightened. Tightening the T-handle forces the pressure plate against the Buna-N rubber covering on the plug which expands the rubber and seals the seacock. If the seacocks are maintained and cared for properly, they will last almost forever.
As with most seacocks there are some do’s and don’t’s:
Tightening the T-handle forces the plug at the handle end,to push against the bronze retaining ring that holds the plug inside the seacock. If the T-handle is over tightened, the retaining ring may deform and prevent the seacock from sealing. If this happens, either a new retaining ring should be installed or the old retaining ring removed and straightened.
Attempting to turn the seacock handle without releasing the pressure plate will damage the rubber covering on the plug.
Never, apply grease to the plug or inside the seacock body. Grease will cause the rubber to swell, resulting in a stuck or damaged seacock.
As is the case for all seacocks, including modern ball valve seacocks, the valve should be operated at least once a month. Failure to operate the valve on a regular basis, may result in a stuck seacock or damaged seacock. If the valve is not operated regularly, the rubber coating flows into the seacock’s through-bore. If this happens, turning the seacock damages the rubber covering the plug. A similar things happens with modern ball-valve seacocks. The teflon seals flow into the bore-hole in the ball. When the ball is turned, the seals are damaged.
As mentioned before, the rubber covering the plug is made from Buna-N. If the rubber will not seal against the inside of the seacock, it may have become oval in cross-section. Simply remove the plug from the seacock, place a sheet of 80-grit sandpaper in one hand, followed by the plug and sand the plug’s surface with a rotating back and forth motion. Turn the plug a quarter turn, and repeat the sanding. Repeat this operation for perhaps two turns and reinstall the plug in the seacock.
Groco, does not have any of these seacock bodies but several years ago, they had a few barrels of new plugs and parts. I just called Groco. The front desk, is just that “the front desk” and Patrick did not answer his phone. Groco (Baltimore, MD) has a website and contact information. If you e-mail Groco, mark your e-mail “ATTN: Patrick.”
The only purpose a seacock backing plate serves on a well constructed GRP boat is to provide a flat surface for the base of the seacock. In the days of wooden boats, the seacock backing plate had two purposes: 1) to provide a flat surface for the base of the seacock to mate to and 2) to reinforce the planking where the hole was cut to accept the thru-hull.
Let me digress for a moment. A properly installed seacock is thru-bolted through the backing plate and hull - ABYC standard. Seacocks that are just threaded to a thru-hull are incorrectly installed and do not meet ABYC standard. Yep, the seacocks on most modern production boats are incorrectly installed and do not meet ABYC standard. Even if the seacock is flush up against the hull, it is not correctly installed unless the base of the seacock if thru-bolted through the hull.
Because the BCCs’ hull is massively built, i.e. stout thick, there is no need for a seacock backing plate other than to prove a flat mating surface for the seacock base. There are several ways to provide a flat base for the seacock, 1) a wooden block shaped on one side to match the hull’s curvature, 2) a wooden block bedded with filled epoxy to fill the gap between the flat underside of the backing plate and the curvature of the hull, 3) a built up fiberglass shelf on the inside of the hull where the seacock will sit, and 4) a fiberglass plate epoxied to the inside of the hull. In all cases, the flat mating surface of the backing plate must me perpendicular to the center axis of the thru-hull.
If I were installing backing plates, I would used either 1/4" thick fiberglass flat stock or 1/4" thick Garolite. Both products are available at McMaster.com. I would install the plate with thickened epoxy to fill the gap formed between the plate and the inside of the hull. Prior to installation I would drill the hole for the thru-hull in the plate. The challenge facing us, is how to ensure the plate is perpendicular to the axis of the thru-hull. Following is how I would do it:
Cover the underside of backing plate with peel-ply (West Epoxy Systems),
Apply grease to the threads of the thru-hull - (a thru-hull nut is required),
Make four small polyethylene or wood wedges,
Insert the thru-hull through the hull and place the backing plate over the thru-hull,
Screw the thru-hull nut on the thru-hull until it rests agains the backing plate,
Back off the nut about 1/4",
Place the wedges between the backing plate and hull and adjust the backing plate with the wedges, until it’s surface rest flat agains the thru-hull nut and the head of the thru-hull is square and flush with the hull’s outside surface,
Mix a small batch of filled 5-minute epoxy (thick) or use a 5-minute epoxy stick ( I like to use a 5-minute epoxy stick),
Force the filled epoxy under the outside edge on the plate but do not filled the gap between the hull and plate. The idea it to form a small shelf for the plate to rest on,
Register the plate with the hull using a Sharpie pen, then remove the plate, wedges, and thru-hull (remove the peel-ply)
Mix up a batch of thicken, filled epoxy and apply the epoxy to hull where the plate will be installed,
Lay the plate on the previous formed “rests” and press the plate down until the plate is firmly seated on the “rests” and epoxy has squeezed out of the hole for the thru-hull and the sides of the plate,
Clean up the excess epoxy from the sides of the plate and in the hole for the thru-hull which leads through the plate and hole in the hull,
After the epoxy is cured, clean the hole out with a hole saw, sand the inside surfaces and seal with a coat or two of clear epoxy,
Dry fit the seacock and thru-hole,
Drill the hole for the thru-bolts (bronze flat head machine screws) and counterbore, the outside of the thru-hole for the heads of the flat head machine screws,
Bed the thru-hull, seacock and machine screws with polysulfide.
To keep costs down, marine grade plywood can be substituted for the backing plate. All edges should be sealed with several coats of clear epoxy.
The above procedure may be used to just form a flat shelf for the seacock base on the inside the hull. To form the shelf, use the above procedure as a guide but use polyethylene flat stock instead of Garolite or GPR flat stock. Once the shelf is cured, the polyethylene plate is removed. We used a similar procedure to form seacock bases on the Flicka’s hull. These were slightly larger than the base of the seacock.
I suspect Sam L. Morse, bedded the wood backing plates using filled polyester resin then fiberglassed over the base. If this is the case, this is what I would do:
Remove the thru-hull and seacock ( to save time, you may want to sand the head off the thru-hull with 60 grit sandpaper using a rotary sanding disc and drive the remaining thru-hull out),
Using a Finn tool, cut the fiberglass on top of the base, such that you can remove the wood backing plate ( a chisel and hammer may be required ). Leave the side edges in place,
Cut a new backing plate from plywood,
Glass over the top surface of the backing plate with glass and epoxy, let cure, sand the fiberglass surface and coat with clear epoxy several times, ( to save time, glass of enough plywood before cutting out the backing plates)
Using slightly thickened epoxy (cotton micro fibers), install the new plate and cleanup the excess epoxy,
After the epoxy is cured, drill the thru-hull hole using the hole in the hull as a guide,
Rod,
Your backing plate method sounds excellent. Shaula, a SLM 1981 boat, had only 2 Groco seacocks, the tapered rubber plug, 1.5" model on the head outlet, and a 3/4" model on the head intake. All the other seacocks were W-C all bronze tapered plug models. All the pads were 3/4" plywood. The pads were not sealed or glassed over, but may have been treated with antifungal Cu napthalate? I’m not sure what Mehmet has, other than a Groco on the head outlet and what looks like a W-C from the pic on the head inlet. His pads look the same as ours.
When I replaced our head intake backing pad, I used some 3/4" teak and filed down the lower surface where needed to fit the hull (more or less). I used lots of Boatlife polysulfide between the hull and plate to fill any voids due to an imperfect fit. Compared to your method, this is quick and dirty, but it works and it’s at least as good as what we started with in 1981.
Mehmet,
This thread is sort of a continuation of the one you started Oct 5,2010, called Thru-hull Fittings, isn’t it? Are all your pads soft? Are all your seacocks leaking? Sure hope not. I wonder how many of your 1.5" seacocks (the big ones) are Groco? Whatever you end up doing seacock-wise and pad-wise, either Groco, W-C, ball valves, I know you realize that you need to start you your sojourn with no leaks and solid backing pads. Don’t put it off because it will most likely be even more inconvenient down the line! Consider yourself fortunate that this problem came up when it did. Best Wishes and don’t hesitate to ask for the forum’s two cents worth!
Dan Shaula
I like your procedure for replacing seacock backing plates - quick, uncomplicated, and effective.
IDUNA is fitted with W-C seacocks and except for the two seacocks under the sinks, all seacocks are fitted with two brass grease cups from Essex Brass -
The grease cups provide a means to grease the seacocks in the water. I open the seacock, pressurize the grease in the cup by turning the T-handle on the greaser, then wiggle the seacock handle using a slight back and forth motion. I employed a similar procedure when I greased glass petcocks in the lab.
I did not fit greasers to the seacocks under the sink to save space. When I want to grease these, I screw zerk grease fittings in the two 1/8’ NPT drain holes in the seacock body and use a grease gun. Sometimes, I loosen the two nuts on the seacock plug before pumping in the grease.
For a grease, I use Shell Retinex LC2 for seacocks, winches and engine. This grease is formulated with lithium salts and a “tackifier” for marine applications. Based on my conversation with a Shell engineer, the “tackifier” is added to all marine greases to improve the resistance to water washout. Retinex LC2 is sold as a truck grease with no reference to marine applications. My experience using Retinex LC2 is it works better than Spartan seacock grease.
Great tip (and link) on adding a grease cup to the seacocks. Those W-C seacocks (and other tapered cone types) seem to last forever if properly maintained.
Mehmet:
As others have mentioned, you should definitely overhaul and re-bed all of the seacocks/backing plates before leaving. I would recommend you doing this yourself. It’s not that difficult, it’s a skill you will want to have while cruising, and you are likely to do a much better job than any “experienced” yard worker. There are some great “how to” articles pertaining to servicing tapered cone seacocks, and re-bedding them at Welcome To MarineHowTo.com Photo Gallery by Compass Marine How To at pbase.com
Dear friends,
I am grateful to you for all your advice and suggestions. After discussing the issue with more sailors and my wife I have decided to replace them all. Thru- hulls, sea-cocks and backing boards. All of them. New ones will be also Groco but a newer model: the BV series. The old ones are 31 years old. They are great but I think they served their time. I am not sure whether the new sea-cocks would accept grease cups or not though..
I decided to use Garolite as backing board.
Meantime encouraged by you and a nice man who stopped by today to give me a quote for the project (on behalf of his company) I did start taking the them apart. It is hard, time consuming but also fun. It took me several hours to get just four screws holding 2 backing boards (bolted thru the hull) but eventually did it. I cut them from inside with a Dremel tool so it was easier..
I will keep you updated..
Cheers
Mehmet,
We were hopeing that you were busy, working on those seacocks! I’m glad to hear that you’ve taken on the job yourself. Time consuming but rewarding, I think. Let us know if we can help. We’ve all done this sort of stuff for the first time a while ago, and know there are always challenges. Getting lots of conflicting advice can have advantages? Or not? Guess it can’t hurt.
You might be able to sell your old seacocks at a used marine gear store. Here in Seattle, we have such a consignment chandlery. Somebody might just be looking for your old Grocos for parts, you never know.
Dan Shaula
Hi,
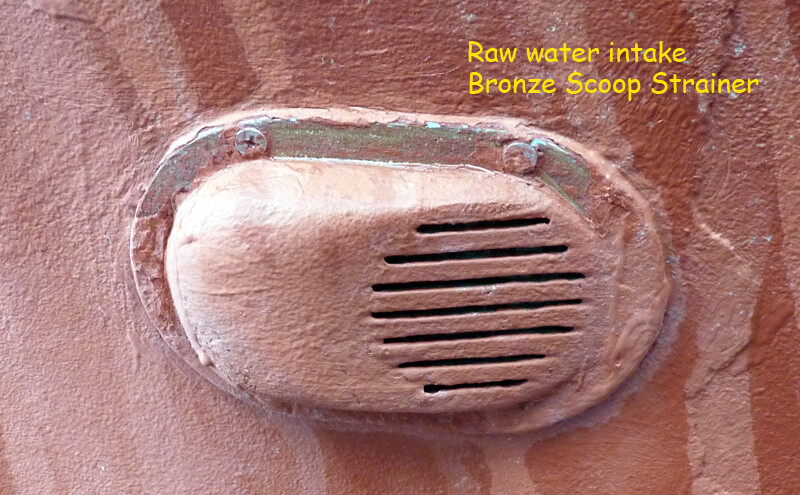
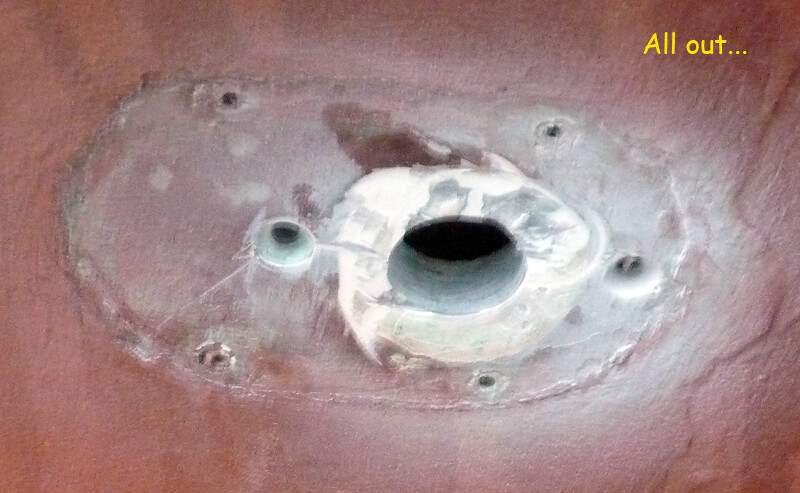
I used Rod’s “how to do” list and started working on the sea-cocks. I got 2 out. 4 more to go. The backing board under the raw water intake (Groco) came out very easy. That was the one which was leaking. However I had to cut part of the flange to free it. The other backing boards (marine plywood) are really hard to take out partially because of VERY tight quarters. Some of them were wet and looked pale.
My German friend Herr Fein Taskmaster is big help…
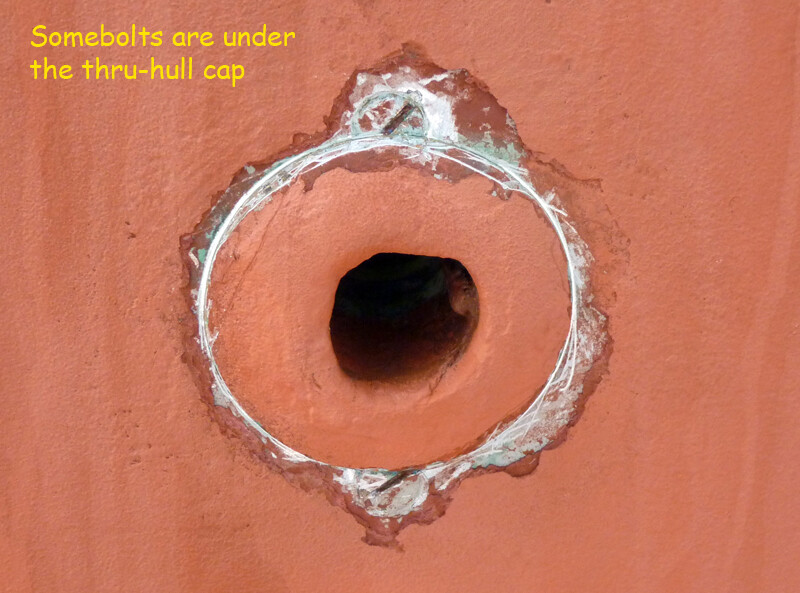
Some of the bolts are on the sides of the thru-hulls’ some of them under the mushroom cap. The latter makes the job more.. Rewarding? No.. No..Just more complicated..
Mehmet,
Shaula also had bolts under the thru hulls. Did you unscrew the thru hull from the seacock first (from the outside)? The bolts kept the seacock from turning while I unscrewed the thru hull. Carefull use of a small propane torch on the thru hull helped to weaken the sealant bonds. Maybe you ground off the thru hull flange, rather than unscrewing it, as per Rod’s suggestion? Nice pics. Nice progress!
Dan Shaula
Greetings..
Today last two of the sea-cocks are freed. They were also the least accessible. Of course I am talking about the cockpit drain sea-cocks. This time I had to cut the thru hull heads (mushroom head) from the outside and screw them out with a thru hull wrench. I could work on the starboard side after taking the dividing panel but not on the port side. I just don’t fit. I have to find a smaller person. (Definitely someone less then 225 lbs)
Even though I took the thru hulls, left the sea-cocks in their place. If it rains I don’t want the water go inside.
Since they drain the cockpit water even when she is on the hard they must remain open. I can’t think any reason they should be closed. So the question is why we have sea cocks there? Why ve need an opening-shutting mechanism? When do we shut it?
Mehmet
(An inquiring mind)
Mehmen,
Maybe it has to do with Murphy’s Law? If you were in the middle of the Pacific Ocean, on your way to the Marquesas, and your old hose between the drain and the thru hull developed a serious leak, you might wish you had put a sea cock on the thru hull! I think it makes sailors, especially offshore sailors, nervous to have nothing between the inside of their little space capsule and the deep blue sea except a flimsy piece of rubber tubing. If there was a fire in the engine compartment, and the tubing was destroyed, wouldn’t be nice to be able to close a sea cock??!
Dan. Shaula