Like most sailors at sea and underway, there comes a time when re-fueling our main tank becomes necessary.
I carry extra jerry jugs and siphon from them into my BCC’s main tank.
Usually I time the transfer, in the morning hours, when it is calm, and the steering vane or tiller pilot in online.
My problem is that I keep my Baja filter, siphon hose, and clean-up gear in the lasserette, ( a bucket full) and to get that stuff out, I have to open the hatch.
This is a problem for me because my tiller has to be in the down position and actively steering the boat, which makes it almost impossible for me to open the lasserette hatch to take out or replace the gear.
I have discussed this problem with Bil on BCC Zygote, and he said he has the same problem.
Has anyone adapted a hinge to their tiller, which wouldn’t interfere with active steering, which could hinge up, and allow the lasserette hatch to open with enough access, to get our re-fueling gear out and to put it back in, while underway ?
Douglas,
It sounds like your lazarette hatch doesn’t have the bronze Murray pull-apart hinges that were standard back in 1981. On Shaula (#59), the hatch can be removed when the tiller is briefly raised to its upper position.
Instead of a true Baja filter–aluminum with multiple screens–we’ve used the much smaller plastic filter put out by Mr. Filter and sold by West Marine. It has done the job for several decades, and is small enough to be easy to clean and store (in a plastic ziplock).
We use the older shape of Sceptre 5 gal jugs which is not as tall, with a more square-ish base, than the newer model (the old shaped ones are still available). Using these jugs and the filter, I put my thumb on the end of the spigot with the vent closed, and can rest the side of the jug on the edge of the cockpit seat and the spigot reaches the funnel OK. I control the outflow with my thumb, and after a quart or so has passed, I crack the vent. Air is then sucked in through the vent and the rate of flow is easily controlled by adjusting the vent.
After use, the filter retains maybe 10 or 15 ml of diesel (with any water dirt that was in the jug) in its bottom, and I dump this in the gal jug I keep in the bilge for used engine oil. Then a quick wipe of the filter with a paper towel is about all you need to do to clean up. I’ve never used a true Baja filter, but have watched a friend do it–no thanks. We’ve refueled many times at sea, often in 1 plus seas and have never had a problem.
I have thought about installing two studs on the back coaming of the hatch. These would slide into holes in the back coaming of the lazarette. There would also need to be two studs facing down on the sides of the hatch near the front. The rear studs would prevent the back of the hatch from lifting and the studs facing down would prevent the hatch from sliding forward. Once the hasp on the front of the lazarette was closed the front part of the hatch could not lift up, nor could the hatch. To remove the hatch, the hasp is release, the front of the lazarette hatch is lifted slightly and slide forward.
HI Doug, Are you using a Freehand Steering or other type? I have sailed many hundreds of miles using my Freehand Steering vane with the tiller totally removed. Now, I no longer use the vane but steer the boat using the cheap Navico tiller pilot steering the trim tab. If you use a monitor, cape horn or other that requires the boat be steered by the tiller then try using this method. I originally installed this setup when I first installed my Cape Horn.
Roger
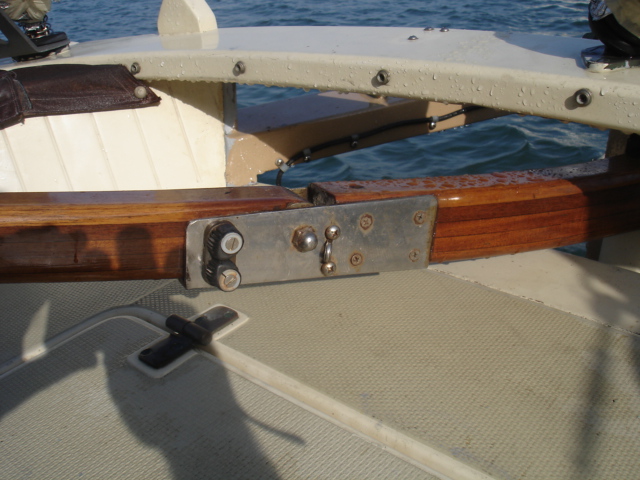
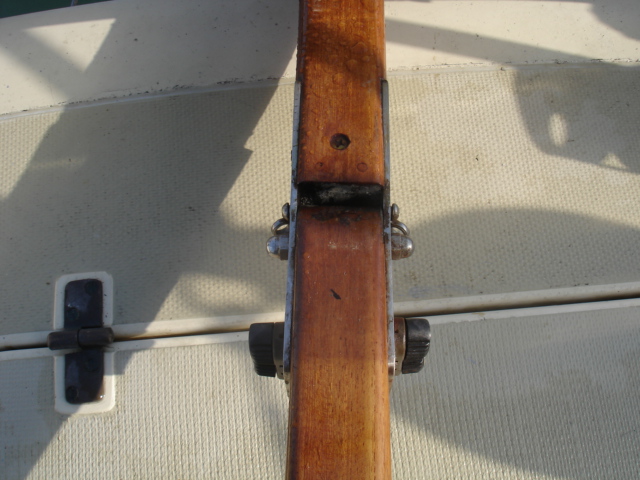
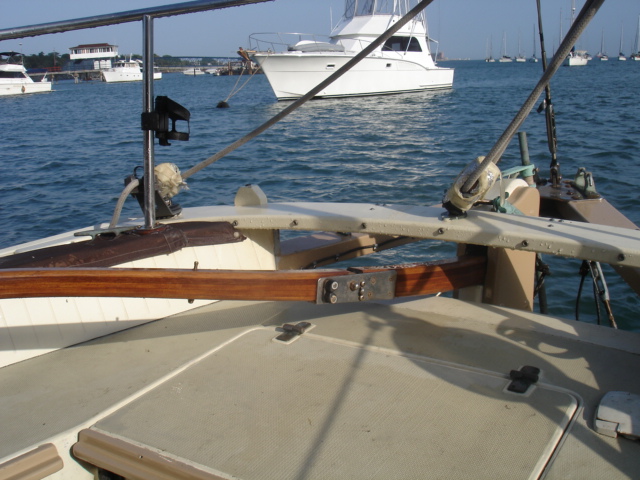
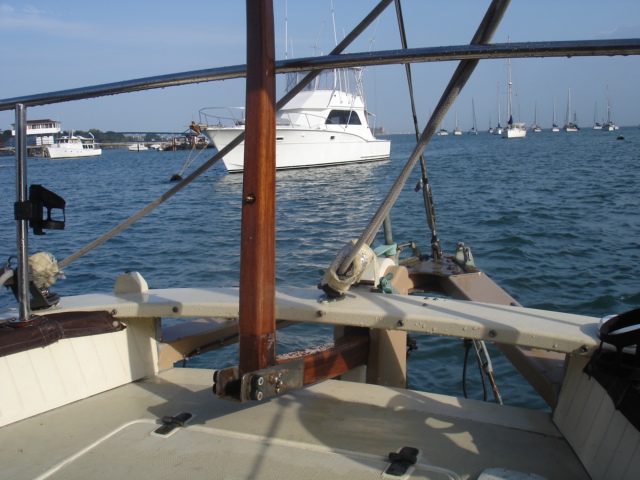
Hi Bil, Doug and the rest. I have attached a drawing of the tiller hinge. I feel like I should emphasize that the ends where the tiller is cut, be properly sealed and the laminates be held together.
For the front piece. I used two 1/4" wooden dowels drilled and epoxy glued through the laminates between where the pivot hole will go and the end radius will be cut.
On the back piece. I drilled a #7 hole through the top of the tiller, into the SS bottom plate while it was in place where I would want it to be when finished. I removed the tiller and taped the plate to accept a 1/4-20 SS machine screw. I then drilled this tiller hole out to 1/4". When I installed the tiller back piece into the tiller hinge, I installed the bolt with epoxy glue and bedded it all in 5200. This pulls down the laminates to prevent them from splitting in the future. I also installed four wood screws in the side on both sides.
When drilling the tiller hole for the pivot, be sure to level the tiller based on the centerline, not the side surface. The tiller is cut at a taper, If the tiller is set flat on the drill table, the hole will be perpendicular to the bottom surface. When the tiller is hinged up, it will be at an angle.
I also installed a sleeve in the front piece where the pivot bolt will be located. I used copper tube but S.S. would also work. This is epoxy glued in place as well. I suggest that the pivot hole not be drilled until everything fits perfectly or you could end up with a gap. For this hinge to work, it must be a good snug fit so there is no play.
Hi Bil, Doug and the rest. Sorry, I am having a bad day with this drawing. I wrote up long detailed instructions here and then tried to attach the drawing. I made the drawing in pdf so it would be large enough and clear enough to read. However, I cannot attach a pdf file to this message. So I returned and scanned it as a photo. Because of its size for clarity, it took too long to download so I clicked cancel and lost it all… Ok, If you want a drawing of the tiller and detailed instructions, I will email you a pdf file with it all. Just send a message to me at xiphias37@yahoo.com
"I have thought about installing two studs on the back coaming of the hatch. These would slide into holes in the back coaming of the lazarette. There would also need to be two studs facing down on the sides of the hatch near the front. The rear studs would prevent the back of the hatch from lifting and the studs facing down would prevent the hatch from sliding forward. Once the hasp on the front of the lazarette was closed the front part of the hatch could not lift up, nor could the hatch. To remove the hatch, the hasp is release, the front of the lazarette hatch is lifted slightly and slide forward. "
I am trying something similar to this. I removed the take-apart hinges and fitted recessed ring-pulls to each side of the hatch cover so that it could be raised slightly & slid out forward under the tiller. I have yet to fit a locking arrangement to secure the hatch at sea but was considering drilling holes horizontally through coaming & hatch vertical edges for bronze rod (locking bars). These rods could be threaded at the end to be wound into a captive nut but I haven’t fully developed the idea yet! I generally try to avoid putting anything I could need when under way in the lazarette but things don’t always go to plan!