Rot in plywood around portholes

Dear BCC owners,

As long-time reader but first-time poster to this forum I’d like to start by introducing myself and saying how much I appreciate the help from the people on this forum.
I am the third owner of BCC#118 White Wings 3, currently moored in the Sydney harbor. I hope to sail her across the oceans some day.

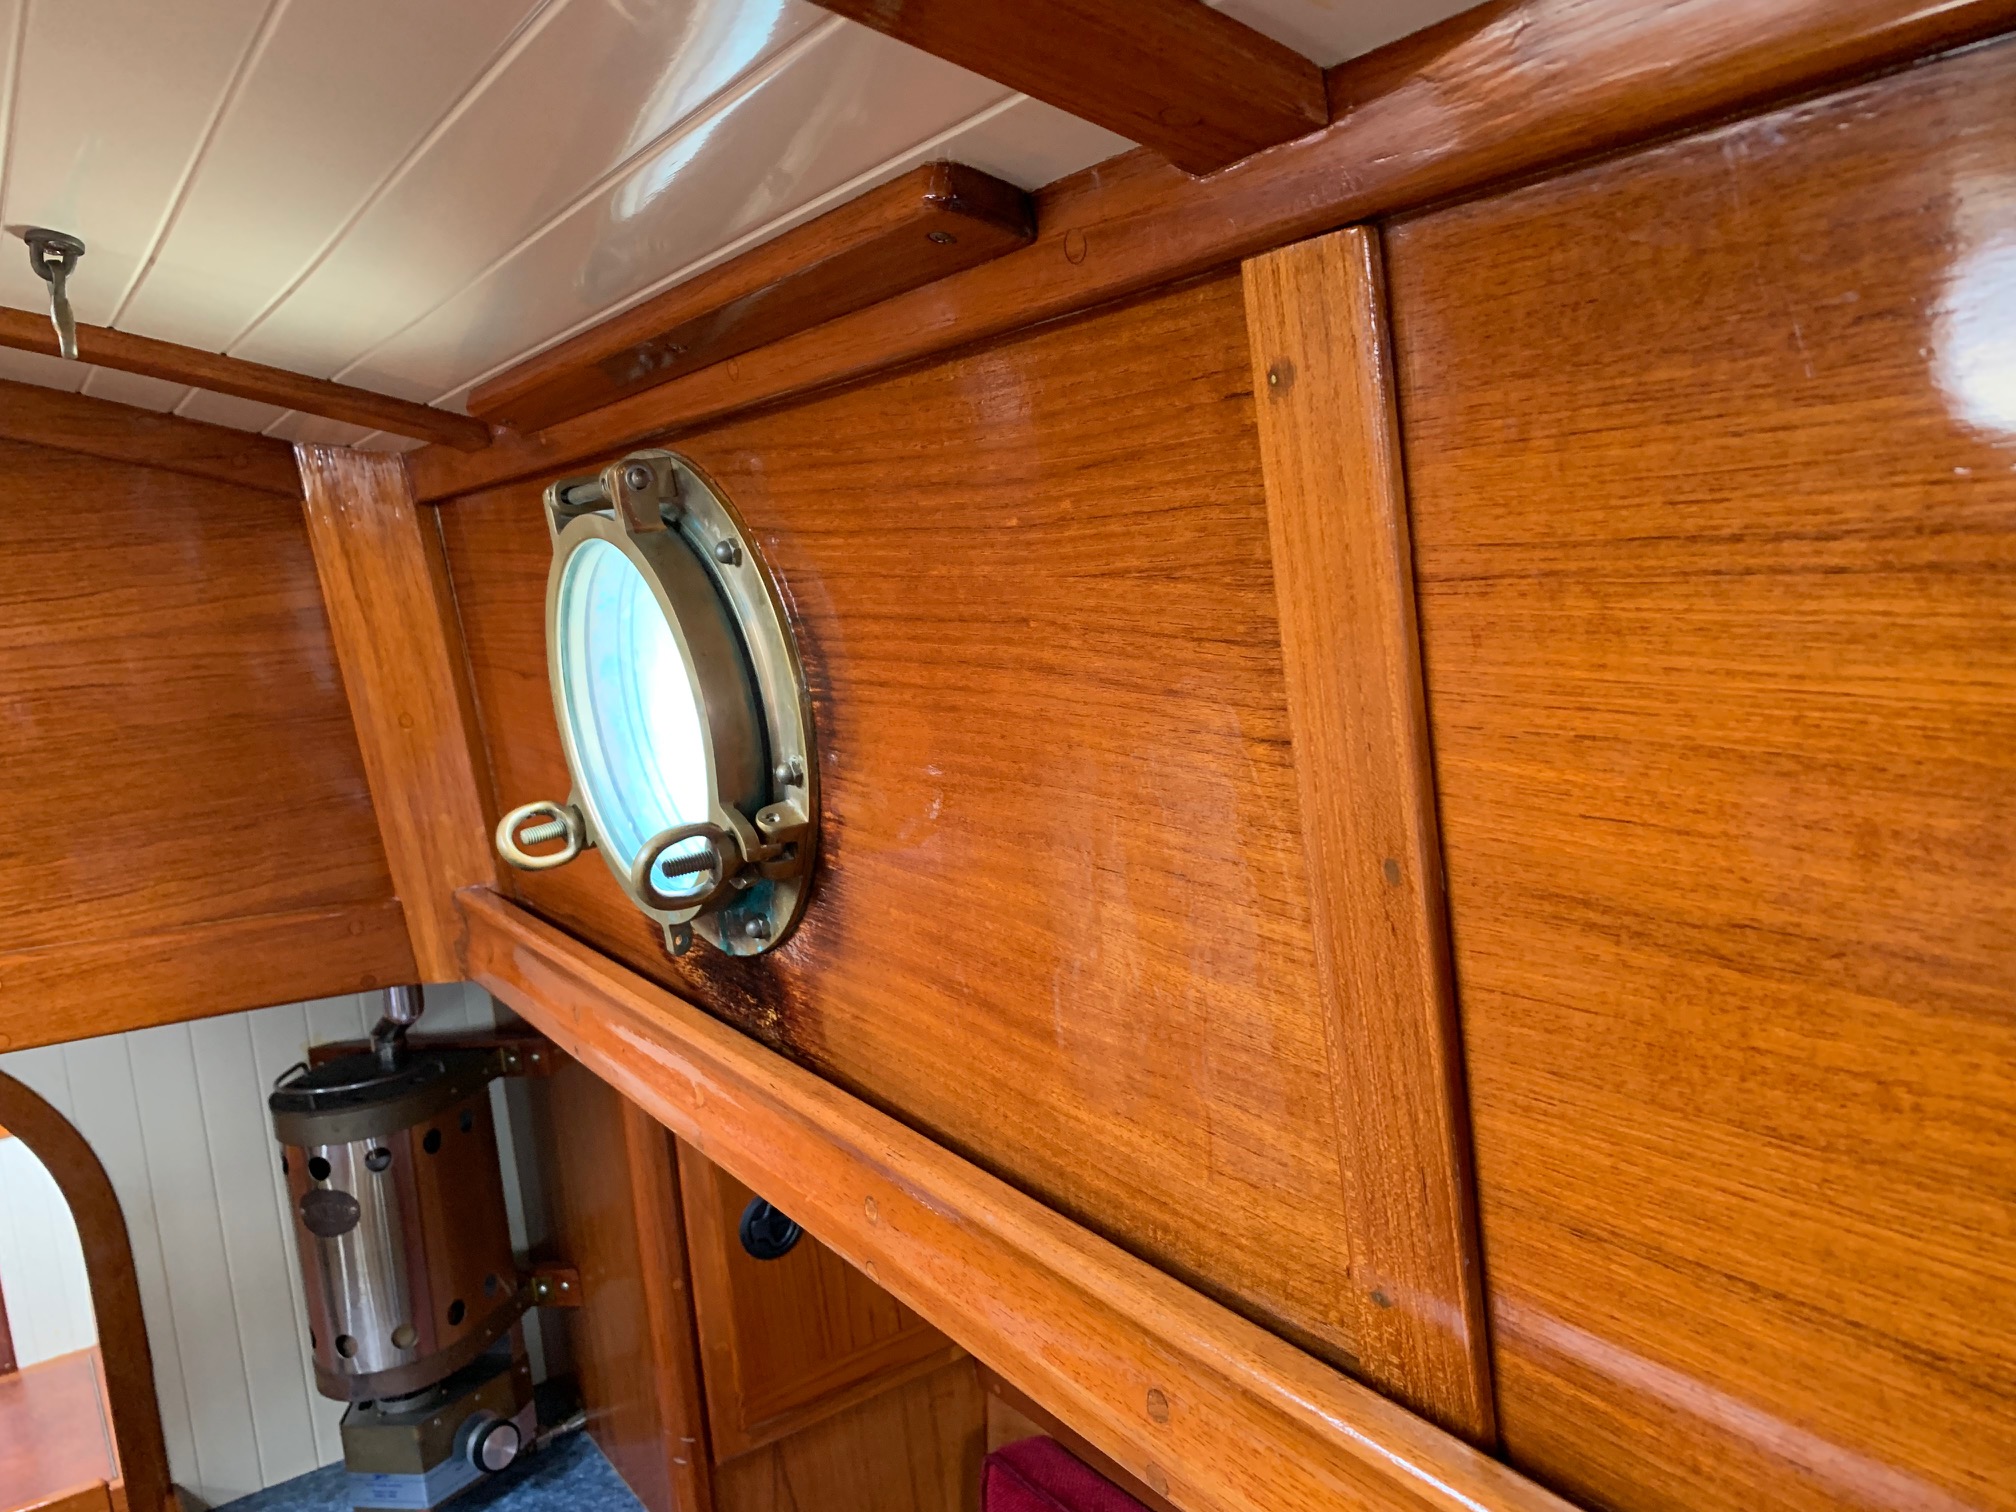
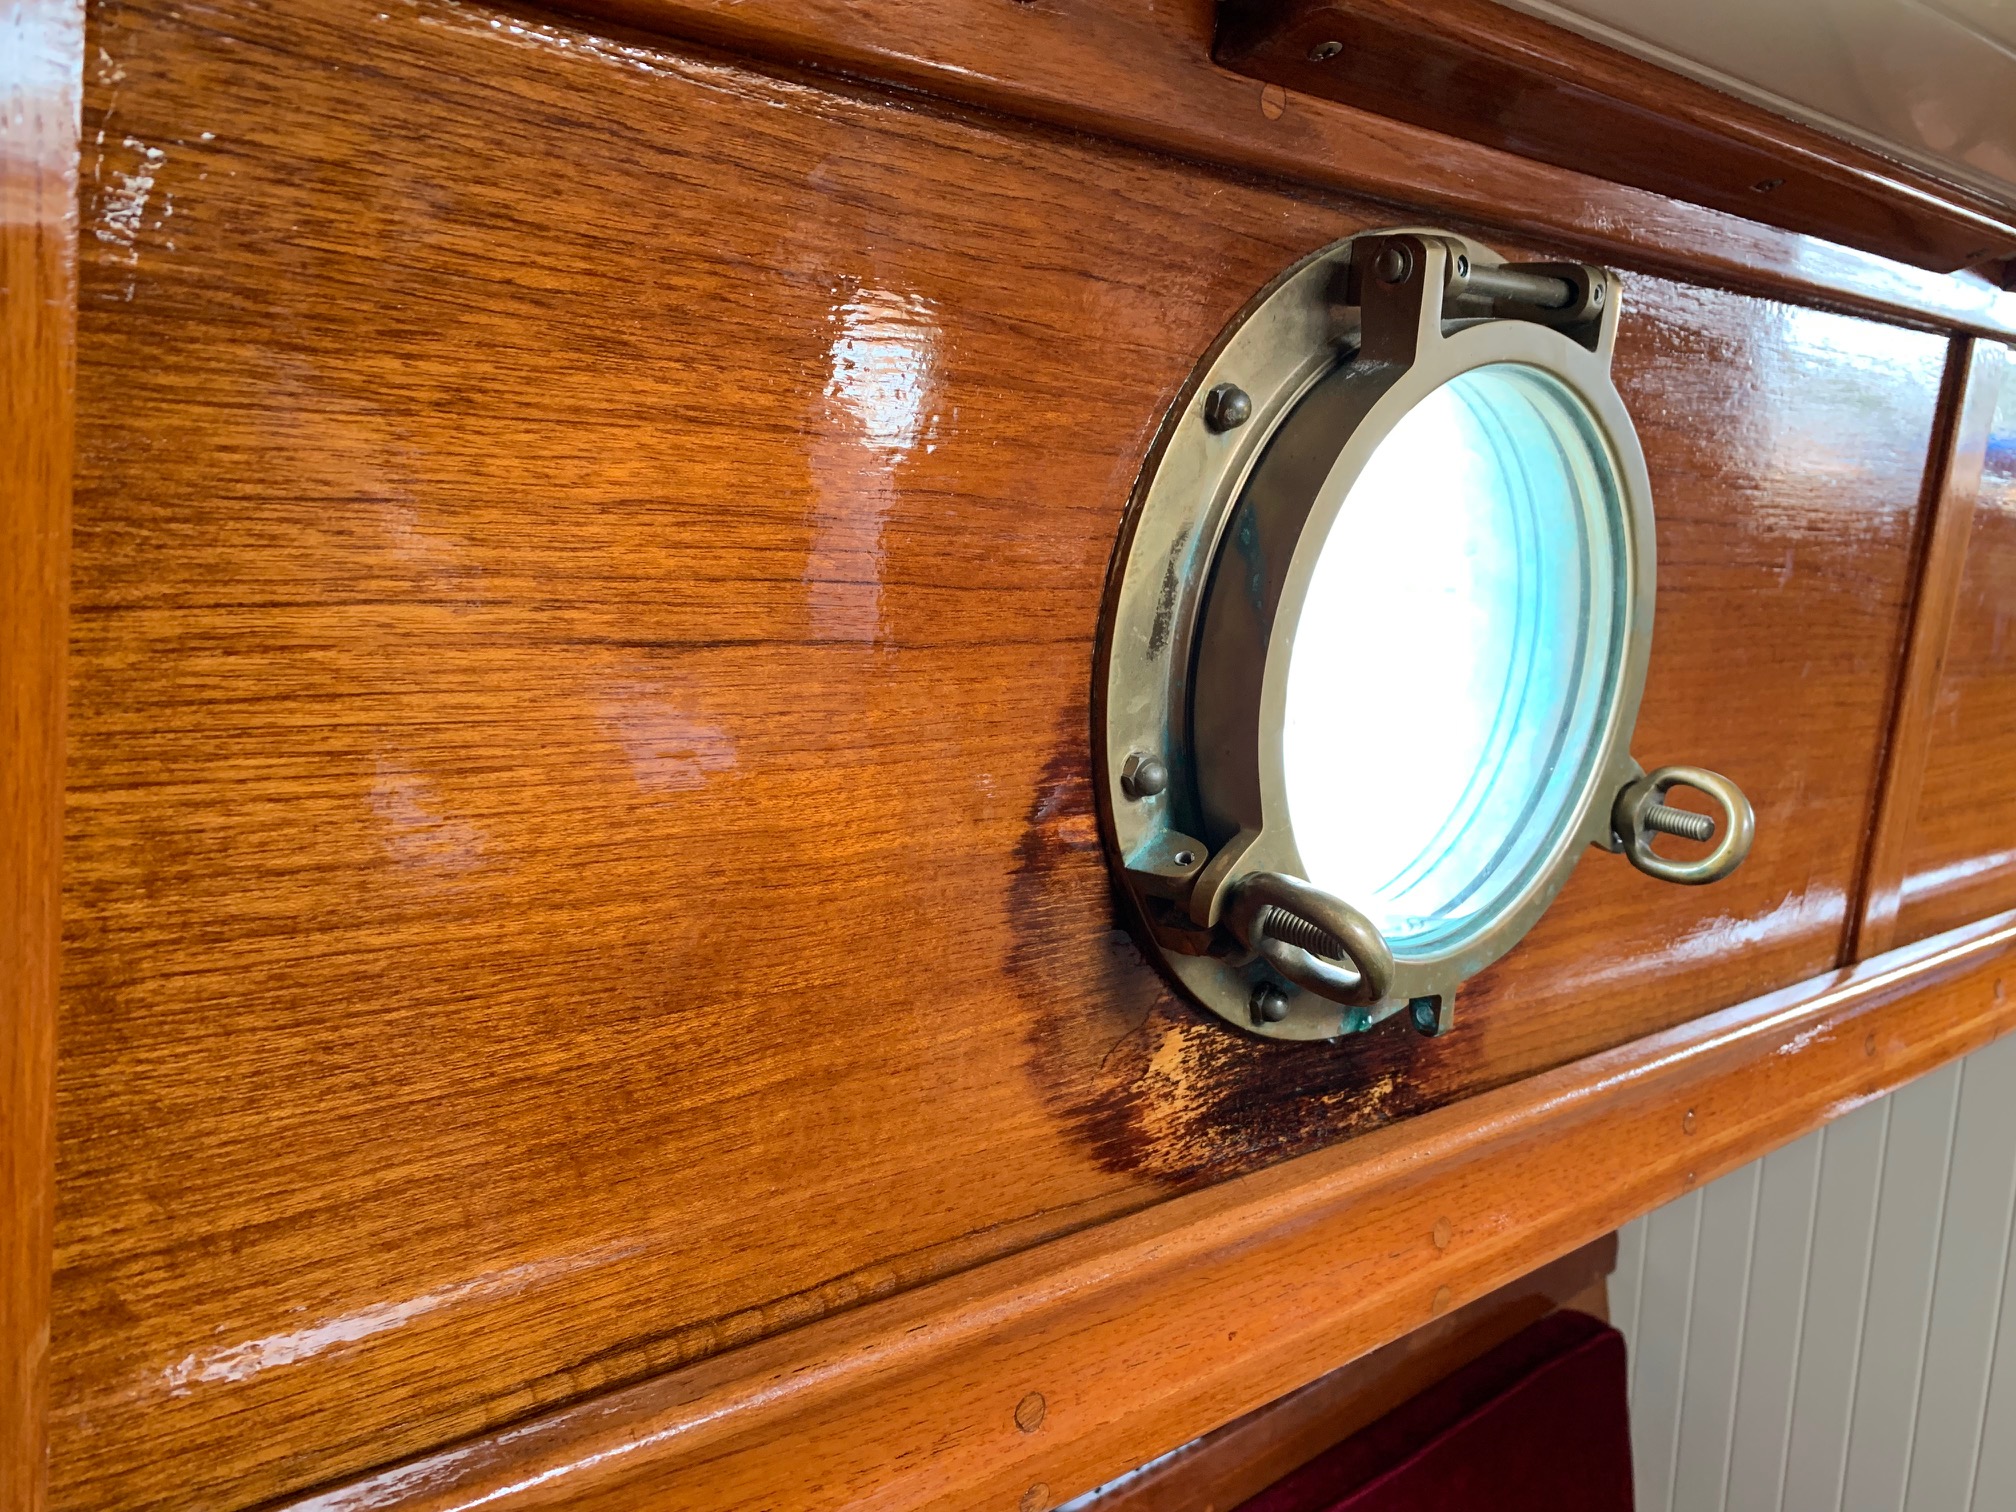
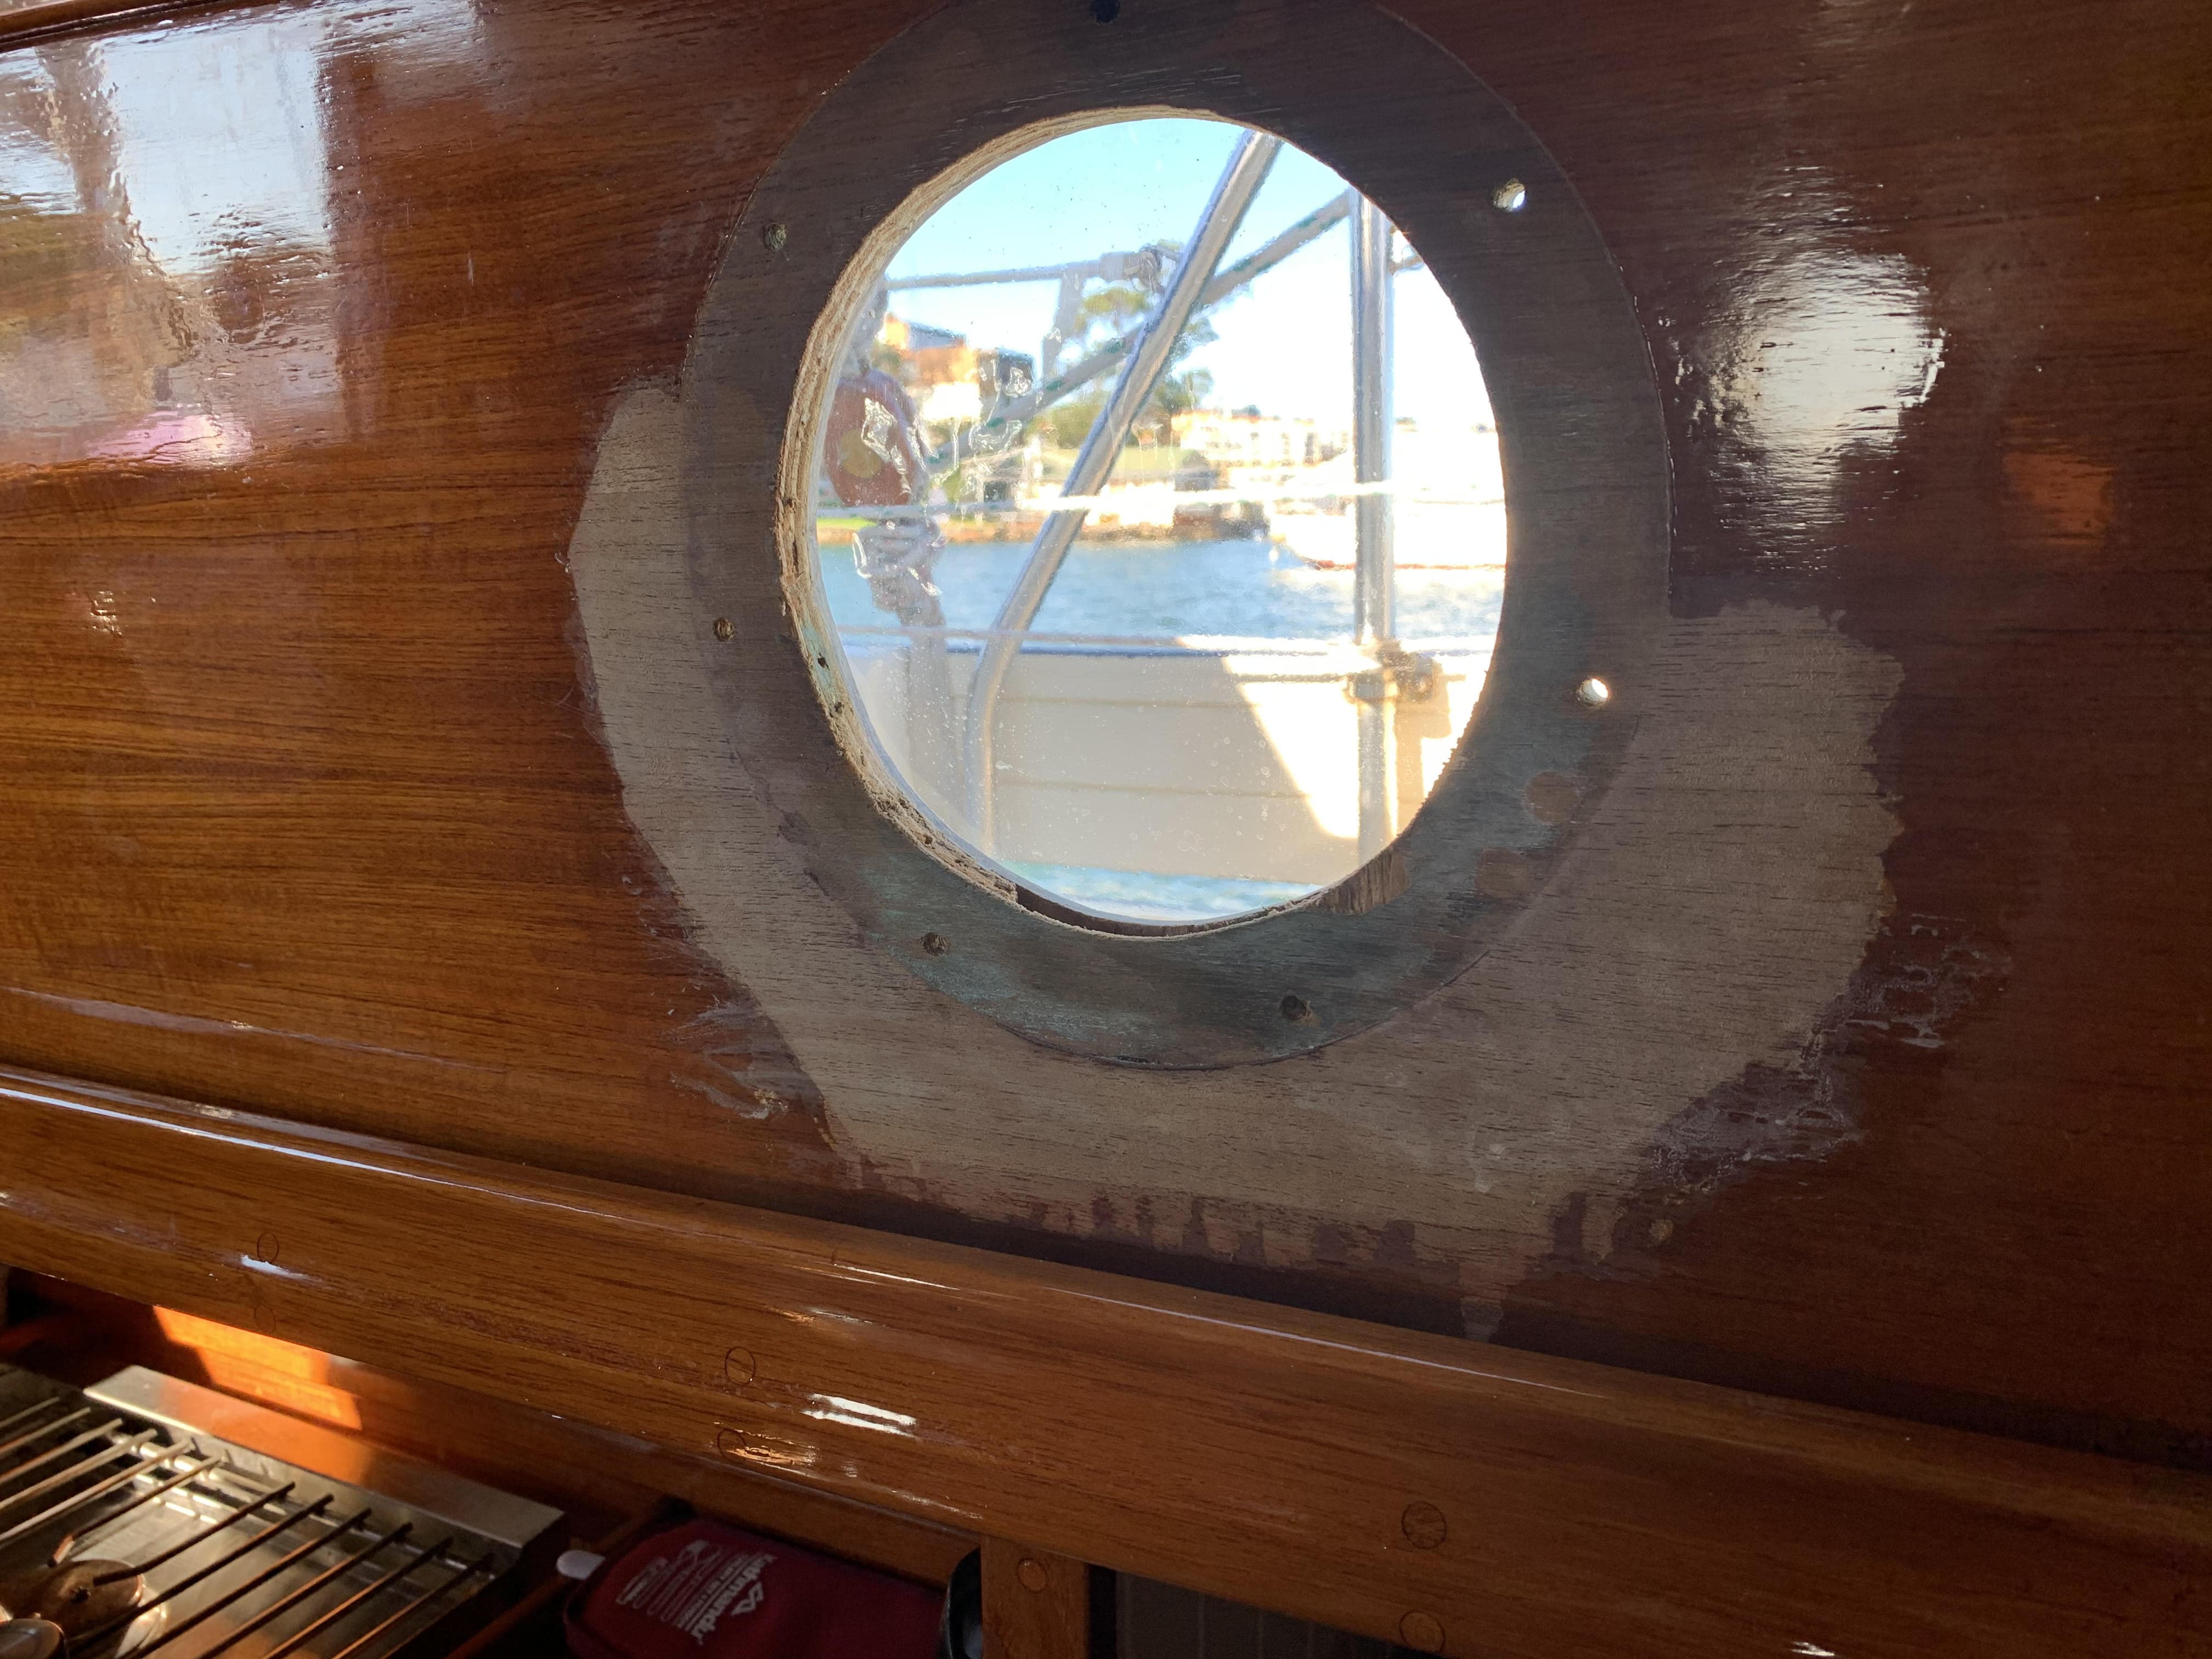
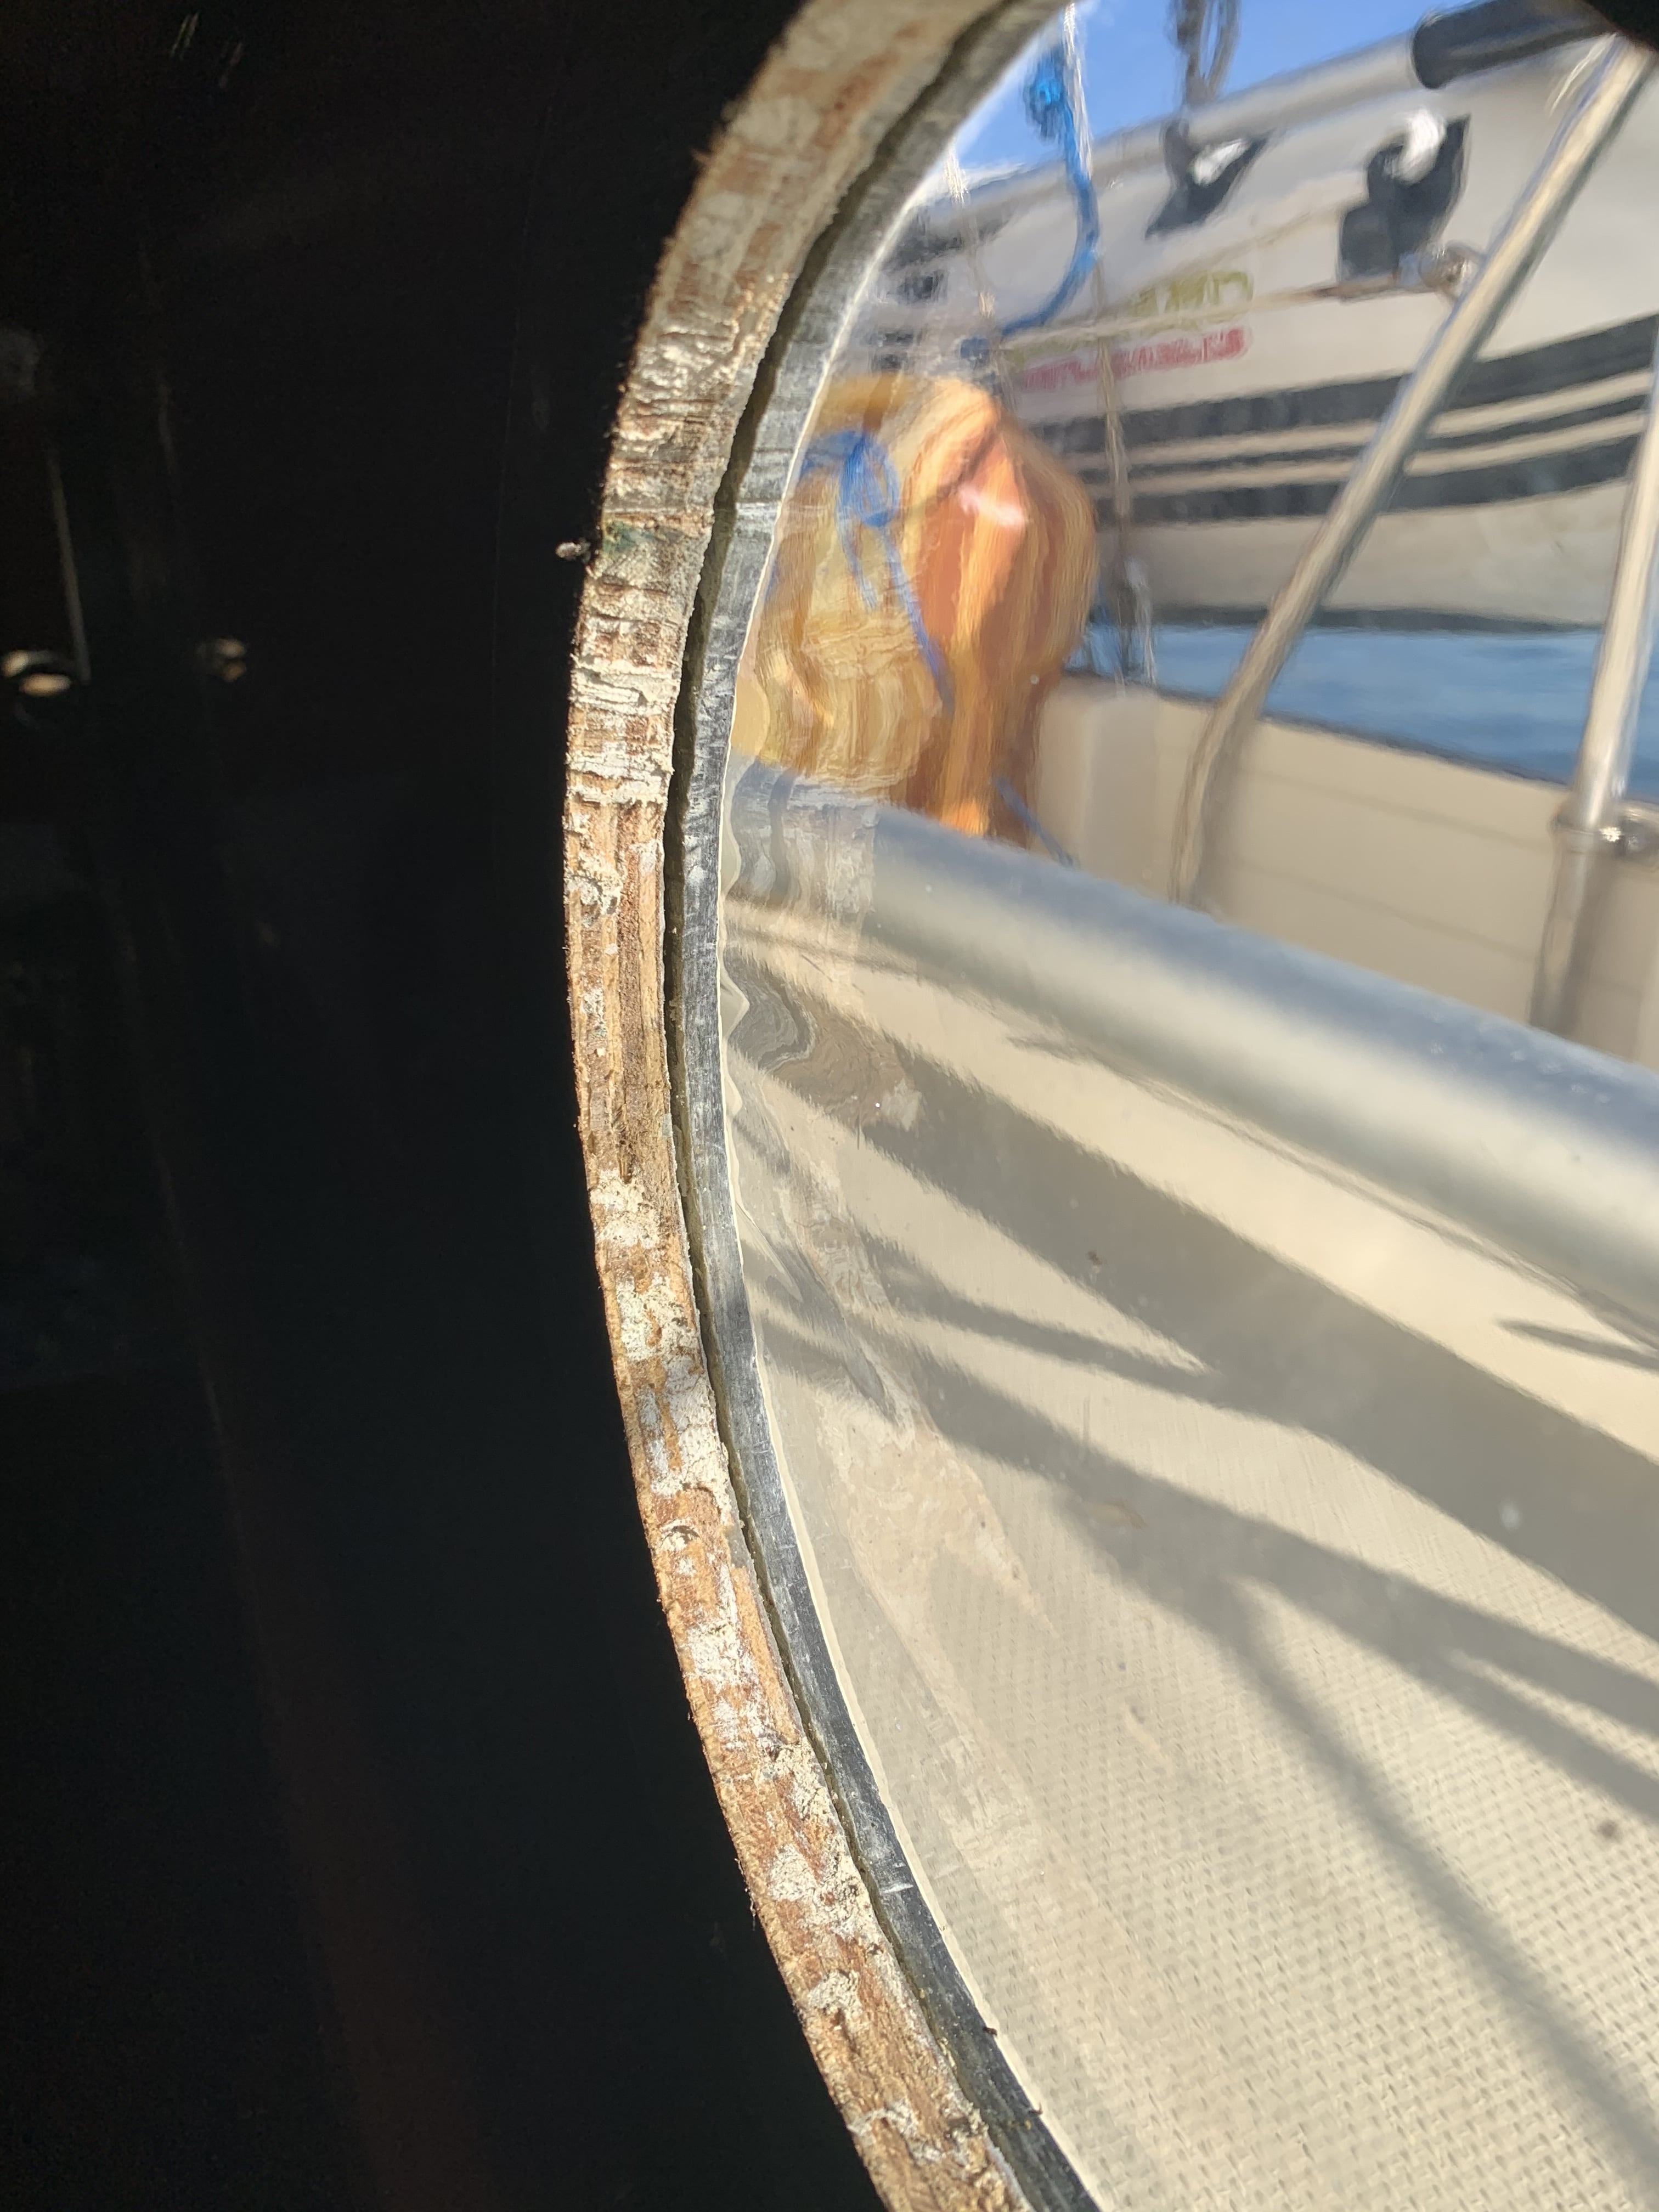
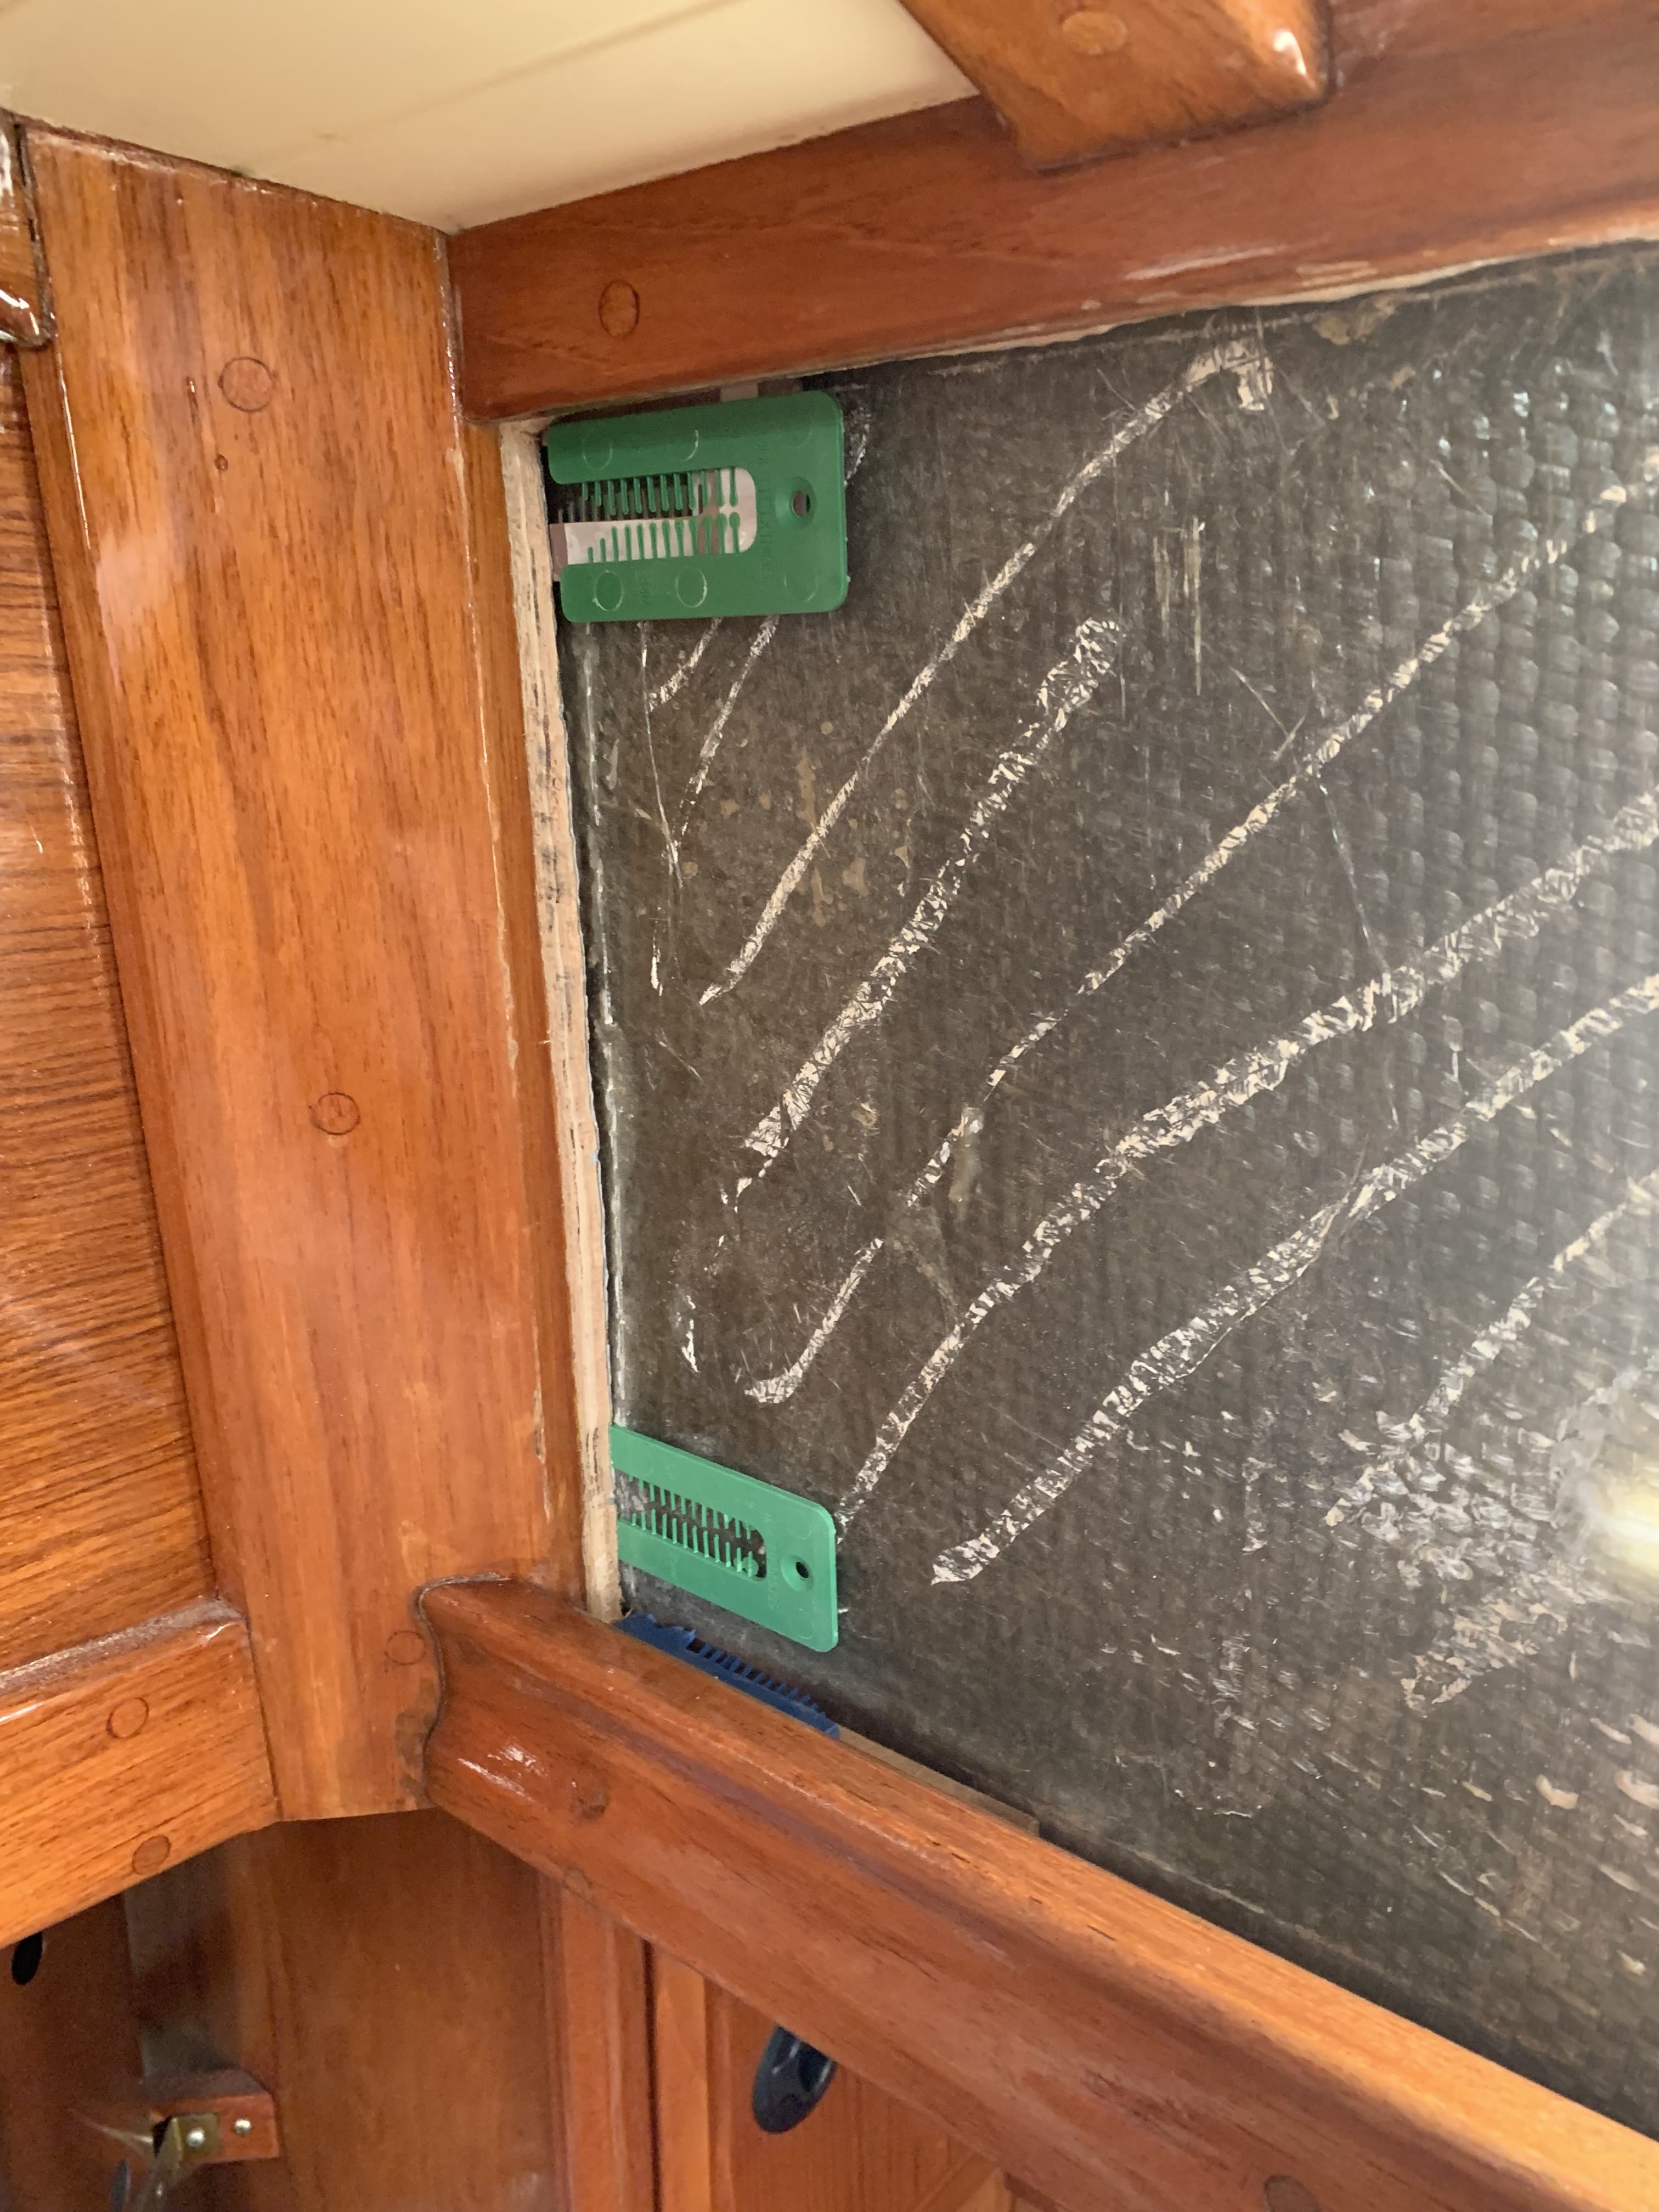
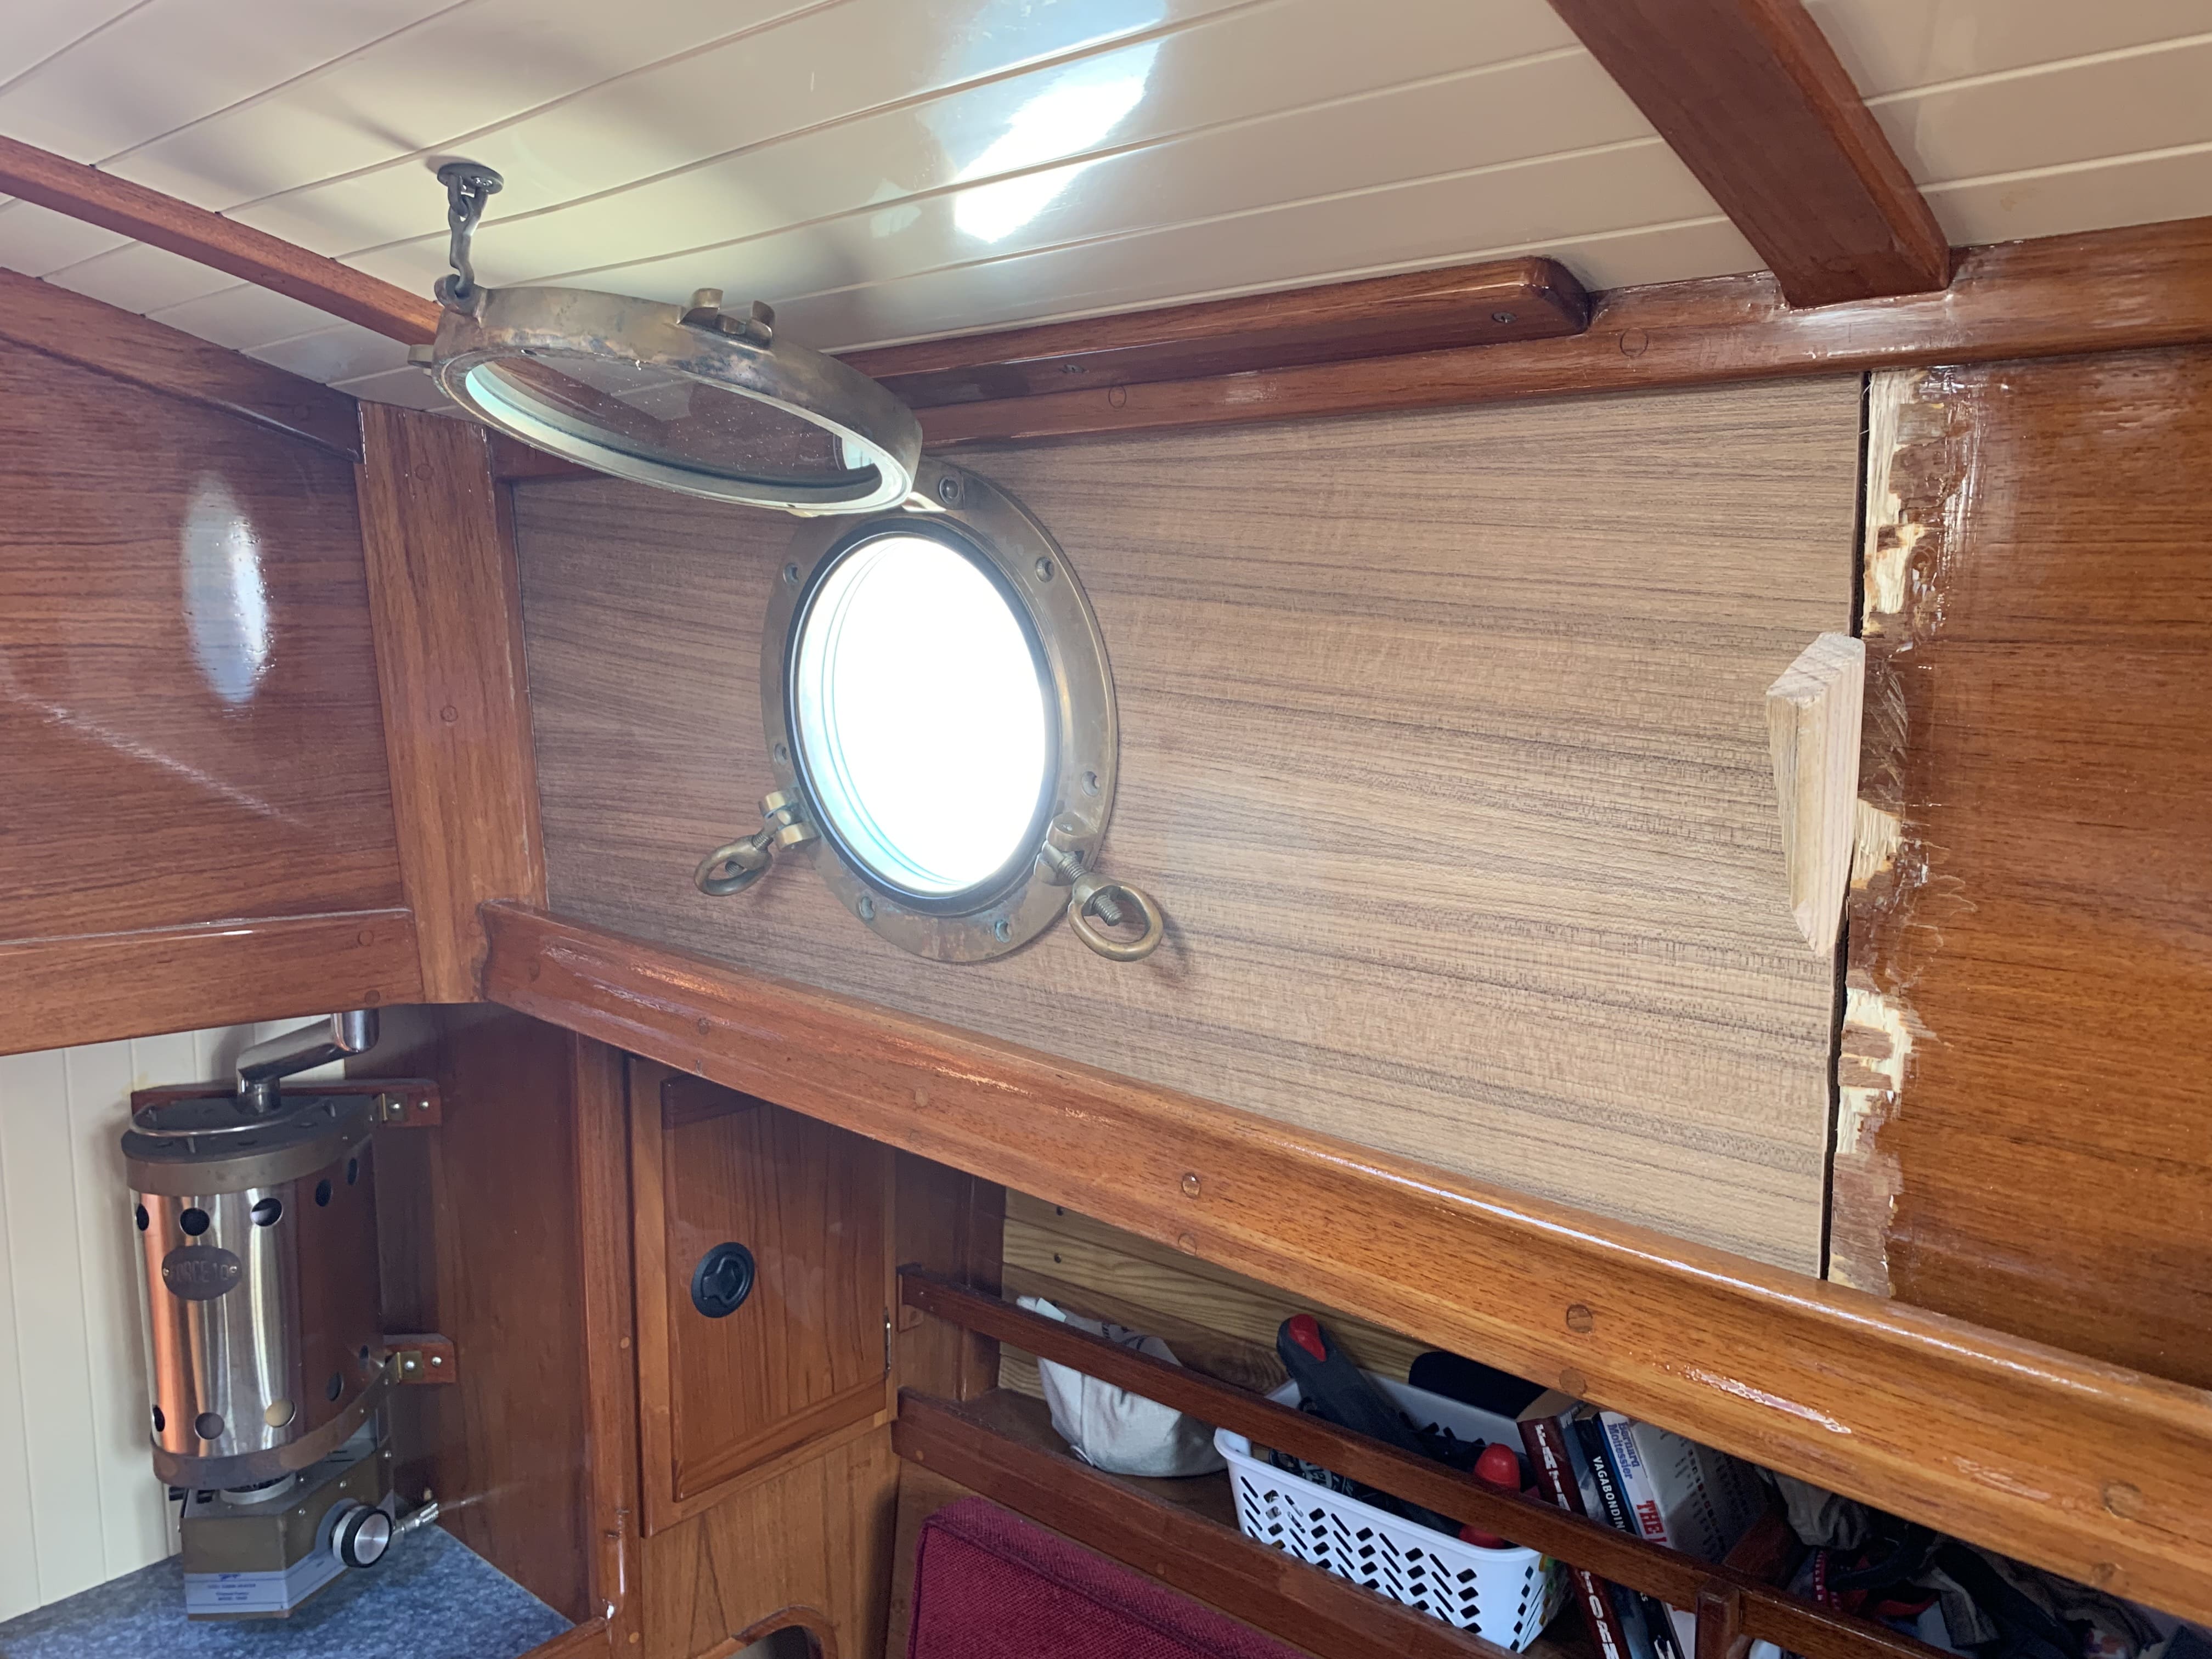
I hope I will be able to get some useful advice for an issue that is worrying me. I have some rot spreading in the plywood around the portholes.
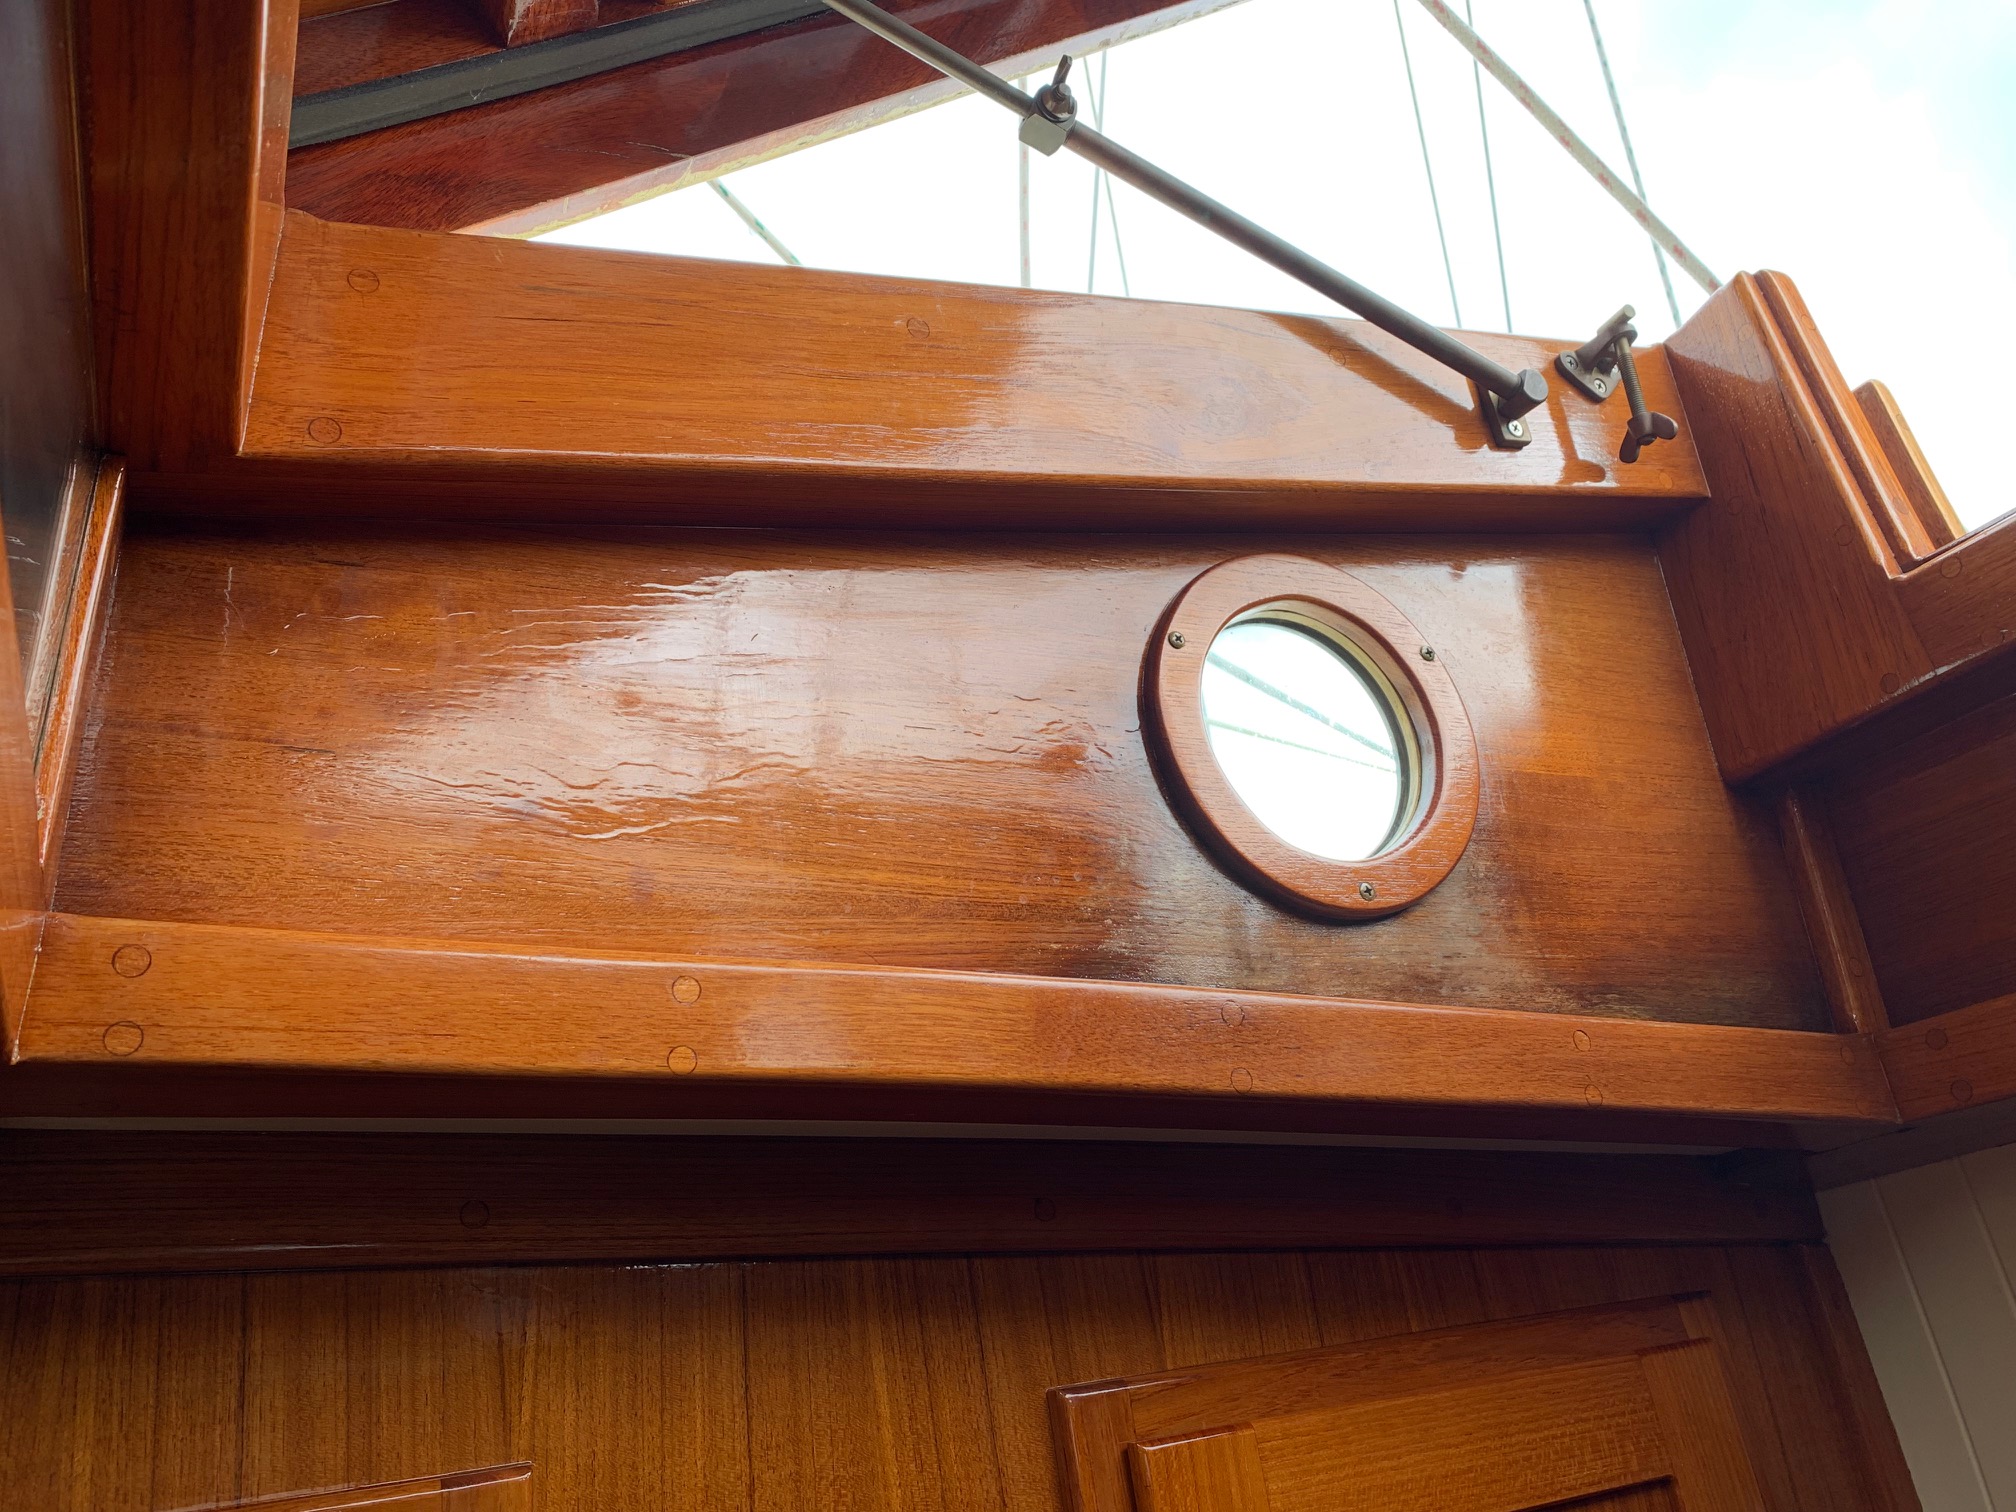
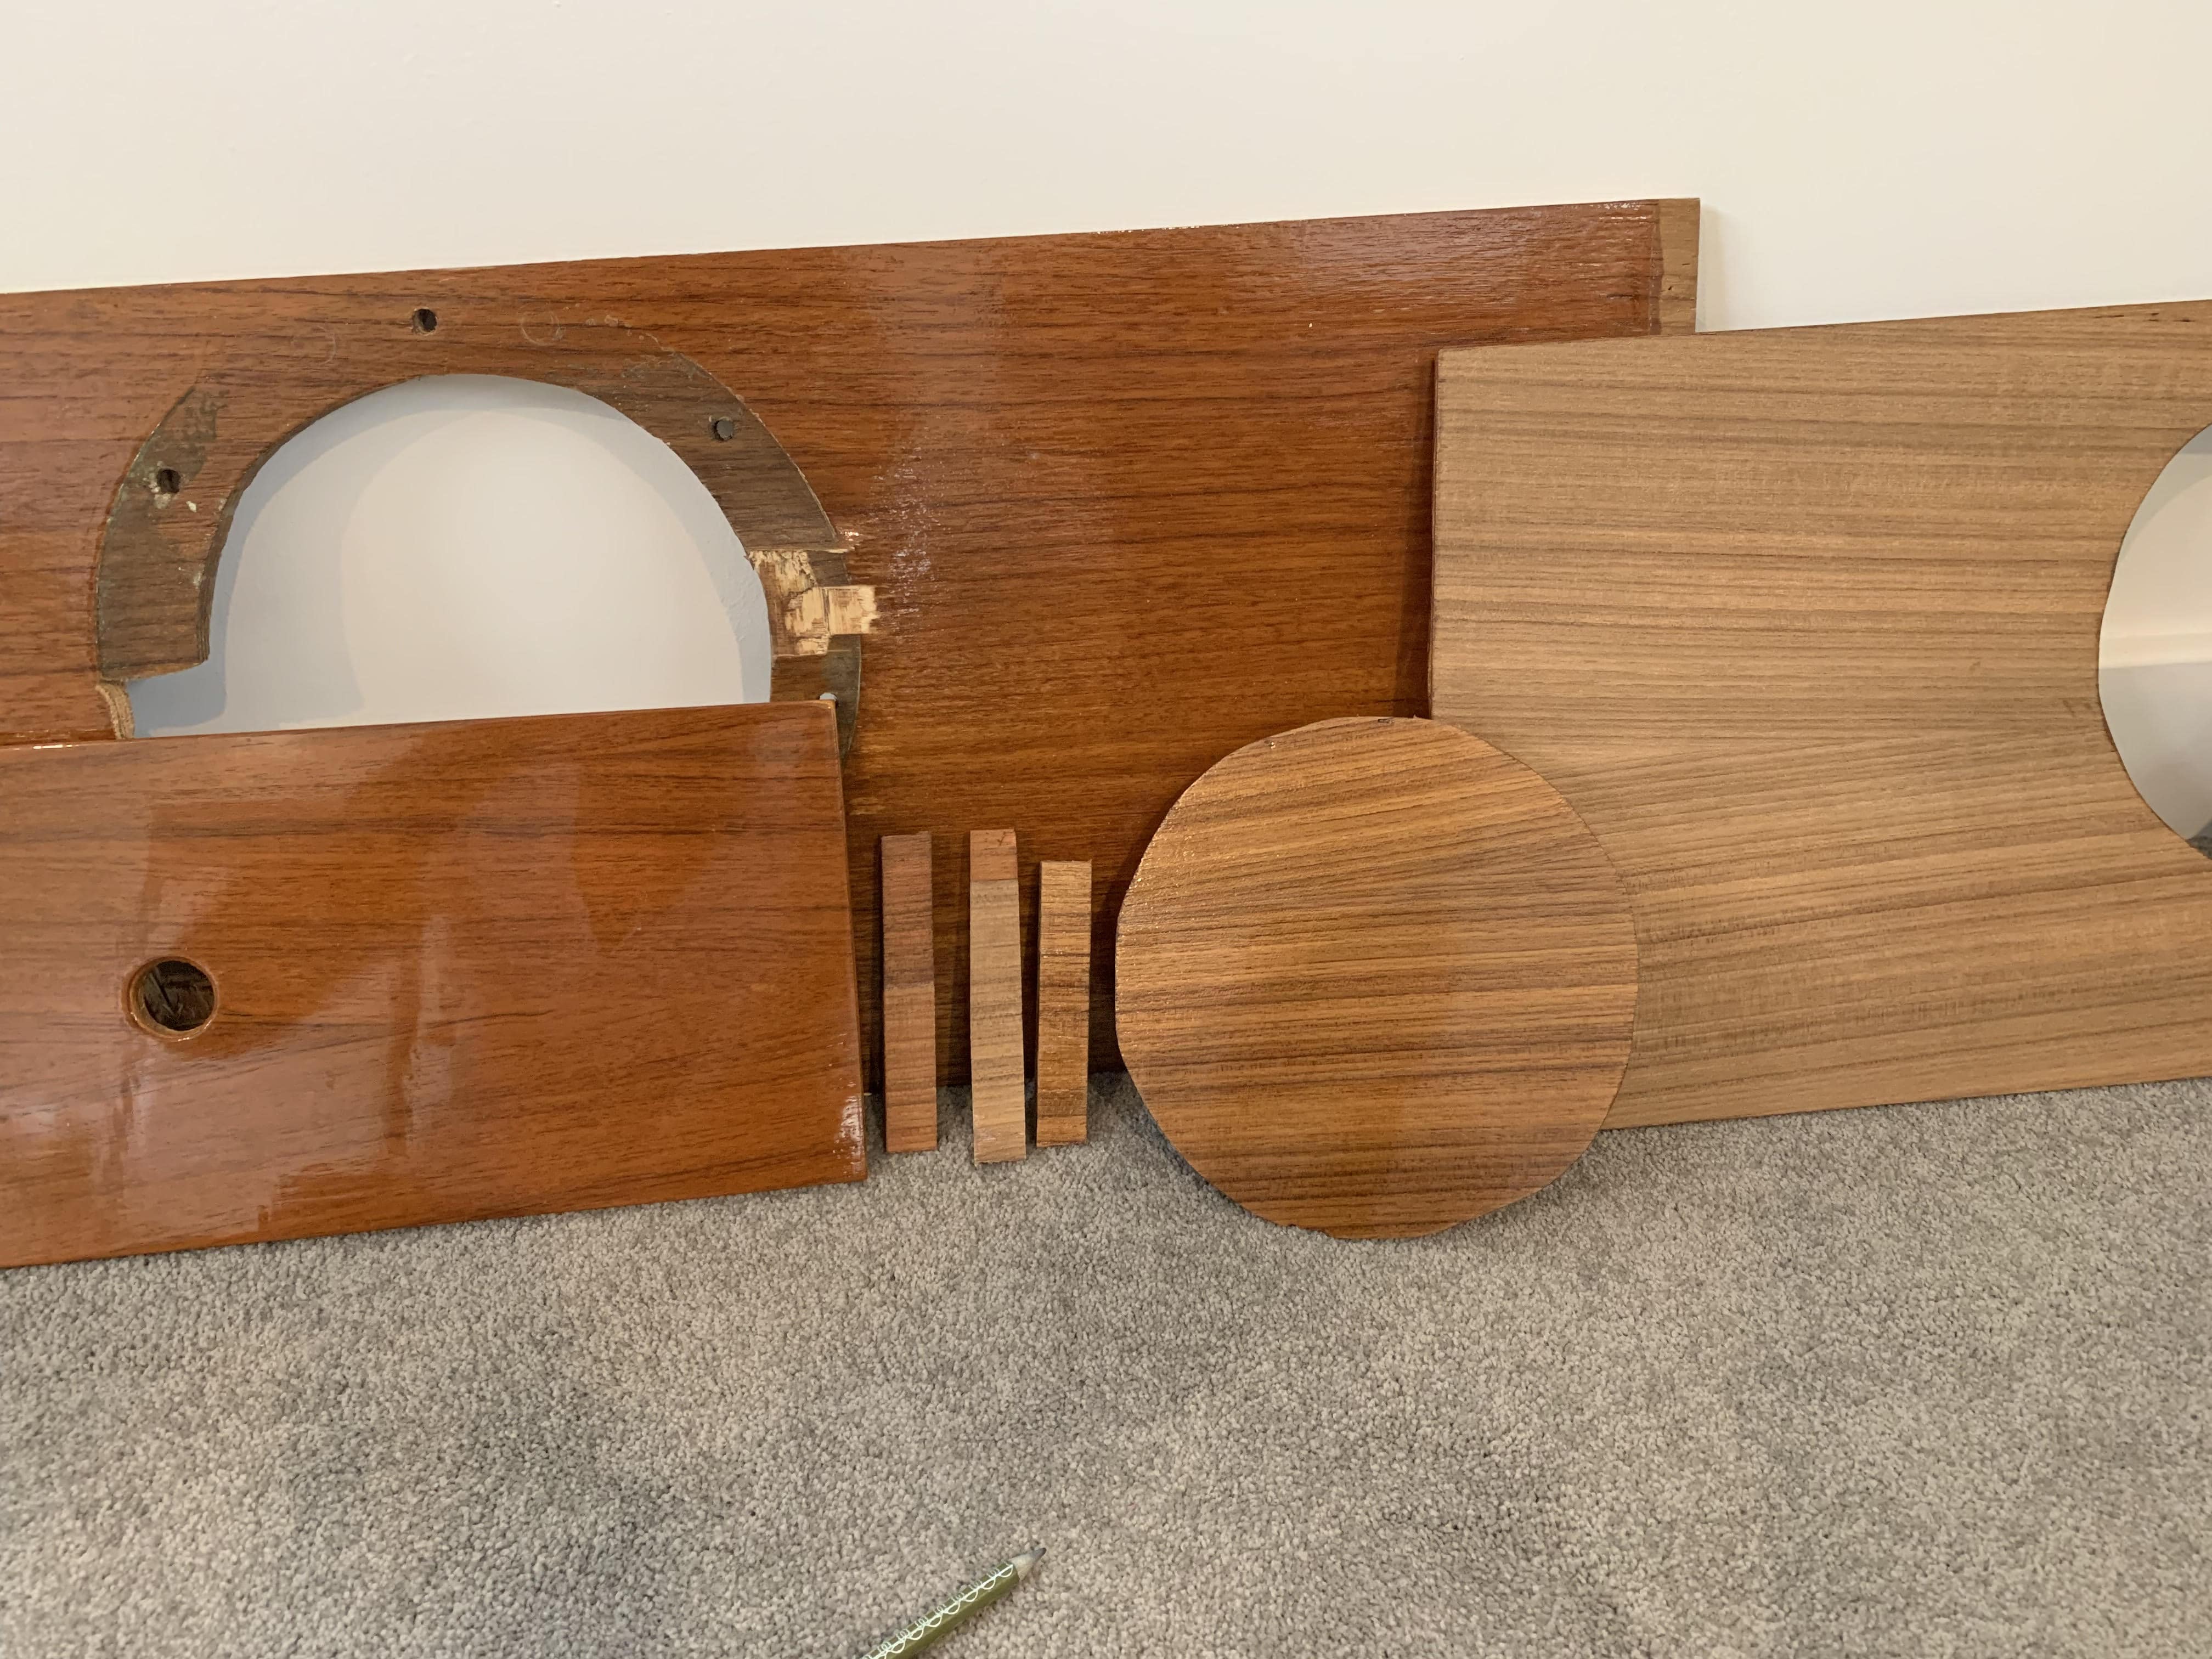
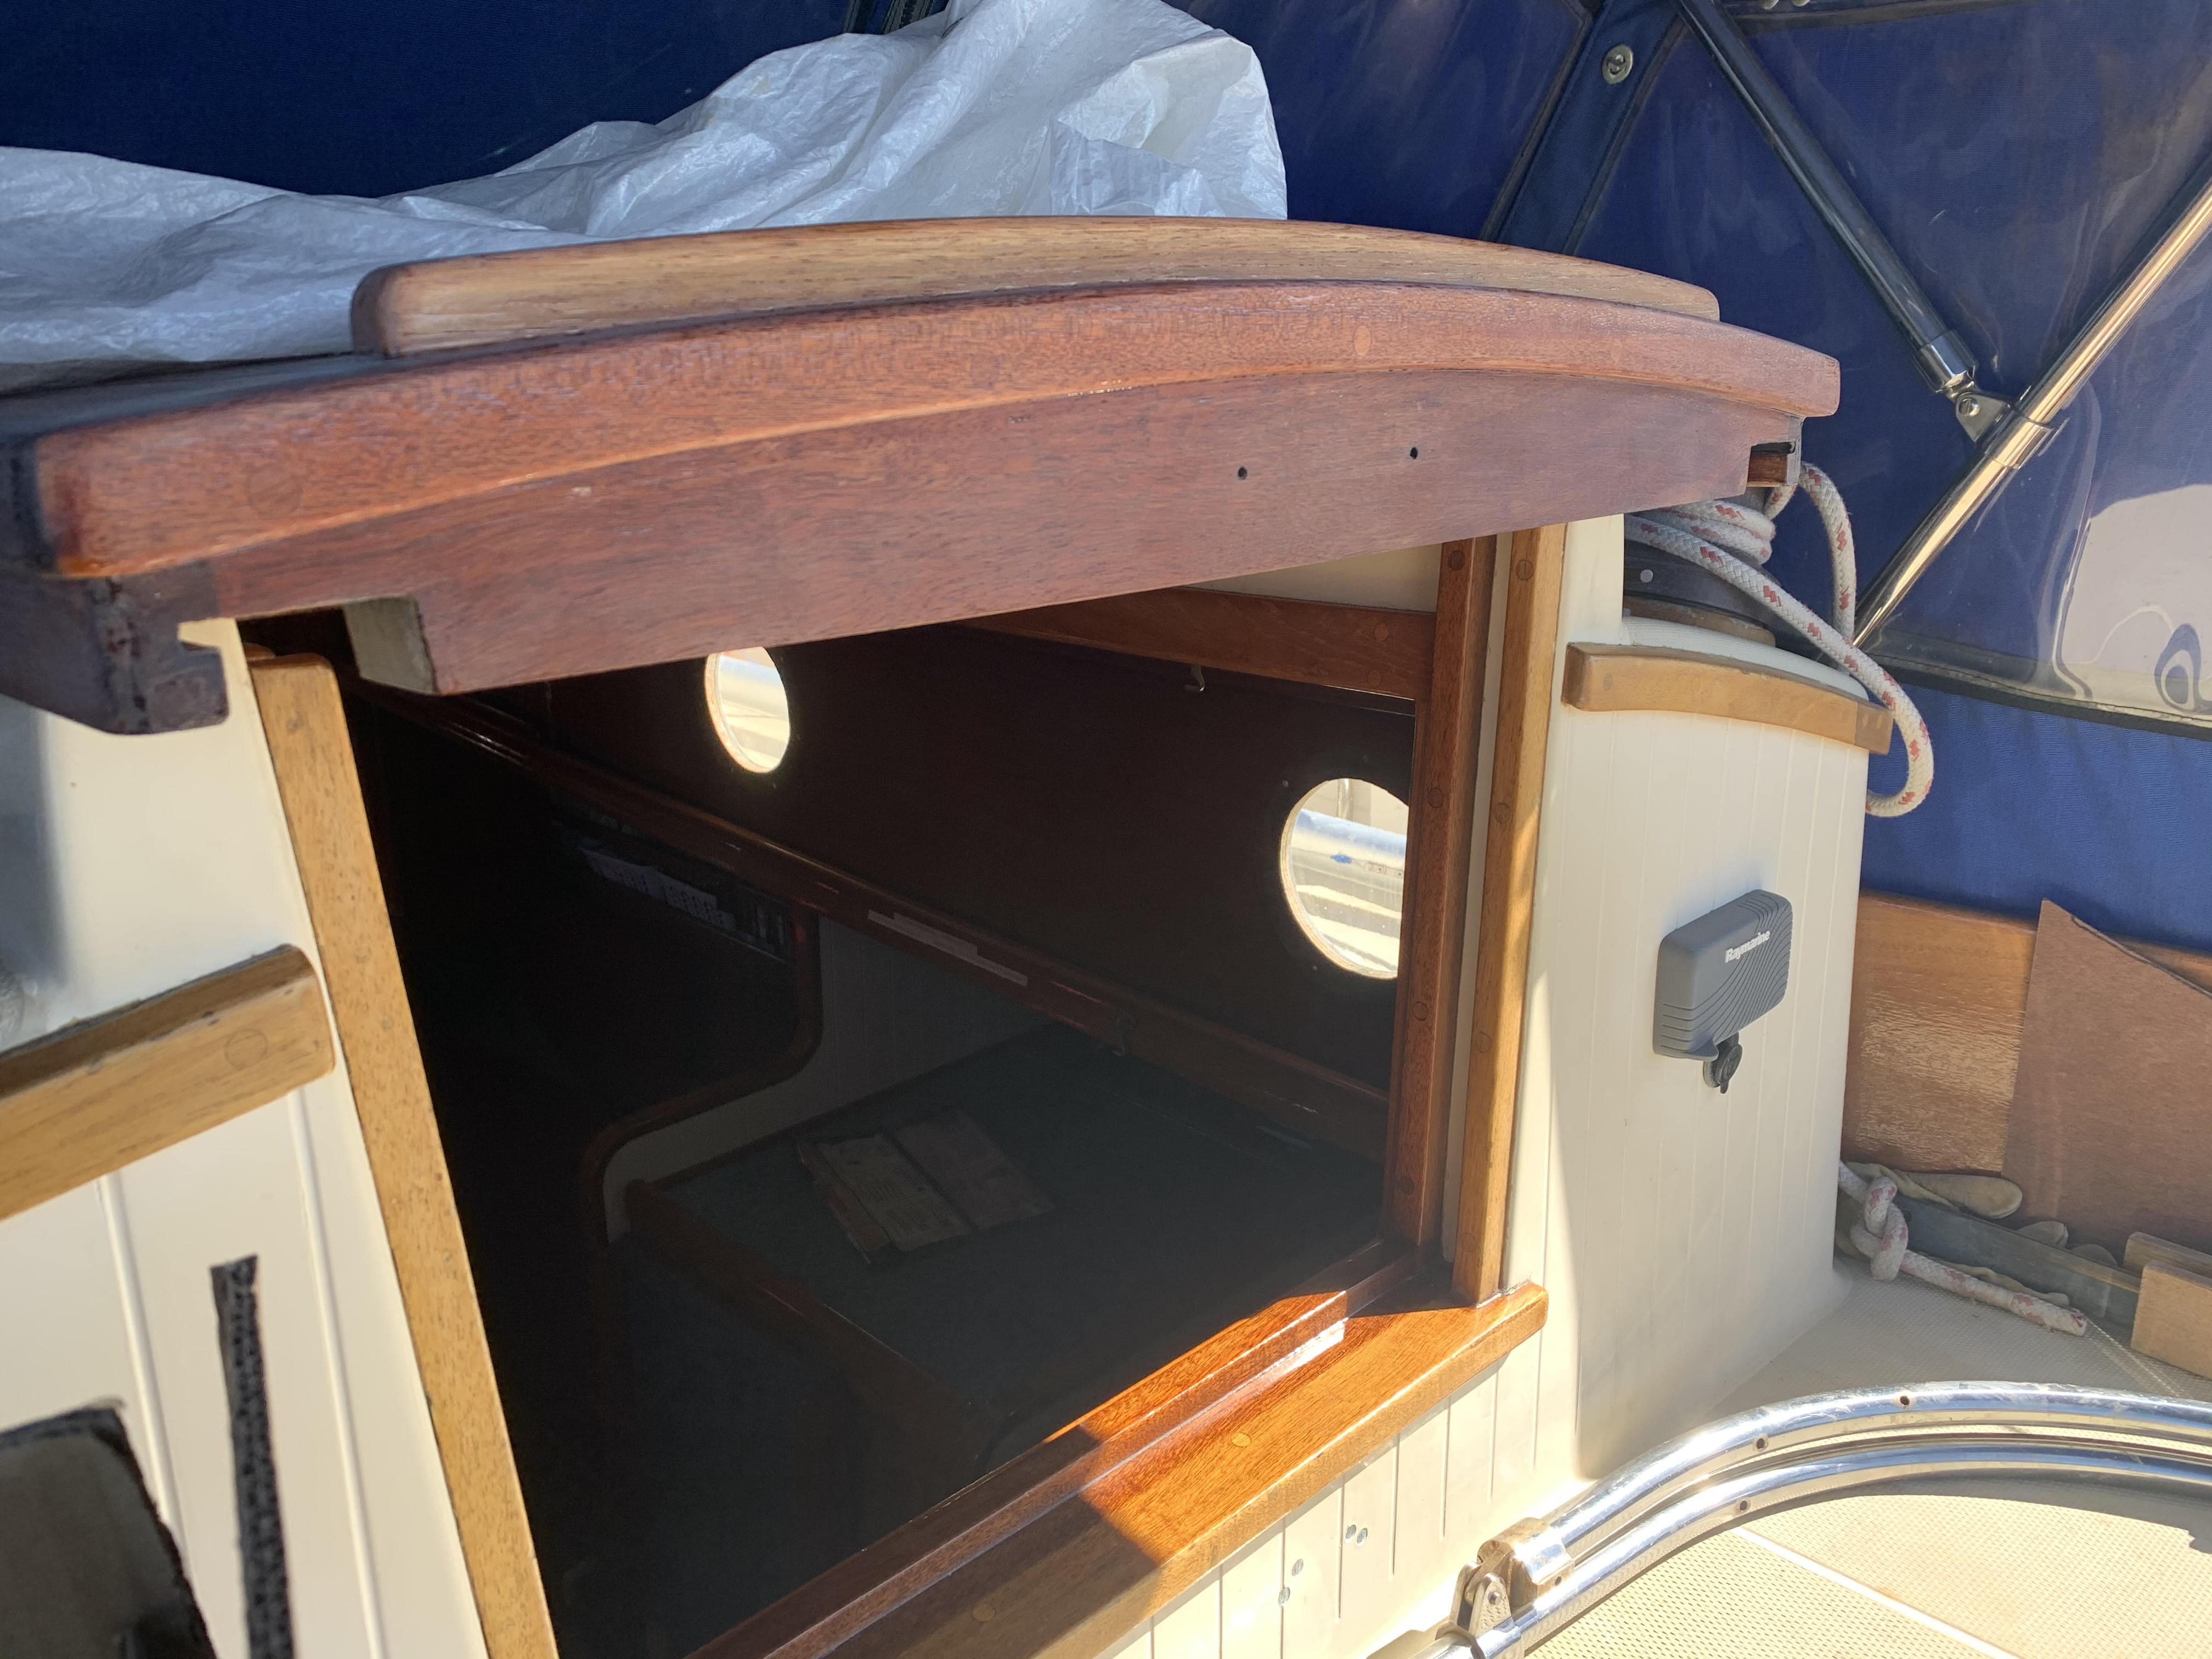
This is happening around 2 of the portholes, one in the main cabin, the other one in the forward cabin (fixed porthole). Another porthole in the main cabin might be starting to show similar signs of rot. I am attaching some pictures to this post.
The wood is soft and wet, especially around the porthole in the main cabin.

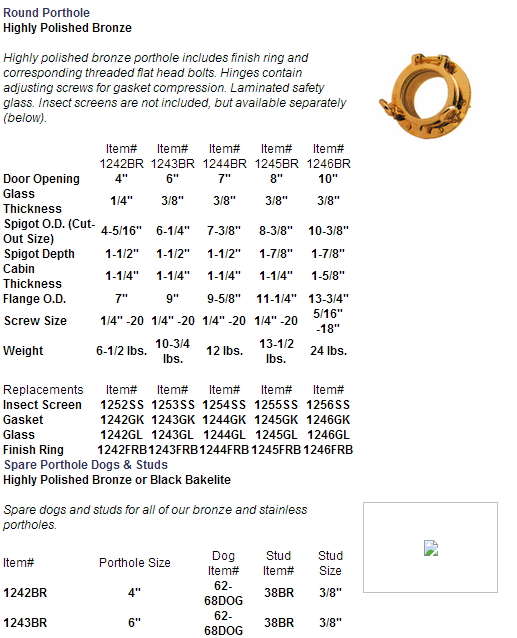
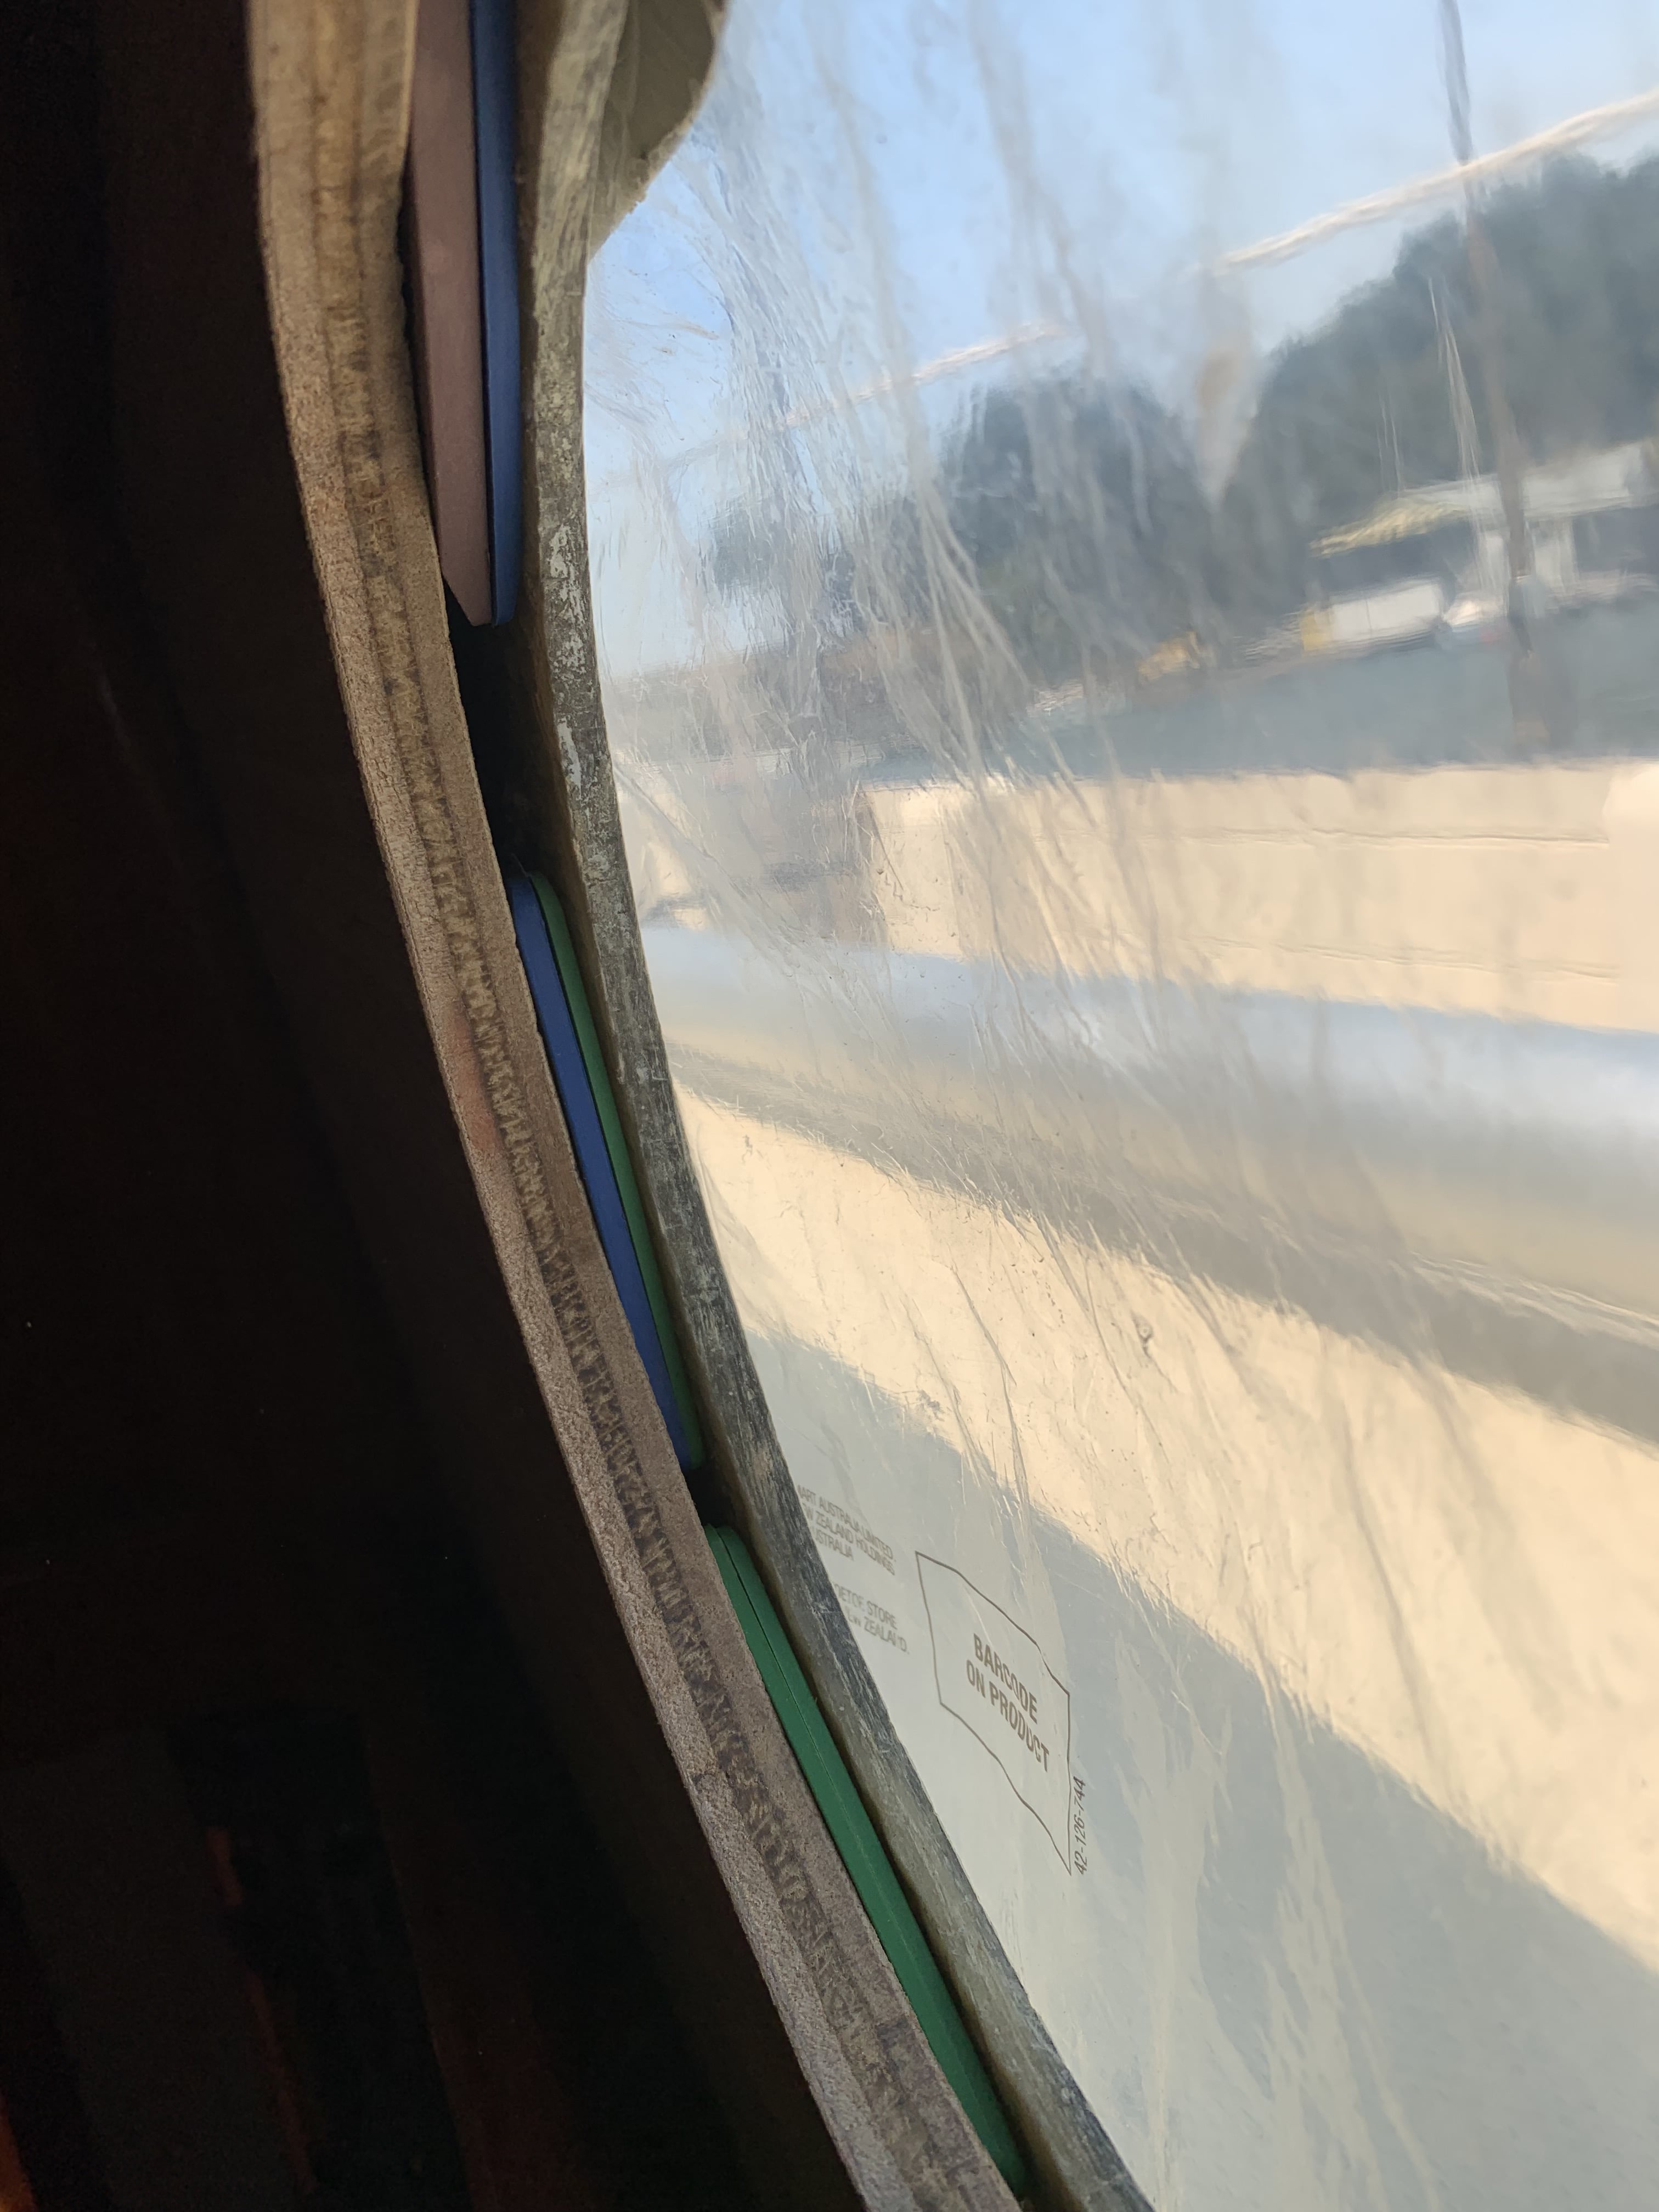
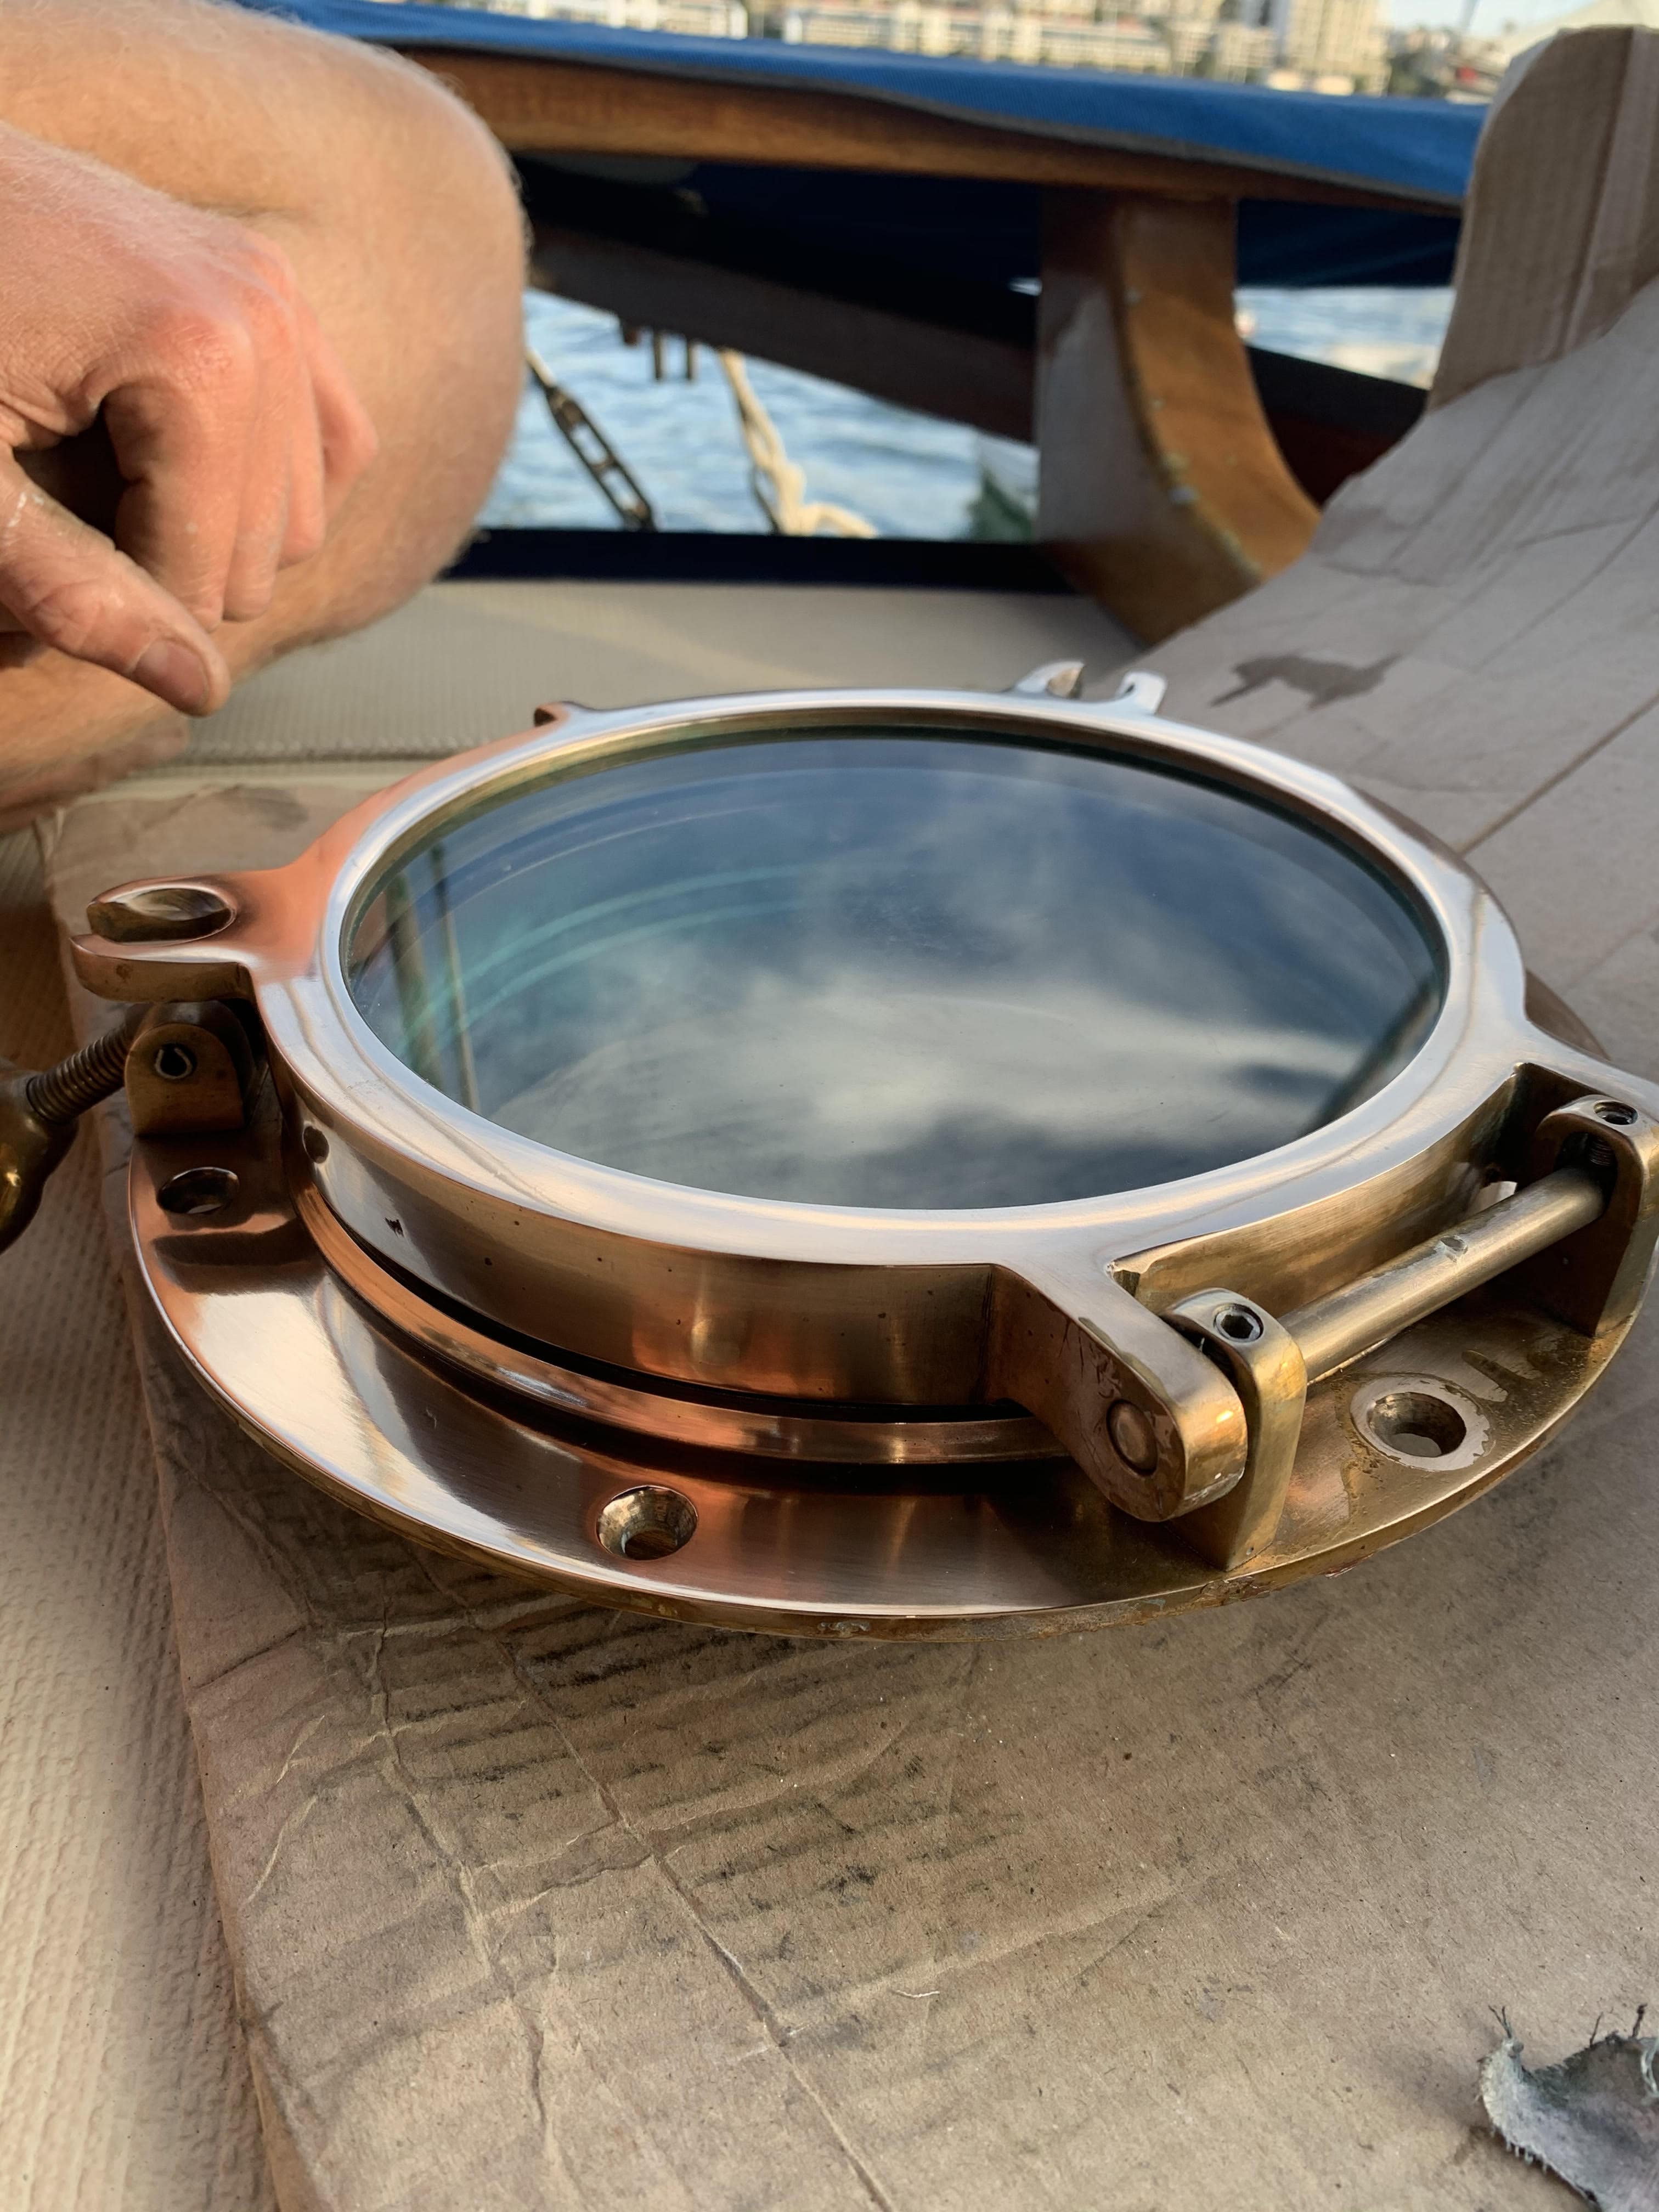
To stop the leaks, I ordered material to replace the old gaskets and I plan to rebed the portholes.

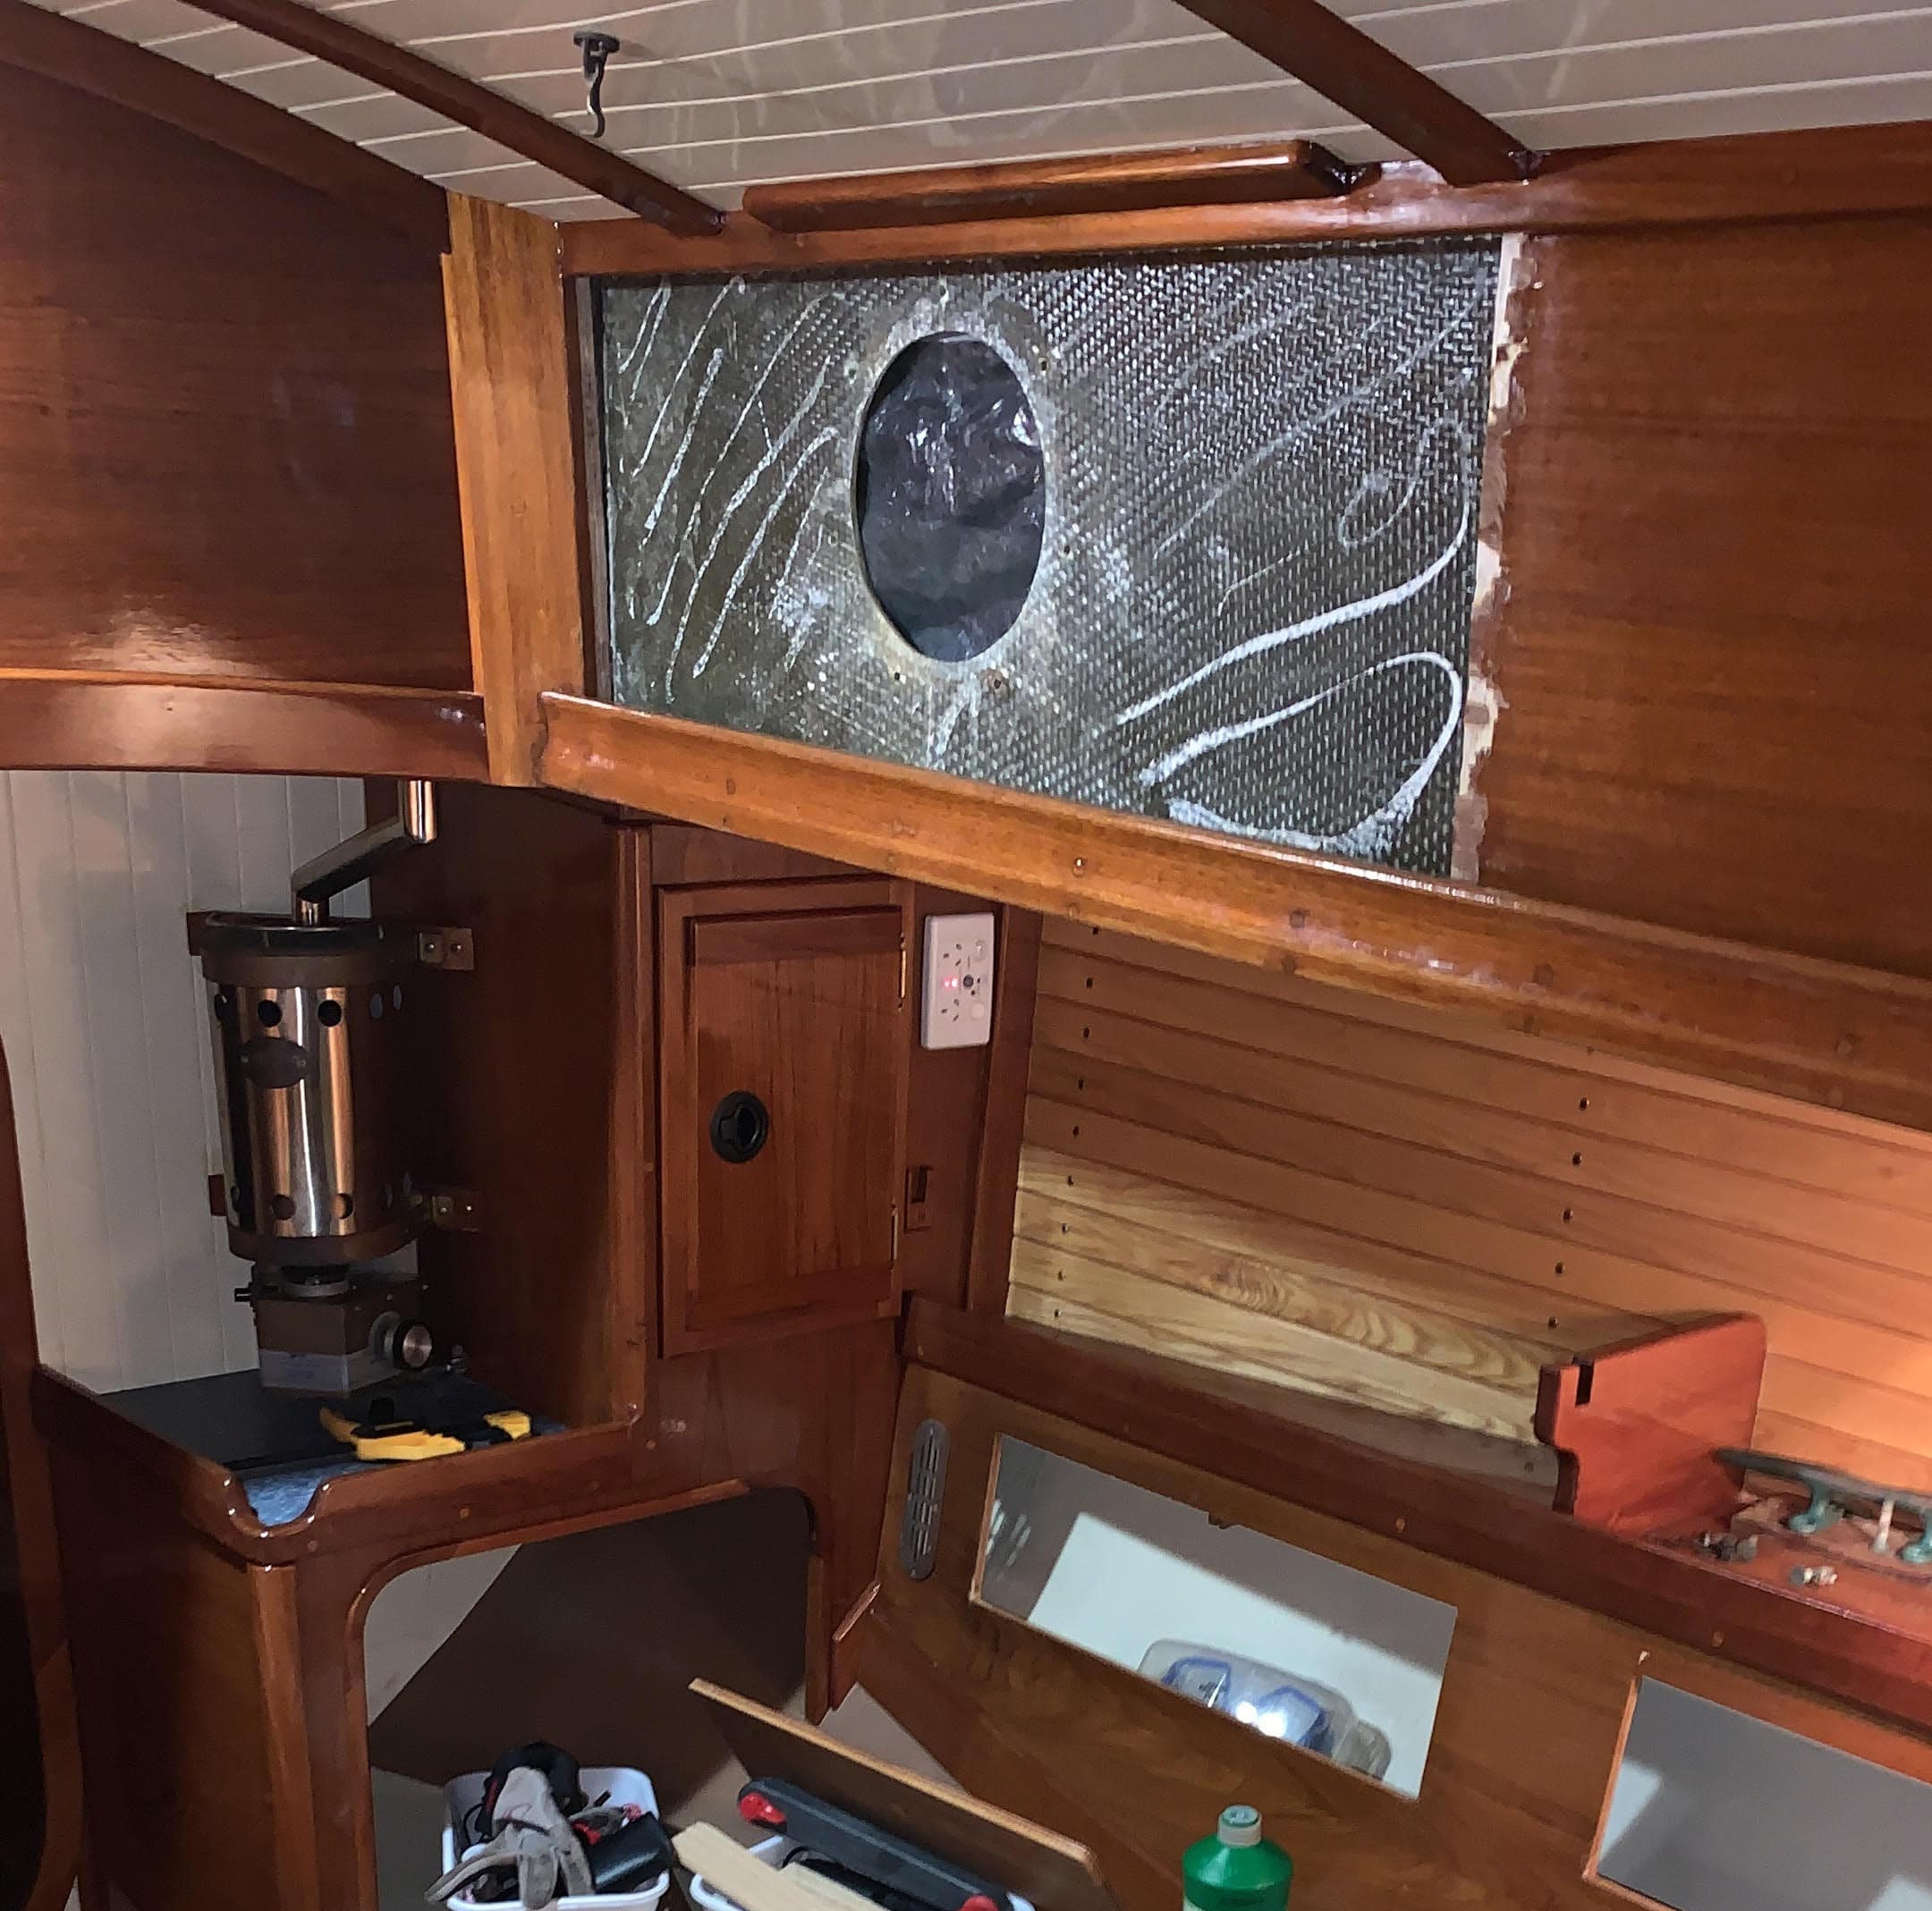
I suppose that the best course of action is to replace the plywood panels entirely, to avoid the rot from spreading to other parts of the boat.
I am wondering, however, how big and how difficult of a job that is.

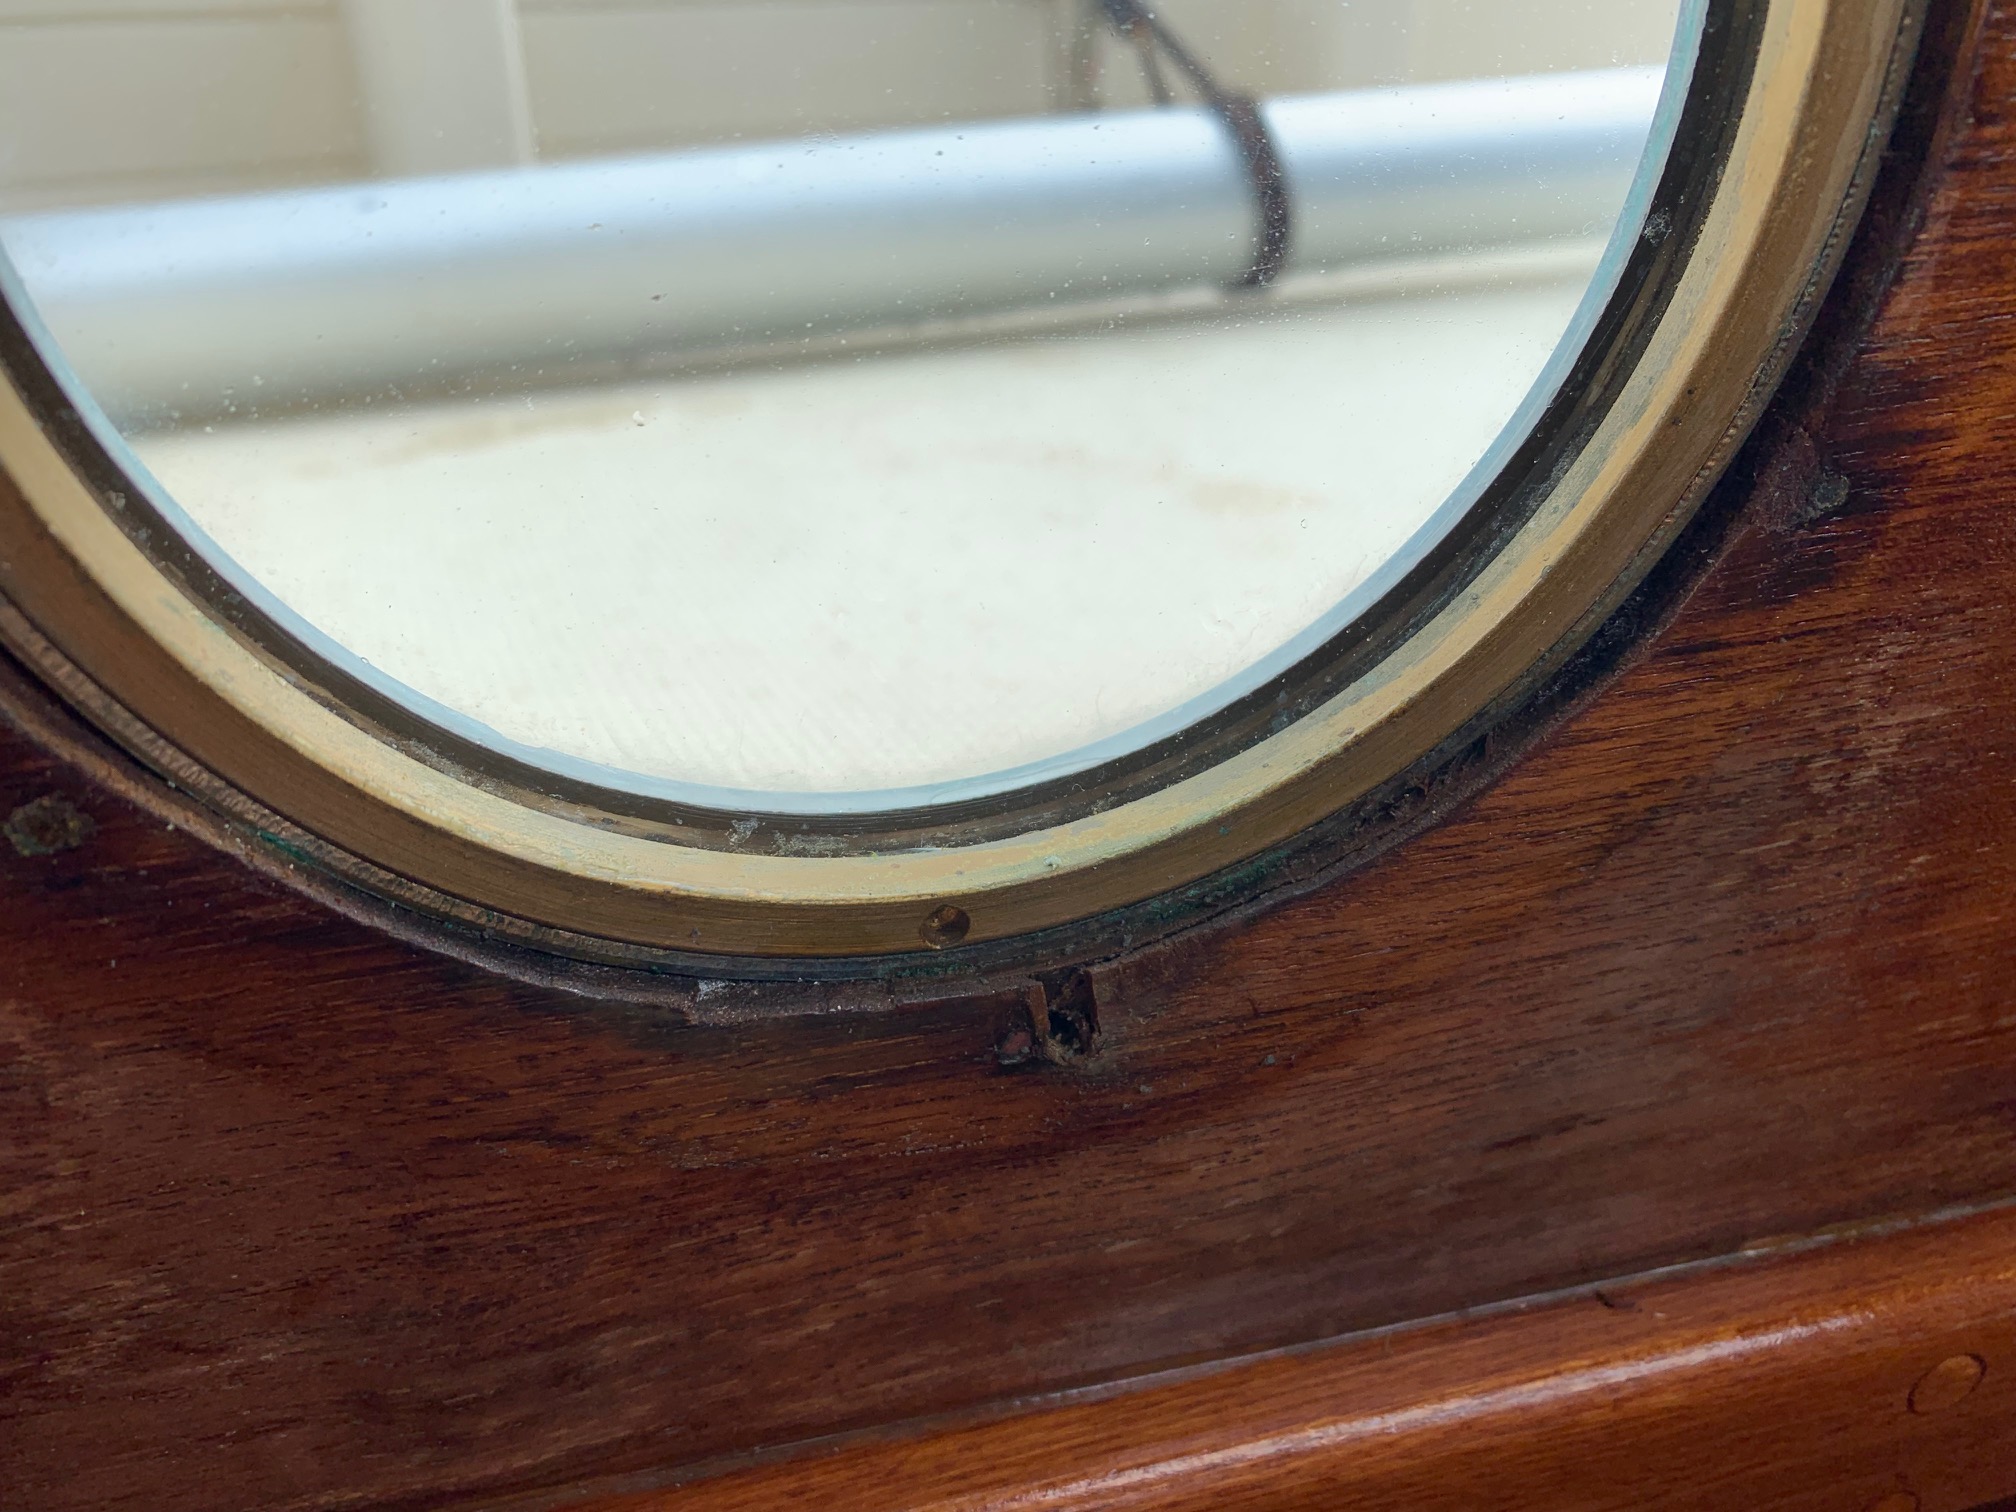
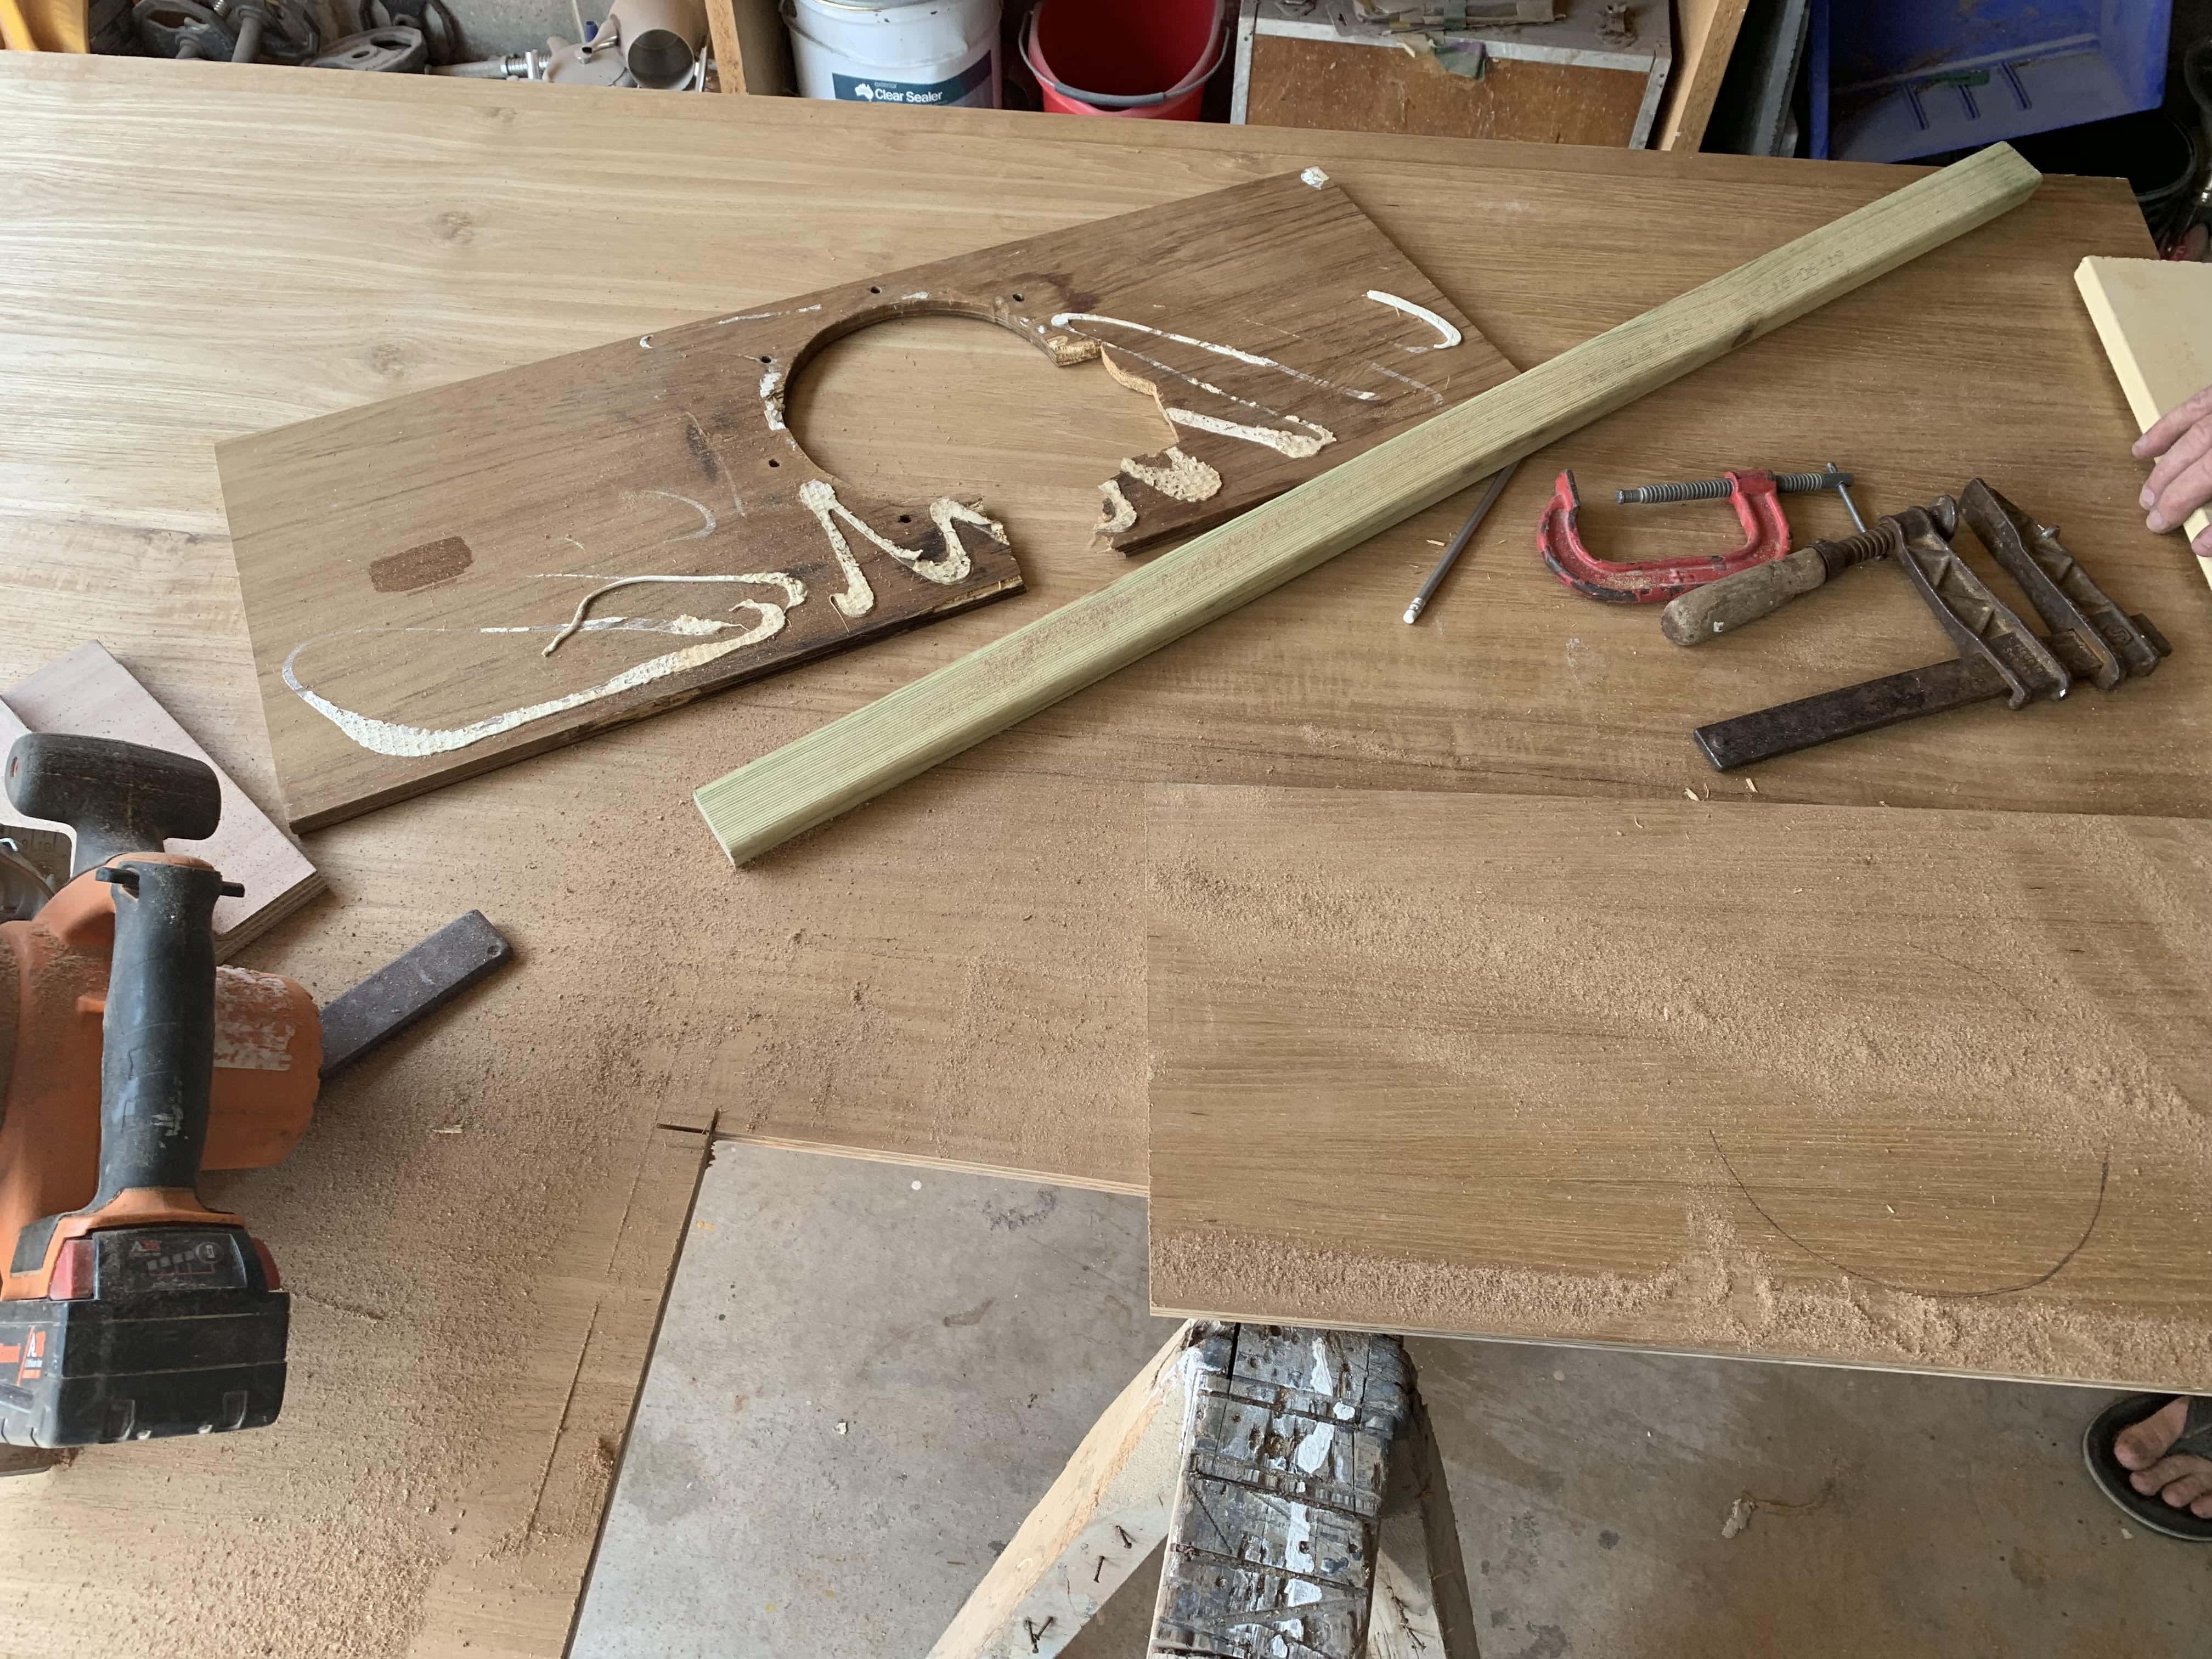
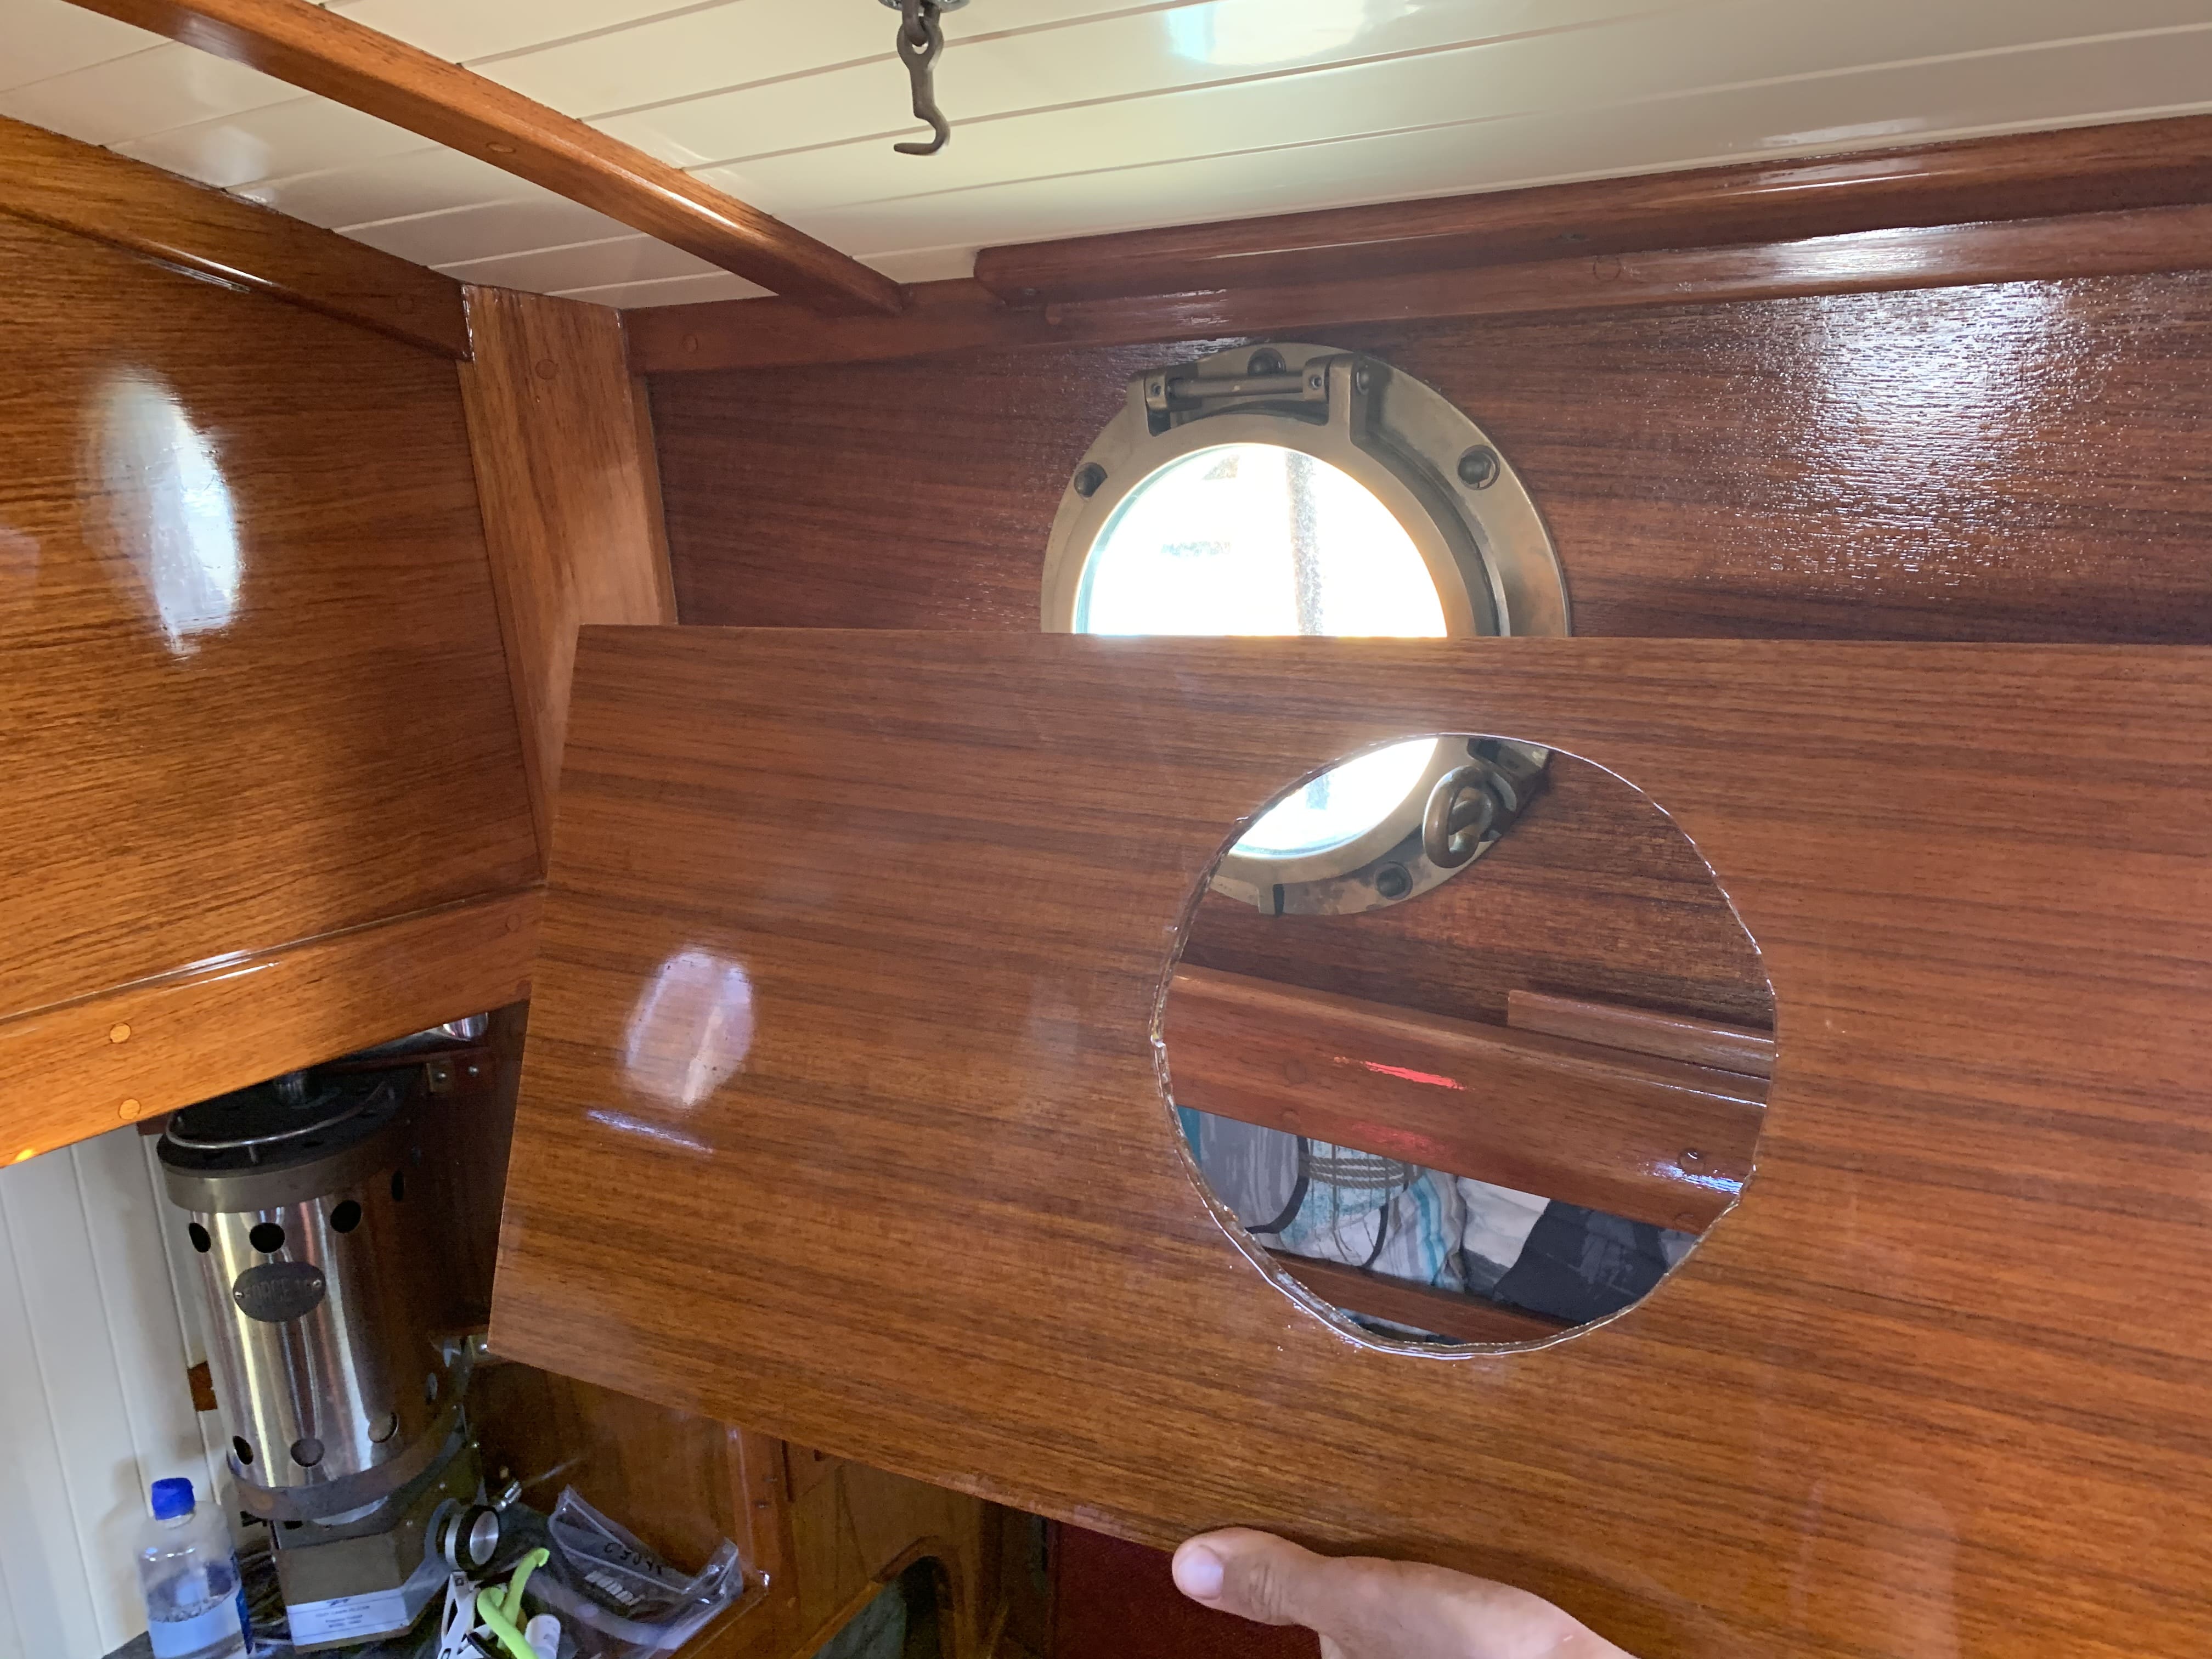
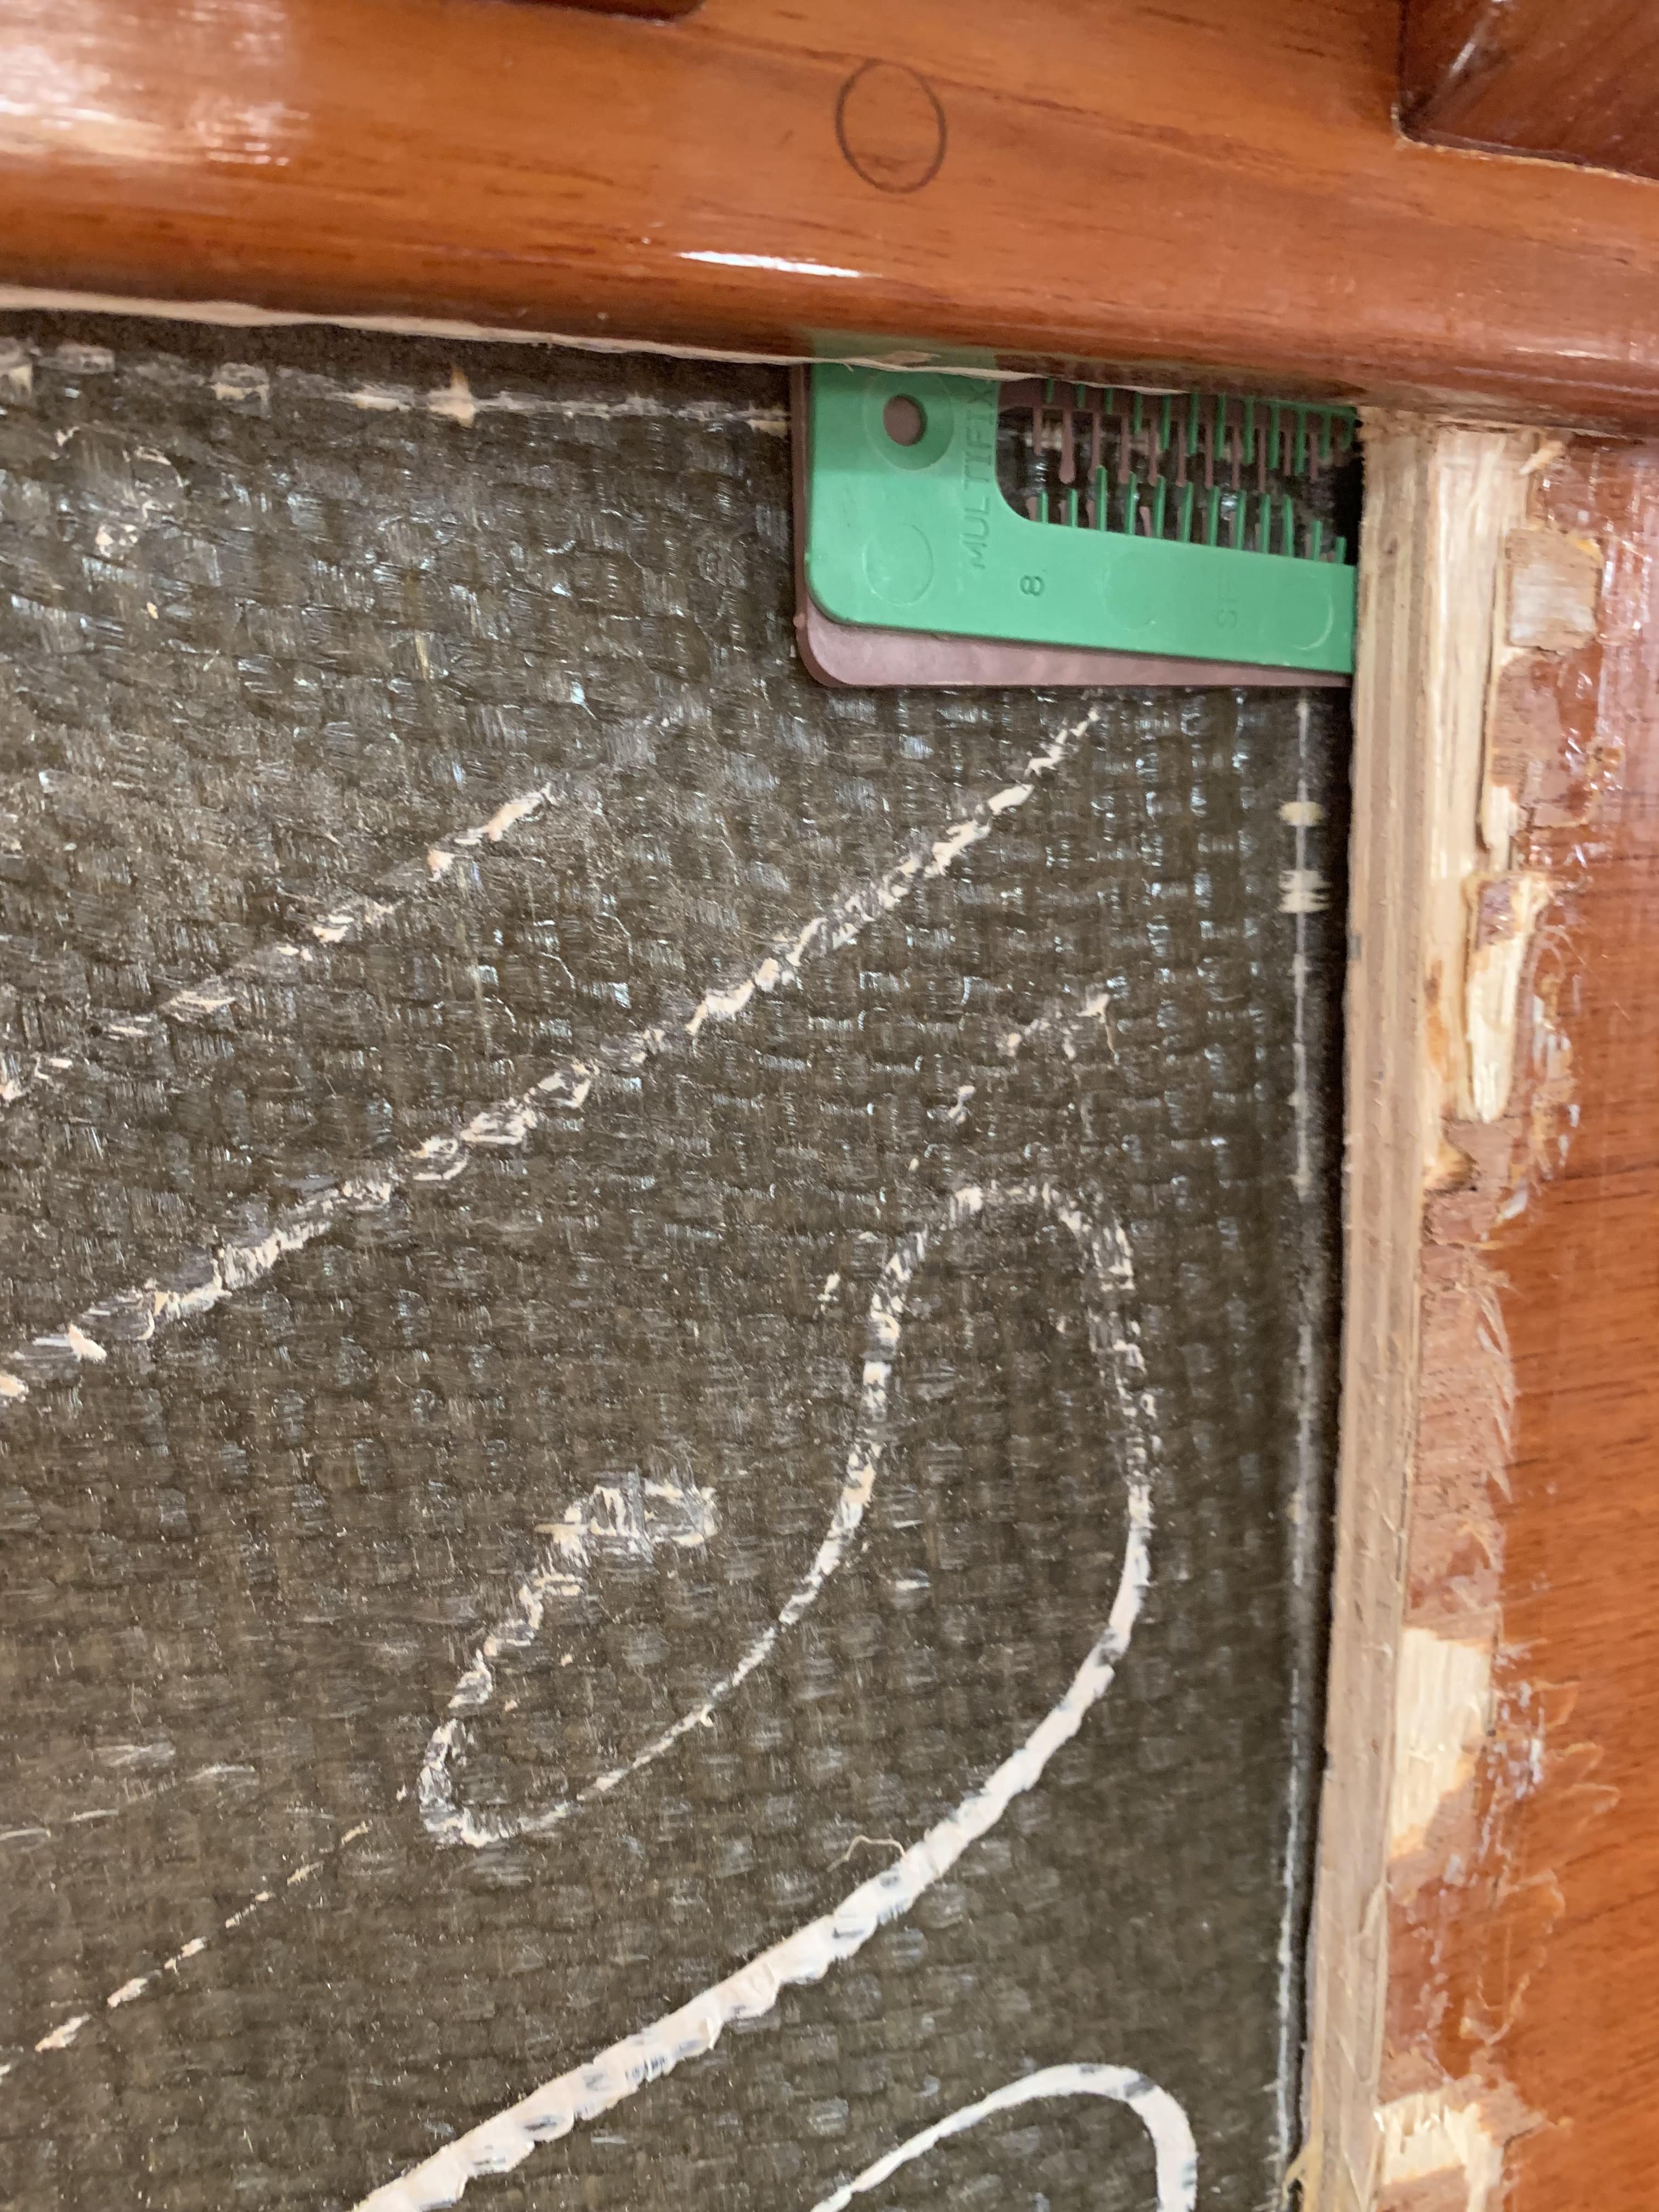
I removed the bit of wood that covers the junction between the smaller side panel forward and the bigger one aft. Unfortunately, it was strongly glued to the ‘good’ panel, and it took some of it away (see picture). Once replaced, the damage will sit under that bit of wood though, so not visible.
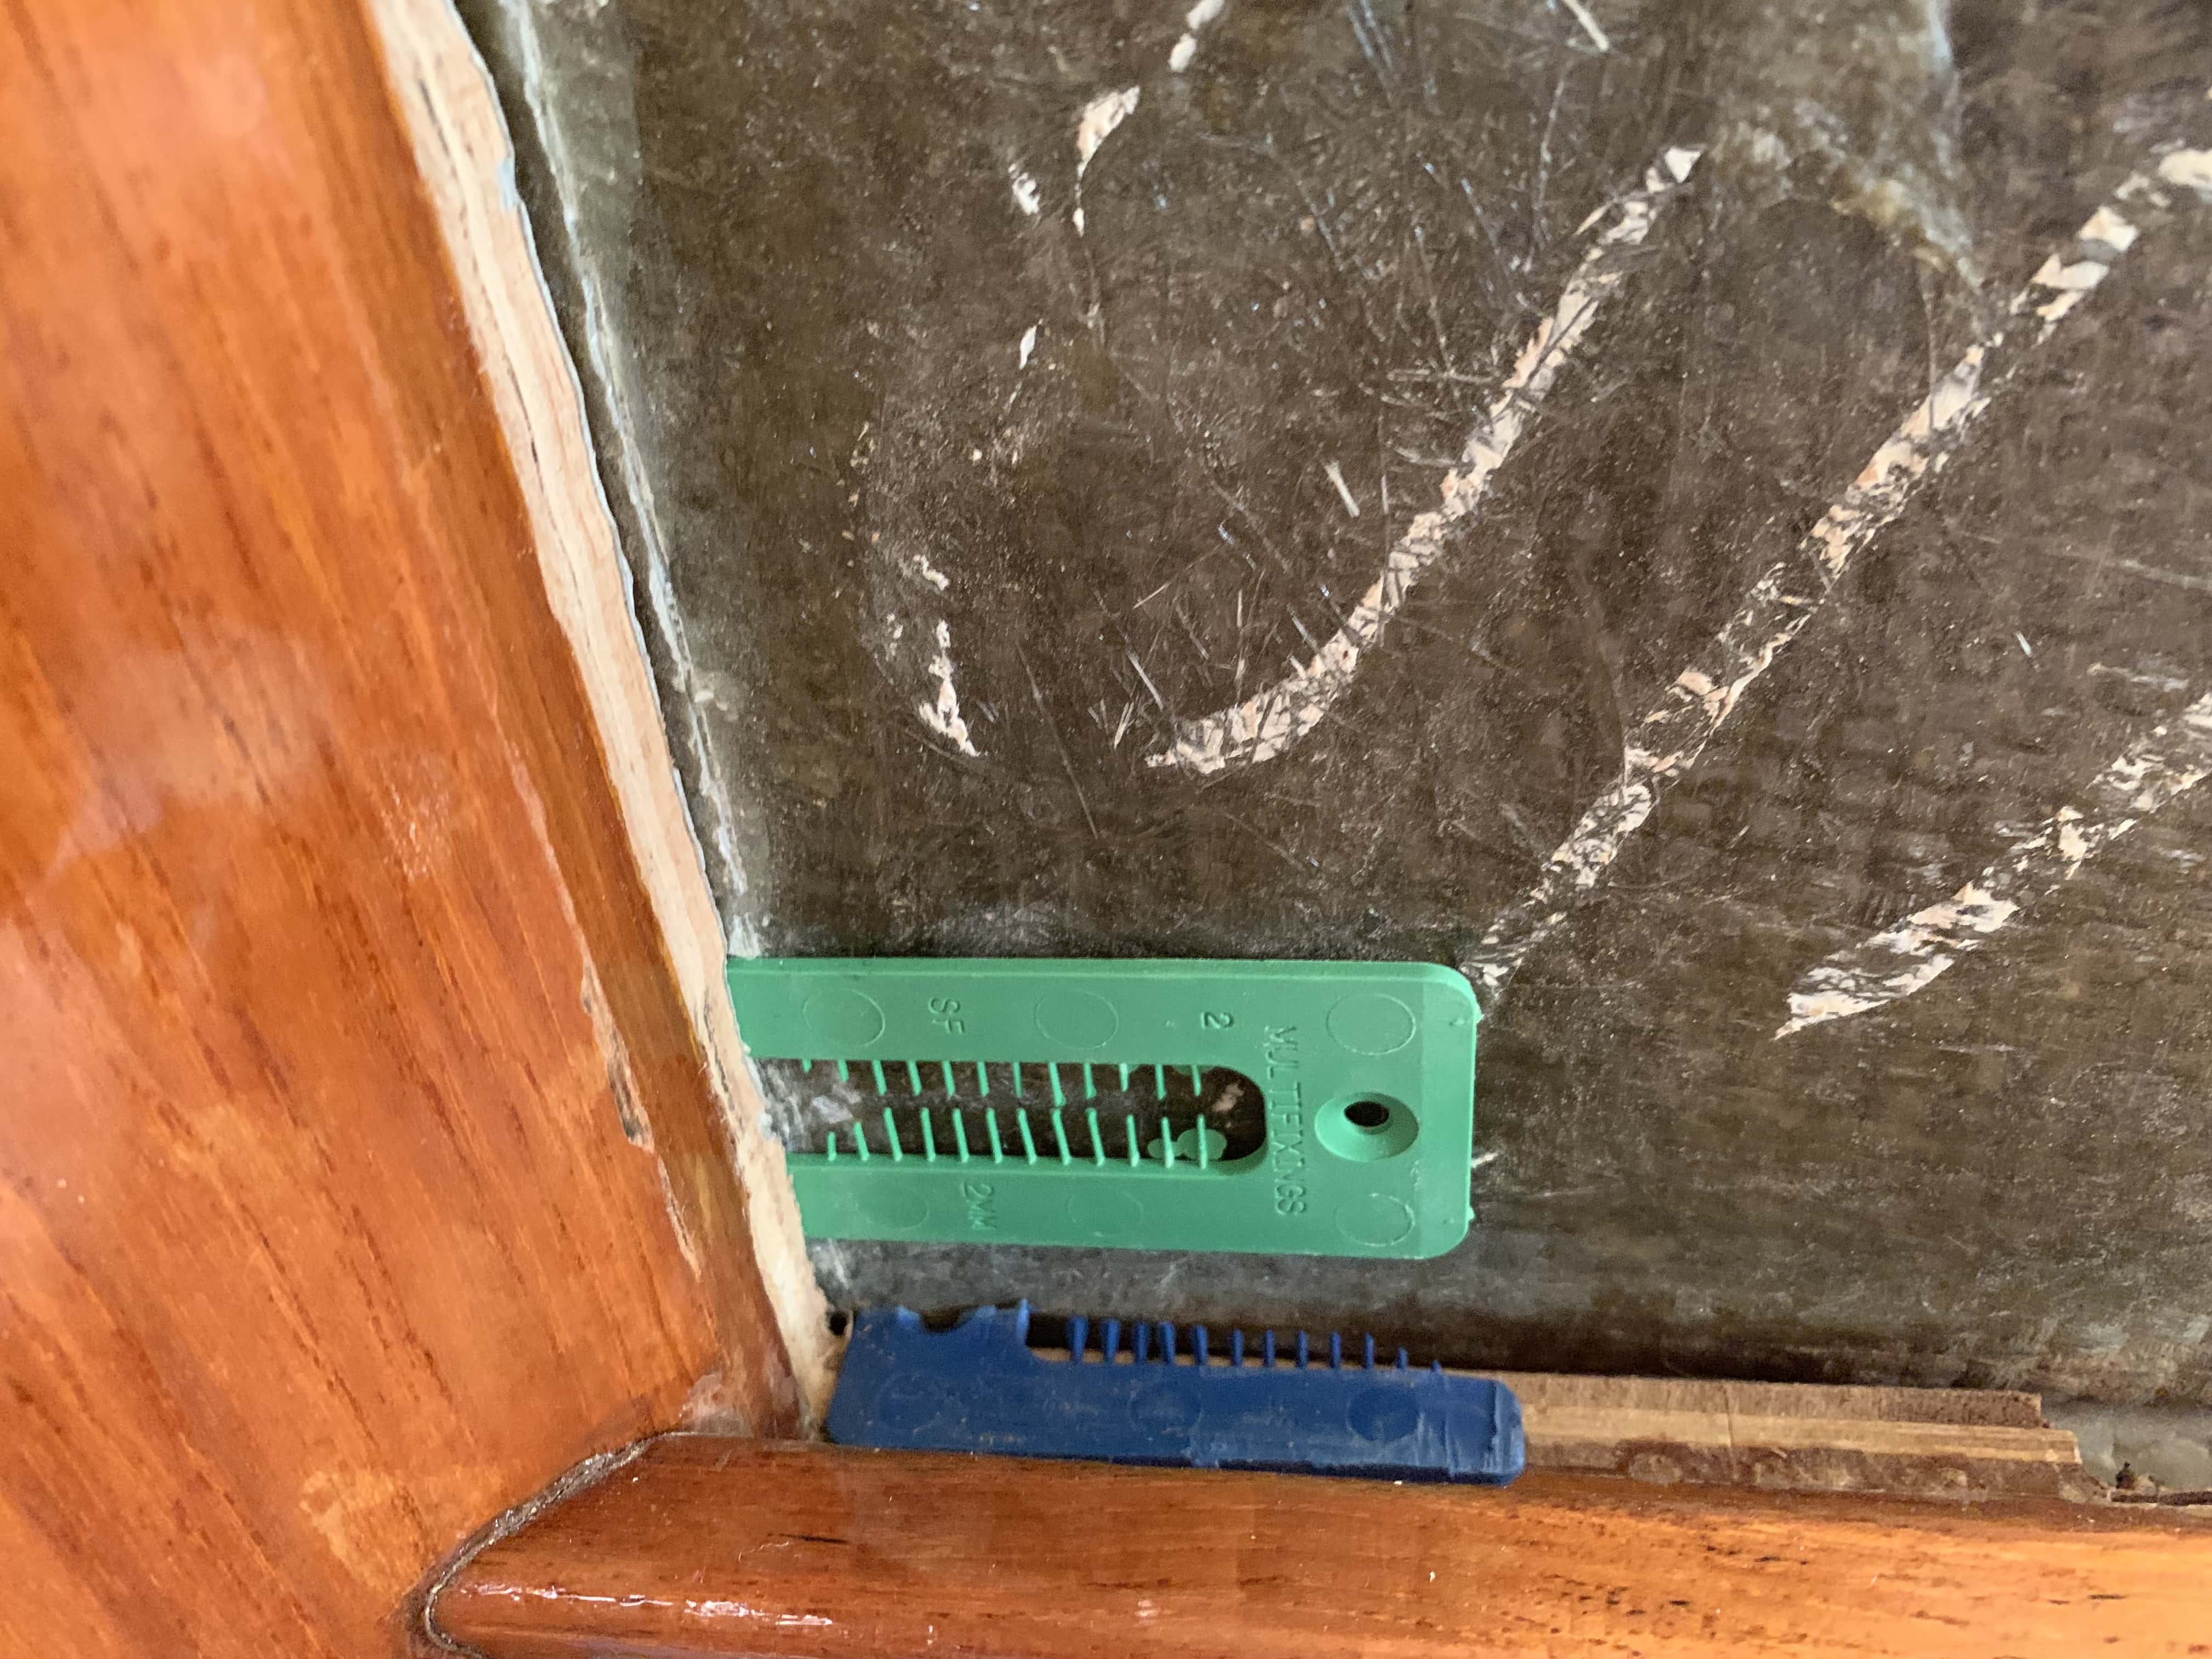
The thickness of the plywood seems to be about 1.5 cm.

Has anybody attempted such project before?
What can I expect to find behind the plywood? Will it be glued to the fiberglass? Can the panel be pulled out easily, or does it sit behind those other pieces of wood at the top and the corner of the coachroof (thus requiring to take those apart as well)?

How realistic is it for someone with no experience in this type of projects to expect to do a clean, proper job? Is it better to engage a professional rather than trying it myself?

The steps I would take are the following:

  1. Take apart the porthole
  2. Pull out the plywood panel (I need to figure out how)
  3. Measure the panel and have a new one cut (what should I look for? Teak plywood?)
  4. Apply Glue to the back of the panel/fiberglass (?) What would I use here?
  5. Slide in the new panel
  6. drill bolt holes for the porthole and fill with epoxy - re-drill
  7. Put the porthole back in place
  8. Varnish

What are your thoughts?

Thanks in advance,
Ignazio

Attaching additional pictures

Attaching additional pictures

Welcome to the BCC Owners’ Forum, Ignazio.

Ouch! Very sad to hear of your problems. Congratulations on your purchase of White Wings III.

I’ve never removed that teak plywood that was applied to the interior wall of the coachroof. I hope another owner will be able to shed light on how it was attached and how best you might remove it.

Your problem is not limited to the interior, of course. My reading of your post is that you have deck leaks at one deadlight (in the forepeak) and one or two portlights (in the main cabin).

You cannot stop a deck leak from inside.

My guess is that the caulking (the sealant) has failed. Think of an opening portlight as made of four things: (1) a spigot (a cylinder of bronze) that penetrates through a sandwich of teak plywood and GRP; (2 & 3) two bronze rings (one of which is integral with the spigot) that form the outside layers of a sandwich with the inside layers being the GRP monocoque and that teak plywood; and (4) the hinged light or glass & bronze door.

I’ve not a good illustration. I’ll attach a screen grab from the ABI catalogue (ABI being A & B Industries, who now longer exist as such but who were the manufacturers/wholesalers of your portlights and deadlights).

I think your task is to (a) remove the portlight completely; (b) remove so much of the teak plywood as is necessary; (c) clean up the GRP; (d) replace the plywood with plywood of a similar thickness; (e) re-install the portlight, using copious quantity of sealant; (f) cosmetic work.

Sam L Morse Co, who built White Wings III, routinely added teak plywood as a liner of the coachroof (main cabin) and the coaming around the scuttle hatch. I do not know how the teak plywood (or teak-faced marine plywood, if you prefer) was attached to the GRP monocoque.

White Wings III might have two layers of teak ply in those areas. Zygote, which was built at almost the same time as White Wings III, has a slightly different construction: the GRP deck monocoque, an internal lining of teak ply, and then a thin GRP cosmetic layer. So the internal layers of the sandwich at Zygote’s portlights and deadlights is GRP-teak-GRP. So I suspect that your sandwich might be GRP-plywood-plywood.

Late edit: I’ve also attached a graphic from toplicht.de showing something of the structure of their portlights.

1832170.JPG

Hi Bil,

Thank you so much for your quick and clear response, and great to hear from another BCC owner in Australia. I will let you know when I decide to sail up to Queensland. It would be great to meet in person.

Your reading is perfectly correct. I will start by disassembling and removing the portlight in the main cabin to get a better idea of the sandwich structure and then decide what to do.

Cheers,
Ignazio
BCC 118 White Wings III

Ignazio: Hi!

Jonathan on BCC Takayna (the name of the indigenous nation who lived in what has since been Anglicised as the Tarkine forest in Tasmania and so has a similar pronunciation) is in Tassie with Takayna at the moment. He’s been at the classic boat show and so on.

I figure he’ll sail past you on his way back to QLD sometime in the future. Jonathan may have some ideas for you.

You could do worse than to send a Private Message, using this forum, to contact Jonathan.

I know that a couple of US owners have removed and re-installed one or more portlights (likely to deal with similar problems).

I hope that one or more of our fellow owners might be able to give you solid advice in the next day or so.

Cheers

Bil

Hi Ignacio

Sorry to hear of your problem. I don’t have a lot of advice to offer; however, Dioscouri (hull #64) also has teak- veneered plywood rather than the GRP cosmetic layer that was used on a lot of the later year BCCs. I wanted to brighten up the cabin by painting the plywood with 2-part epoxy paint (cream coloured). In order to do the job properly, I removed all the teak trim pieces. It was somewhat challenging because they seem to have been bedded with something in addition to being screwed in place. I was, however, able to remove all of them without damage by working patiently and using a putty knife to carefully pry them off. The only pieces I could not remove were the handrails. I may have been able to remove them if I had tried harder, but they really didn’t need to come off for my purposes. I removed the portlights by using a product that dissolves sealants. I forget its name.

Good luck with the restoration.

Gary

Welcome to the forum Ignacio! I don’t have any experience replacing the cabin-side plywood. And if I had, it might not be of value to you because of the different ages of our BCCs. I think Roger Olson changed a lot of construction details in boats of your age. Our cabin sides are MDO plywood which Sam thought would be easier to paint, which we wanted to do.

However we have had to deal with with water getting in around the opening ports. About 20 years ago, there was signs of leaks around a 2 or 3 ports–some lifting of paint and some drips. I rebedded the outer ring of all the ports. I didn’t remove the ports, just the outer ring. That also involved removing all the sealant and reapplying sealant to the ring and to all the fasteners. Be careful not to tighten the bolts so much that all the sealant is squeezed out. Fortunately I saw no signs of rot.

I suggest you rebed all your ports ASAP because your 2 leakers could indicate that others could (soon?) also have a problem that you can’t detect yet.

In the era Shaula was built (~1981), there was a layer of “bondo” between the cabin-side plywood and the FG cabin-side. I think bondo is just thickened FG resin. At least that’s what it looked like when I installed instruments in the cockpit.

svshaula Wrote:

However we have had to deal with with water
getting in around the opening ports. About 20
years ago, there was signs of leaks around a 2 or
3 ports–some lifting of paint and some drips. I
rebedded the outer ring of all the ports. I didn’t
remove the ports, just the outer ring. That also
involved removing all the sealant and reapplying
sealant to the ring and to all the fasteners. Be
careful not to tighten the bolts so much that all
the sealant is squeezed out. Fortunately I saw no
signs of rot.

Removing and rebedding the outer ring, the finish ring, is a good step.

I know at least one US-based BCC owner who did that and reversed the fasteners (putting the acorn nuts on the outside) to make clear to himself (and future owners) that removing and rebedding the finish ring every decade should be routine maintenance.

I suspect that Ignazio should do that with all his portlights and deadlights (the ones not showing evidence of deck leaks).

But for the portlights and deadlights that do show evidence of water penetration, I suspect that pulling the complete assembly to allow caulking (sealant) to surround the spigot and to replace all and any of the water-damaged timber might be necessary.

Dan’s advice on not tightening the fasteners immediately is crucial. Fit the spigot and finish ring with big mobs of sealant, but only finger tighten the fasteners. Then next day, torque the fasteners to final tension.

I had the exact problem you are having with the wood rot around the portholes. Like yours I had not addressed it until the rot was fairly advanced. Therefore I removed the portholes and then removed both of the side panels completely. It required removing the trim pieces which surround the teak plywood panel. I used a hammer and chisel for the removal of the panels. The plywood is attached to the fiberglass cabin sides with fiberglass resin. It is firmly attached and very hard to remove the residual resin. I mostly used the hammer and chisel followed by a grinder to further smooth it. For replacement I used 1/2" teak plywood cut to fit and attached with adhesive. Doing both sides at once I used 2/2" wood struts with a wood pad to apply pressure to the panels across the cabin while the adhesive set. Then I cut the wood around the portholes followed by installing the portholes with a huge amount of polysulfide caulk. That is a messy job but they have never leaked since. Lastly I reattached the trim around the panels. When all was complete you would never know the panels had been replaced. I believe these leaks around the portholes was an unfortunate shortcoming by SLM in not using sufficient amount of caulk when bedding the portholes. I hope my experience will help you with your project.

Good luck,

Ron Thompson
Ho’okahiko 97

Thank you so much, everyone.
Ron, your post is super helpful.
Gary, for removing the seal I bought Debond marine formula. Apparently it work miracles.
I would love not having to remove the teak team trim pieces and I’m thinking of using a Fein tool to cut close to the existing trim and just butt the new panels between them rather than removing them.
Thanks for the point about the outer rings, Dan. I might do that on the good ones if taking apart and rebedding the entire thing is going to be very complicated.

Ahoy Ignacio , BCC Calliste # 72 had this problem too, but not as extensive.

I removed the spigots and coated the Teak ply around the hole end grain with thickened epoxy to prevent further water de-lamination .

On passage from Hawaii to Seattle my brnz portlights dripped condensation water on to my port settee bunk so I enlarged the drip tray/hand hold, under the ports.

Upon reinstalling the spigot I reversed the FH screws putting the nuts outside and FH of screws inside so it is easier to wipe the inside condensation off the bronze , when that occures

If you are not familiar with this kind of work or repair , expect it to be harder and take longer than you think it will . Yes, fill the bolt holes with epoxy and re-drill the holes , champhor the bolt holes too, which creates a nice “O-Ring” around the bolt with the calking , when the bolts are tightened home .

This boat is worth the effort so do a good job .

Cheers

Hi all,

Ignazio, as Bil predicted, I should be passing through the Sydney area sometime in the next 3 to 6 weeks, depending on how long I have to wait for a weather window to open to cross Bass Strait.
I don’t think I’ll be of much help to you as my boat, being Canadian built, is very different to yours.
As an aside does anyone know of another BCC with 4 portholes per side or is mine the only one?
It would be fantastic to arrange a meet up and compare experiences. This trip has shown to me just how bloody amazing these boats are.
Cheers
Jonathan

Dear folks,

I am writing back on this topic to give you an update on the project, share leanings from my experience and get your opinion on something that is worrying me (see bottom of post).

Since the last posts here I have

  • Removed the porthole. This was not an easy job. Debond Marine Formula helped.
  • Realized that the panel had already been replaced previously. The original panel had been cut flush to the trim and extracted, with the replacement panel butted in place. Not sure how long ago this has been done, but unfortunately the installation had some problems: 1) the bedding was not done properly and a significant amount of moisture was getting in, 2) the panel had not been sealed in the back and edges, 3) bits of the old original rotten panel were left at the bottom, which allowed the fungus to easily spread to the replacement panel (I have dug these out with a chisel and replaced).
  • I removed the panel, cutting with a saw the adhesive used to bond it to the fiberglass (probably sikaflex or 3M 5200). For a week, I suffered itchy arms from the fiberglass shards.
  • At this point I had to travel for work overseas on short notice for almost 6 months. White Wings III had a hole on her side covered with Gorilla tape during this time (which luckily held well – I had a friend check the boat fortnightly though)
  • Once back in Sydney, I started the hunt for some teak plywood, which is very hard to find and very expensive these days. I had to buy a whole sheet of 2.4 x 1.2 m
  • I cut a replacement panel with the help of a retired carpenter friend and started colour testing with stains to match the colour. I stained the panel, put 2 sealing coats of epoxy on the back of it and on the edges to seal it from moisture and started varnishing, but I wasn’t very happy with the colour. I installed the panel nonetheless as I was planning to go for a cruise, but had another one cut, which I stained, sealed and varnished again and is now ready to be installed in place of the other one. I am very happy with the colour match this time
  • I also removed all the other portholes, most of them in need of rebedding. Several of them had some water getting in and dark water discoloration around. The port middle porthole had a good amount of rot as well, which I dug out and refilled with epoxy. I stripped the varnish around those with water discoloration, bleached the wood and am now in the process of revarnishing. The result is looking promising so far. I used the opportunity to give a good polish to the portholes as well.
  • In the forward cabin meanwhile: I removed the deadlights, where I also had water penetration problems and discoloration on the interior. I replaced the screws with bolts locked with acorn nuts from the inside, (the screws were barely holding the deadlight I felt), I created epoxy plugs around the bolts, countersank on the outside and rebedded the deadlights with butyl tape. The panels there have been very dry since. I have then stripped, bleached and revarnished the parts of the plywood that had water discoloration and they now look almost like new (still a few coats to go).

Here is my question to you now: The plywood panels are normally bonded with epoxy (or something that looks like it) to the external layer of GRP everywhere around the boat. Where the panel had been replaced though (starboard side, forward part), there is a significant gap between the panel (including the rest of the whole wood trim) and the grp layer. This gap also extends back, getting gradually smaller, up to the mid porthole, aft of which the panel is then fully bonded.
Is this an issue? Is the coachroof structurally weaker due to this? What to do about it if that’s the case?

I am planning to install the new (hopefully final) panel with some packers behind it to keep it aligned with the rest of the wood trim in the cabin. I would use a polyurethane adhesive between the panel and fiberglass, similarly to what was used previously and bed the porthole with butyl tape (countersinking the holes on the outside and creating epoxy plugs around the bolts).

See attached pictures for reference.

Thanks a lot for your inputs.
Ignazio

1 Like