Who’s recaulked their hatches? Any Rec’s on product to use? I’m going to varnish over the seams with Honey Teak or Interlux Perfection. Roger had mentioned I need a 2 part sealant, like Boat Life Type P or similar, which holds varnish better then single parts. Any other thoughts, experience, tips regarding this project?
Ben.
I built a sliding hatch nine years ago and did the powerded graphite mixed into West Epoxy seam infill. The three eights inch thick teak staves were laid onto a teak plywood base with quarter inch spaces between, I filled the spaces with the graphite mix let it kick,sanded and varnished. The hatch looks great today and the seams hold varnish well but offer little non skid when the hatch is wet. To do this and to eliminate any movement you need quarter sawn material for the staves. Since you are probably not rebuilding the hatches you need flexible caulk. Any seam caulk will work as long as it sets up. Don’t worry about it holding finish as it is my belief that the rubber caulk is also supposed to offer some slip resistance to the otherwise slippery when wet varnished wood surfaces.I usually wait until the caulk sets, sand it down, mask it with the proper width tape and apply varnish. Time consuming but eliminates the flaking of the varnish when it starts to crack and flake off.
so your saying you would mask off the sealant, and NOT varnish it eh? Interesting! I don’t like the idea of having so many varnish edges for water to get underneath. Set me straight here if you meant something else. Another idea was to glue in some strips of wood, similar to your graphite/epoxy concept.
Ben,
If you varnish over the whole shebang the varnish is going to eventually crack along the caulk to wood seam because of different expansion/contraction ratios of the two materials. Yeah, I know the varnish will be elastic and go with the temp. changes but that will only last a short time. When that does happen you have an open crack for water to lay in and cause tha varnish edge to lift. As with the bare caulk, no crack and the water has a chance to run off and the surface can dry.With the epoxy/powdered graphite mix in the seams no need to worry about expansion/contraction just varnish over it all.
Ok i get it… so i wonder how the BCC comes out of the factory – varnish over the whole thing, or taped off the seams and leave them bare? One would think that the reason they went to all the trouble of having the seams there would be for non-skid reasons to which you enlightened me. Certainly there are simpler ways to build a hatch cover. Following this reasoning then, could one assume they didn’t varnish over the seams?! And if NOT for non-skid reasons, why would one build a hatch cover this way?
The varnish on my hatches holds up well providing I keep it covered most of the time and put a couple new coats on twice a year. The seams do not seem to be a problem.
Ahoy Ben, who ever , used what ever varnish-clear finish on Calliste’s fwd hatch and the companionway hatch, it has resulted in the edges of the wood, contacting the black bedding compound, to crack and lift along the edge of the black joints !
I too am looking for a solution, before I resurface these hatches.
I am also looking for a remedy to the splintering off of the knife - feather edge of the teak cabin floor boards where they contact the f/g hull, on top of the cork color hull covering material .
If your query brings positive results, I too , am in need of a solution .
I talked to the local woodshop guy here in deltaville last year, about my hatches
which have been a continual source of varnish cracking. The end result of our
discussion was Sikaflex-291 Lot as the polyurethane caulking, and 4 coats of
West 105/207 clear expoxy. I did this in the spring.
It was suppose to produce a nice smooth uncracked surface which I could then apply
many coats of varnish. I then put a tarp over the hatches and didn’t get back to
check on things till late summer. Much to my surprise, after sitting for 5 months
under a tarp, the epoxy was cracked in 5 places, right along the seams. So, since
I don’t want to remove all that epoxy and start again, I’ll probably try to repair
what I’ve got so far and see how things turn out. I did notice that the scuttle
hatch and companion-way hatches were fine, no cracks. The main hatch that the
companion-way hatch slides under is the one with the cracking problems.
So, I’m going to Gannon and Benjamin today to talk to Nat Banjamin about it. His suggestion, without having seen the hatch in person is to fill the seams with strips of wood. I’ll know more later, and post whatever new info I have.
Hi all.
Wishing you all a Happy New Year. Here is a bit of info on hatches and caulked seams. Been thinking this problem over,went to the shop and made up a sample to see if it would work. Here is what I came up with. This will take time but I think it will eliminate edge cracks. Sand and prep the surface of the hatch. Carefully rout,dig,scrape,curse a few times and get the existing caulking out of the seams. Again prep the wood, finish sand and apply the varnish over empty seams and all. Finish the hatch,caulk seams and all,with at least three coats of varnish and allow to cure completely. Mask off the wood edges with painters tape so you have the entire wood surface taped off with only seams left open. Pay the seams with caulk,over fill a bit and squeege off the excess caulk with a nylon squeege. If you would like the caulked seams to stand a bit higher above the wood surface, for added non skid traction, add a second or third layer of tape next to all of the caulk grooves. Doing this will allow a thicker layer of caulk to remain at the seams and above the wood once the tape is removed. Allow the caulk to cure and lightly sand the seams and taped areas to break the caulk-to-tape bond. Remove the tape from the wood surfaces. This should eliminate any unvarnished edges at the seams as the wood edges are all coated with varnish. Again this will take time. Hey,but this is a Bristol Channel Cutter we’re talkin’ bout. Best of luck, Happy New Year
Well, an update on this project… still unsure what to do about the hatches and sealant. I had been planning to preserve the non-skid properties of the sealant, and going with Bob’s suggestion of varnishing underneath the sealant (which BTW was the same solution recommended by the CEO of Honey Teak)… but after looking at BCC pics one day, I realized the dink covers up the seahood, and you can’t even get on it - so non-skid becomes a non-issue there. This brought up the question: is non-skid required anywhere on these hatches? Since I’ve never sailed the BCC, I can’t comment. Can anyone here let me know their thoughts about the worthwhile-ness of spending the extra time now, and the extra future maintenance time required to re-caulk these hatches so that I have non-skid seams exposed considering the following:
main hatch will be covered by a dodger
seahood covered by the dink
fwd scuttle isn’t really a place you climb up on that I can think of
so… other reasons to have non-skid exposed seams??? I wonder…
Also, Bob mentioned that to epoxy/graphite the seams, you need 1/4 sawn strips – has anyone used epoxy/graphite on the OEM hatches with success, assuming OEM is not 1/4 sawn. Epoxy/graphite would be my NO non-skid solution of choice, but of course, I don’t want to rebuild the hatches!
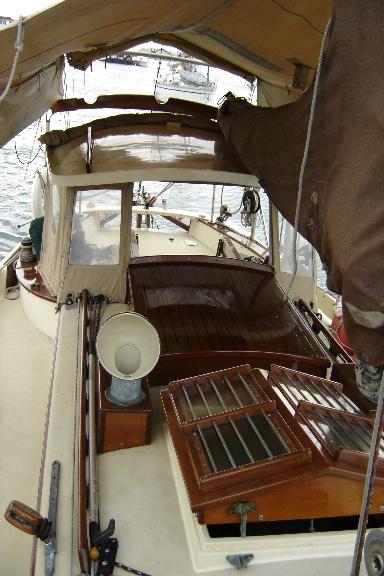
THANKS everyone… a pic of my fwd scuttle with caulk removed:
I think it’d be crazy to commit yourself to taping the caulk every time you need to recoat your Honey Teak. It would be time consuming, and that many seams for water to “get under” is scary!
I think a good alternative, if you want non-skid there, is to leave the horizontal teak/seams bare, but putting a coating on the vertical boards. From the side, the boat looks great, but the top is super non-skid. Further, I’ve seen photos of a few BCCs with this on their forpeak and companionway hatches, and I think they look good.
That said, I can’t imagine you really need great non-skid up there. I can’t imagine you’d ever stand there under way, and you certainly wouldn’t if it didn’t have non-skid. There is nothing to “reach” using it anyway, and at anchor, it’s a fine perch without the non-skid. So, you could also epoxy/graphite the seams, then coat the entire thing in Honey Teak, and just avoid standing on it.
Alternatively, you could likely sprinkle clear glass beads into the first “gloss” coat of Honey Teak, putting the last two over them. This would, from a distance, be completely clear, and up close, you’d have a reasonable non-skid. Since you don’t have to sand HT between applications, this is feasible. I know a guy with a Westsail 42 who did this to his caprails all around, giving good non-skid on the coated surface.
My vote is to leave horizontal bare and coat the verticals. Easiest, and likely the longest lasting.
Any idea who that was on the Westsail who did that non-skid in the honey teak? Would be curious to hear about his solution to scuffing the non-skid top coat the year after for a re-coat.
Oi vey - no perfect solution here, like most things, just gotta close your eyes and pick a poison…
Wow, what an interesting read. It is quite apparent that we all have our ideas of what is best and it is also apparent that what is best for one is not necessarily the best for others. So I thought I would throw in my own 2 cents (centavos) worth. Please, I am not saying the others are wrong or that I am not wrong. All I am explaining here is what worked for me.
I seriously doubt you will ever need a non-skid on any of your hatches. If you were to stand on the sea-hood,I suspect it would be while installing or removing your sail cover. Is this worth the possible problems that trying to maintain a non-skid could create?
I have tired it all, leaving it natural, varnish, oil, etc. “For Me”, I will only varnish the whole hatch with at least 10 coats of varnish. I would not want to take a chance of freshwater entering the hatch and causing rot to the sub-plywood that supports the teak strips. Also, a totally sealed hatch will have minimum expansion and contraction.
The factory does not varnish anything on the boat because we never know if the owner will want to varnish or leave it natural. We always delivered the boat with several coats of “teak oil” for transportation.
The hatches on my boat have been varnished for 9 years now and they do not have any cracks, splits or chipping.
For this to work, I had to remove the caulking applied at the company in the first year. We used a brand of caulking that had silicone. Since then we discovered that the varnish will not bond to any caulking that has silicone in it.
I also discovered that for any good caulking to adhere to teak, the teak had to be primed with a primer recommended by the caulking manufacturer.
Regarding the difference in expansion and contraction of the teak compared to the caulking; I totally agree with this on teak decks or any large area. Your teak hatches are about 2+ feet square. Each teak strip is 5200 and screwed down onto a plywood sheet. There will be little movement. However, if the teak is left exposed to sun and rain, the wood will expand and contract. If the wood is varnished or sealed, there is little, if any movement.
Summary:
Make certain the wood is clean and there are no signs of old caulking or varnish.
Prime the teak where the caulking will be applied. I do not see that a bondbreaker is necessary on such a small surface area. Use a bond breaker where there is expansion and contraction like hulls, decks, etc.
Apply caulking without any silicone. Sand flush.
The first application of varnish is the most important one. You can use a good penetrating two part primer (I like honeyteak or Smiths) to the cover the “whole” hatch. Sometimes this two part is too hard and may not accept varnish unless it is sanded with about 120-150 grit sandpaper. I think a thinned (30%-50%) first coat will provide the bond for the varnish. If this is used, apply several coats, one after the other to get the penetration and build up.
Sand and varnish with nothing less than 7 coats, then follow up every 3 to 6 months or sooner with more coats.
One last comment. I have seen far too many varnish jobs where the varnish is just quickly sanded then varnished. If you want the varnish to adhere to the old varnish, it must “all” be sanded so there is not one single spot that is shinny.
If you use too smooth of sandpaper it will not adhere. If you use too rough it will show the scratches. “For me”, I like to use 180 grit sandpaper for most all my varnish work.
If you intend to apply coat after coat without sanding, be sure to use a varnish that states you can do this. Also, these types of varnish take a long time to get really hard and do not have the amount of UV protection that other varnishes have. You should only build up with this type of varnish then apply a good exterior varnish with hi UV protection. Be careful, most varnishes will not accept a coat over coat. If you want to do the job only once, then allow ample time for the varnish to dry before sanding and applying another coat.
I do not want to recommend any brand names but read the labels for the amount of UV protection. If you have the time, take a piece of teak about 2 feet long and mark it into sections. Use a pencil or felt pen to mark each section with the brand of varnish you use. Apply only one, un-thinned coat to each section of each brand. Set it out in the direct sunlight for three weeks to a month and see what happens. You will be surprised…
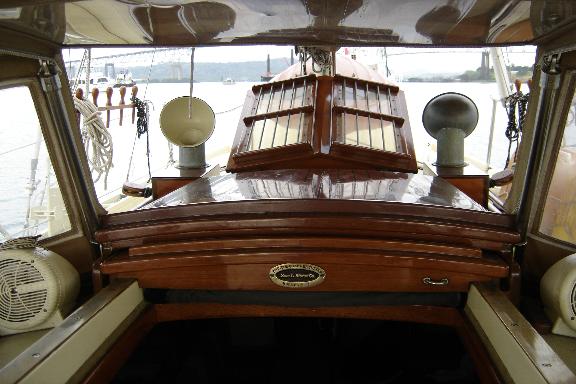
I would attach a photo of a close up of my hatches but I do not have one. If anyone is interested, I will gladly do so.
I would love to see your varnish work! Did you put a base coat of Honey Teak or some other 2-part on before your varnish, or did you start with varnish.
Aaron, I did use honeyteak on all my exterior teak before I applied varnish. However, on all my caulked hatches, I had to sand it all down to bare wood and re-caulk. I used the thinned coats as I mentioned above. I just found some photos of some of the hatches that I will attach here. I will take some more when I get down to the boat…tomorrow???
Roger
Hi Roger, Ah, Yes, I agree, a very interesting read, especially because of your post, in there, too.
This interests me : "If you want the varnish to adhere to the old varnish, it must “all” be sanded so there is not one single spot that is shinny. "
The only “shinny” spots that I get after sanding, and between coats, are in the grain grooves, as I can not sand the wood down past the grain grooves, or there would be no wood left !
I have always suspected that the varnish deterioration starts first, in my “shinny” spot grain grooves .
As for Ben’s question and interest, and mine too , we are trying to reduce future maintaince and prolong the life of our work.
As a woodworker in a former life, we were always aware that wood moves, it is just a wood characteristic that can not be avoided with the material.
We then tried to accomodate that principal in all applications, with wood construction and finishes, everywhere, on our boats.